Documentation
Getting Started
Install/Register/Uninstall
Installation
Installation of cFosSpeed is easy and convenient, taking only a few steps:
- Download the latest cfosspeed-vxxxx-buildxxxx.zip file and save it to your hard drive.
- Extract and execute the file (cfosspeed-vXXX.exe) by double-clicking on it.
- The install assistant will then guide you through the rest of the installation process.
- cFosSpeed can be used immediately after successful installation.
Some people experience difficulties while installing cFosSpeed.
There are two symptoms:
- The installations hangs / takes more than 15 minutes
- The installation fails and in the file CFOSSPEED_SETUPLOG.TXT in the WINDOWS directory there is the error message
Could not find driver, Driver not in the deviceinfoset, No compatible driver
These problems are very often caused by general problems with the network configuration or by other network components. While Windows installs cFosSpeed it asks all other network components for permission. If one of these component has strange or faulty behaviour, the installation fails.
Solutions:
- Try installing in safe mode
- Install cFosSpeed with parameter -ide (see instructions below). This prevents our installer from cleaning up the installation directory after the failed installation. Then you can try to install cFosSpeed with the windows installer: Go to your netork connections (clickk start, connect to, all connections) and chose the connection you want to install cFosSpeed for. clickk properties, network, install, service, have disk and select the file SPEED.INF (SPEED_X64.INF) in the cFosSpeed installation directory.
- Disconnect all TCP connections. Before the actual installation the number of TCP connections is logged in CFOSSPEED_SETUPLOG.TXT in the WINDOWS directory. If you are unsure, pull all relevant network cables. Try installing again.
- Deinstall other relevant network components, reboot and try installing cFosSpeed again. If this helps, please inform us, which network component caused the problem. Maybe we can implement a work-around for it in the next cFosSpeed version.
- Last resort: Re-install Windows.
Install cFosSpeed with the option -ide
- Uninstall your cFosSpeed version
- Download the latest cFosSpeed Beta version
- Install this version with the option -ide
- The install dialog should be finished without error messages. Now please take the following steps:
- Go to START/SYSTEM PANEL/NETWORK CONNECTIONS and do a right-click on your LAN-Connection. Then choose ‘Properties’
- Click on ‘install’
- Choose ‘Service’ and then ‘add’
- Using “Search” you go to the cFosSpeed install directory and choose the file SPEED.INF
- Confirm with OK and the cFosSpeed Service should now be installed.
Registration
1. Using the 30 digit serial key from MyCommerce (xxxxx-xxxxx-xxxxx-xxxxx-xxxxx-xxxxx)
- Click right on the cFosspeed status window or the cFosSpeed task icon.
- The cFosSpeed context menu opens.
- Choose “Enter cFosSpeed serial number” and follow the instructions.
- Enter the 30 digits serial key.
2. Using the 16 digit password (xxxx-xxxx-xxxx-xxxx)
- Please note that this method is a legacy one and should be used only with older cfosspeed versions. If you have an old licence file and have lost the it, please contact us, mention the email you used to buy the old version, and we will create a new version for you.
- Execute the C:/ProgramData/cfos/cfosspeed/ key.cfosspeed file by double-clicking on it.
- The install assistant will then guide you through the rest of the registration process.
- After accepting the terms and conditions for your license, you should again enter your password and close the dialog.
- Your copy of cFosSpeed is now registered to you personally.
You’ve lost your license key or password
- Please use our Contact Form or email us at support@atlas-cfosspeed.com
The license key opens like a text file
- Save the license key to your hard drive
- Open the file by right clicking on it and selecting Open with and then using Search for choosing the cFosSpeed installation program setup.exe inside the cFosSpeed installation directory, e.g. C: -> Programs -> cFosSpeed -> setup.exe
Licence Key is Corrupt
The licence key might have become corrupted when downloaded from the server. In this case, please uninstall the software, reboot and reinstall. Afterwards, follow one of the following instructions to register the product:
Uninstallation
- To uninstall cFosSpeed just use the common Windows uninstall method.
Help with Installation
Some people experience difficulties while installing cFosSpeed.
There are two symptoms:
- The installations hangs / takes more than 15 minutes
- The installation fails and in the file CFOSSPEED_SETUPLOG.TXT in the WINDOWS directory there is the error message Could not find driver, Driver not in the deviceinfoset, No compatible driver
These problems are very often caused by general problems with the network configuration or by other network components. While Windows installs cFosSpeed it asks all other network components for permission. If one of these component has strange or faulty behaviour, the installation fails.
Solutions:
- Try our most recent beta at www.cfos.de/beta
- Try installing in safe mode
- Install cFosSpeed with parameter -ide (see instructions below). This prevents our installer from cleaning up the installation directory after the failed installation. Then you can try to install cFosSpeed with the windows installer: Go to your netork connections (clickk start, connect to, all connections) and chose the connection you want to install cFosSpeed for. clickk properties, network, install, service, have disk and select the file SPEED.INF (SPEED_X64.INF) in the cFosSpeed installation directory.
- Disconnect all TCP connections. Before the actual installation the number of TCP connections is logged in CFOSSPEED_SETUPLOG.TXT in the WINDOWS directory. If you are unsure, pull all relevant network cables. Try installing again.
- Deinstall other relevant network components, reboot and try installing cFosSpeed again. If this helps, please inform us, which network component caused the problem. Maybe we can implement a work-around for it in the next cFosSpeed version.
- Last resort: Re-install Windows.
Install cFosSpeed with the option -ide
- Uninstall your cFosSpeed version
- Download the latest cFosSpeed Beta version
- Install this version with the option -ide
- The install dialog should be finished without error messages. Now please take the following steps:
- Go to START/SYSTEM PANEL/NETWORK COPNNECTIONS and do a right-click on your LAN-Connection. Then choose ‘Properties’
- Click on ‘install’
- Choose ‘Service’ and then ‘add’
- Using “Search” you got to the cFosSpeed install directory and choose the file SPEED.INF
- Confirm with OK and the cFosSpeed Service should now be installed.
Help with Registration
General hints
A cFosSpeed license bought from atlas-cfosspeed.com can be used at any time to activate cFosSpeed.
An explanation on how to do this can be found at: Installation / Registration / Uninstall
You’ve lost your license key or password
- Please use our Contact Form or email us at support@atlas-cfosspeed.com
Hints for special problems
The license key opens like a text file
- Save the license key to your hard drive
- Open the file by right clicking on it and selecting Open with and then using Search for choosing the cFosSpeed installation program setup.exe inside the cFosSpeed installation directory, e.g. C: -> Programs -> cFosSpeed -> setup.exe.
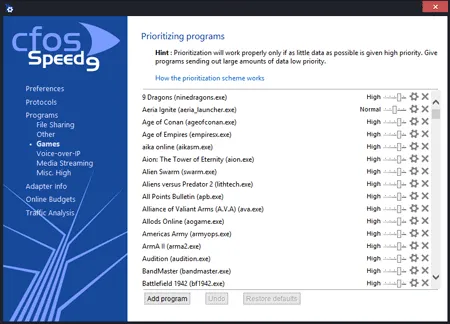
Features
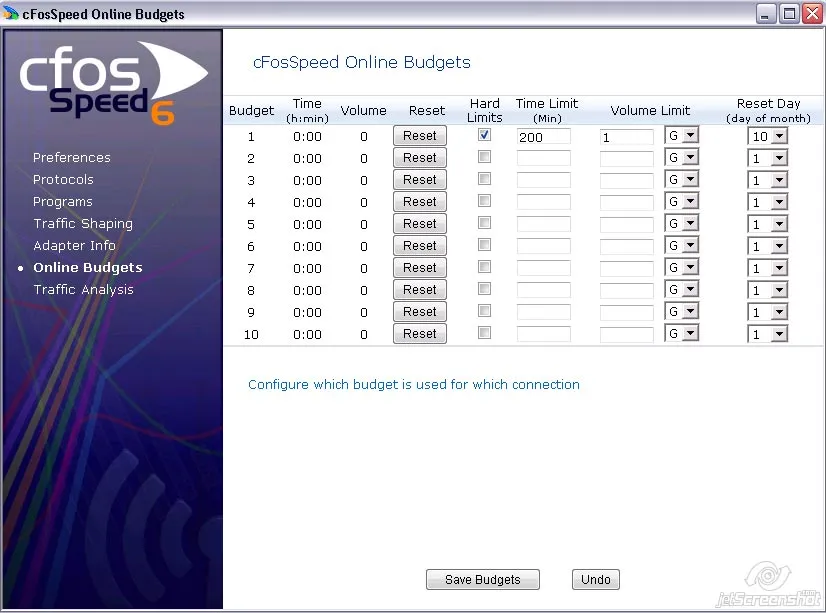
Online Budgets
Since cFosSpeed version 3.10 you can individually config and administrate up to 10 data and time-budgets.
You can access the configuration dialog via the cFosSpeed Menu:
·>Options ·>Online Budgets
For each Budget you can set a time, a data volume budget or both. In addition you have the possibility to set hard limits which allows you to have full control. You can also choose a reset day for the budgets or reset them manually.
To assign a budget to a certain connection use the cFosSpeed connection dialog at
·>Options ·>Traffic Shaping ·>Options
The budgets are visualised by usage graphs.
Example
Main Features
Connections
Broadband: Cable and DSL
Narrow band: Modem and ISDN
Mobile (LTA, UMTS, WiMAX, HSDPA, W-CDMA, WCDMA, CDMA, CDMA2000, 3G Mobile, HSCSD)
Media:
- VDSL
- DSL, PPPoE
- DSL, PPPoA (Vcmux and LLC
- DSL, PPTP
- Cable
- ISDN
- IP over AAL
- RFC1483/2684 bridged
Extras
Status window on your phone/tablet
Overview of connections
Data and packet logging
32-Bit and 64-Bit version
Routing
Router and dial-up connections
LAN and WLAN
Multiple connections simultaneously
Adjustable routes
Connections
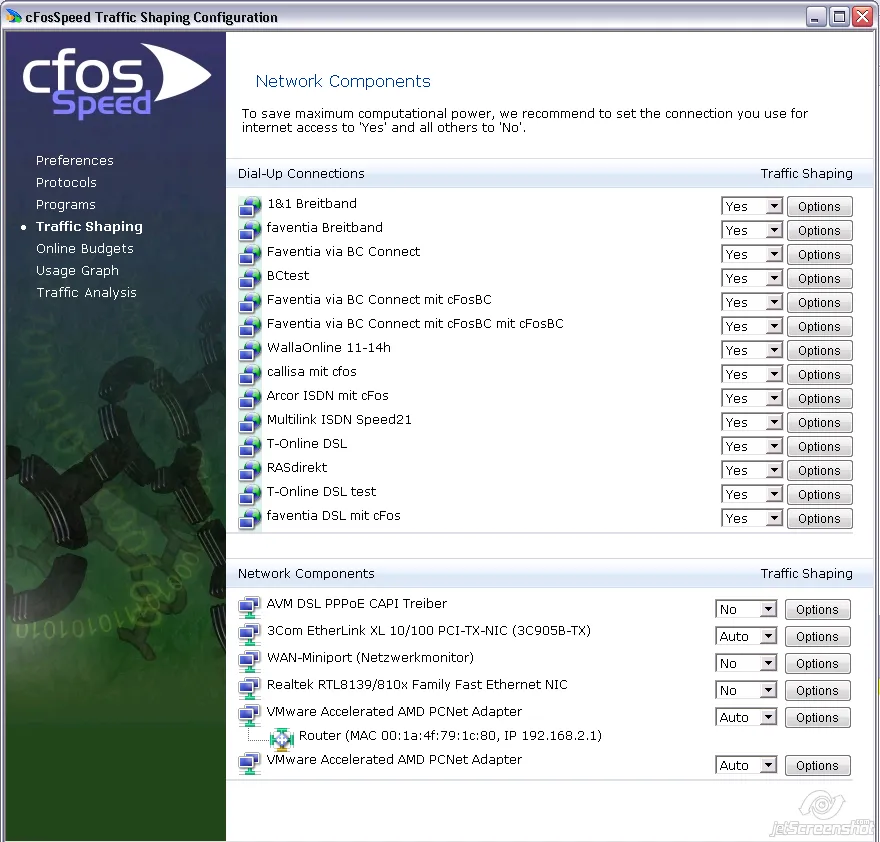
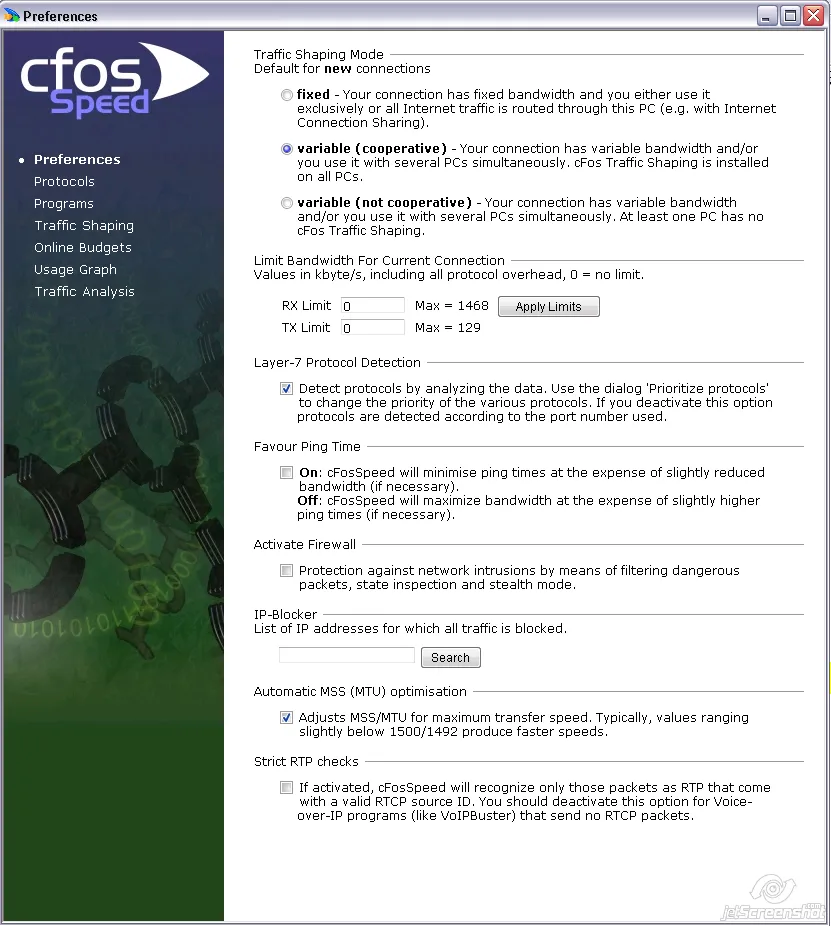
To configure settings for your connections please open the regarding window via Settings/Traffic Shaping. Here you will find an overview over all connections. The table ‘Dial-up Connections’ shows all Windows Broadband and Dial-Up connections. The table ‘Network Components’ shows all network components and routers. For each connection you can configure whether to achtivate (Yes) or deactivate (No)Traffic Shaping. As a third option you can opt to always be asked first(Ask) or use the default mode(default) with the routers.
Please click on Settings/Preferences to open the extended settings window. For this connection you can choose a budget, set the medium and the Traffic Shaping modus.
example
Game Analyzer
Online games can be demanding. If you are in an important boss fight with a lot of action, players, and monsters on the screen and somehow the action gets jittery, the question is: Why?
Does your Internet connection have too much latency? Is your CPU or one of its cores at its limit? Is your graphics card the limiting factor? Do you have too little system memory so paging slows your PC down? Does some program in the background unexpectedly use a lot of Internet bandwidth?
cFosSpeed Game Analyzer helps you to find out. After a demanding event, you can open the Game Analyzer page and see a history of the most important performance statistics of the past 5 minutes.


So, play your game and when things don’t perform as expected, cFosSpeed Game Analyzer has the most important readings at a quick glance, especially after a big fight.
Usage Graphs
cFosSpeed can show a Usage Graph for online budgets, protocols or programs. You also can choose if the display refers to the current month, to the past month, ot the past 3 month or to the past 12 month. Further you can choose the following ways of display:
- rx – display: amount of download data
- tx – display: amount of upload data
- rx+tx – display: sum of amount of upload and download data
- sum – display: total amount of data is shown in a continuous sum.
Online Budgets
Steps to set a Usage Graph for a online budget:
- At ‘Settings/Traffic Shaping’ you can assign a budget X to your connection.
- Now open the Usage Graph window by ‘Usage Graph’.
- Select your display colour and choose ‘Online budgets’ from the list.
- Into the sublist choose the budget number X.
Protocols/Programs
Steps to set a Usage Graph for a protocol or a program:
- Open the Usage Graph window by ‘Usage Graph’.
- Select your display colour and choose ‘Protocols’ or ‘Programs’ from the list.
- Into the sublist choose the protocol or the program.
Example

Ip Blocking List
IP-range lists
In order to filter for huge amounts of IP-ranges, cFosSpeed has support for IP-range files like ipfilter.dat the same way IP-Blockers like Protowall and Peerguradian support them. All traffic to or from one of the listed addresses is blocked. We call those lists “iplists”.
cFosSpeed supports these iplists through two filter expressions: -s-iplist and -d-iplist. They are already set by default in settings.ini. -s-iplist matches the source IP address against a given list, -d-iplist the destination IP address.
The -s-iplist and -d-iplist filter accept the iplist name as second parameter. The default name used in settings.ini is “ipfilter”. In the [iplist] section in settings.ini or user.ini you must specify the iplist names with the corresponding IP block list files that contain the IP-ranges to be blocked. These block lists are not supplied with cFosSpeed.
The [iplist] section contains lines in the format “listname=filename”. ‘listname’ is used to filter for the IP-addresses listed in ‘filename’. You can have more than one list with different names and each list can be made up of more than one file. When compiling the lists, duplicate entries are removed and the whole list is sorted and optimized. You can put this section in user.ini, so it will not be overwritten with the next cFosSpeed update.
An example excerpt from settings.ini:
    filter=-tx -d-iplist ipfilter -c drop
    filter=-rx -s-iplist ipfilter -c drop

    [iplist]
    ipfilter=c:\text\ipfilter.dat
    ipfilter=c:\text\my.dat
This will read both files and make them available as iplist named ‘ipfilter’. This iplist is used by default to filter packets to the drop queue, i.e. to discard them. However, this rule is not active by default, since no IP block list file is set up.
Currently two IP-range file-formats are supported. This is the Emule format:
from-address - to-address [, rest-ignored...]
Example:
0.0.0.1 - 3.255.255.255 , blabla
And this is the Protowall/Peerguardian format:
ignored-text:from-address - to-address
Example:
blabla:0.0.0.1 - 3.255.255.255
The block lists can be quite big and consume a lot of memory. Each line with an IP-range needs 8 bytes. We worked with lists that needed 2mb of memory. The process of reloading them will, for a short time, allocate three times as much.
Since the lists are so big, they have to be read into memory from disk and compiled. This can take some short time, so it is only done when cFosSpeed is loaded or on demand. To re-load the block lists on demand use “spd reload -iplist”.
Blocked packets will be dumped to text file FWLOG.TXT like all other firewalled packets. You can switch off the dumping by setting “spd gset fwlog 0”.
You can list the iplists currently loaded with the command “spd showiplists”. The output looks something like this:
    ipfilter:
       0x8218a4a0, active 1, refcnt 2, 3 entries
It shows that the list named “ipfilter” is loaded to a certain memory address, is active, has reference count 2 (i.e. is used two times, most likely from two filter rules) and has 3 entries (i.e. three IP ranges).
Keyboard LEDs
Use keyboard LEDs to display Traffic Shaping information
cFosSpeed can use the Num Lock and Scroll Lock LEDs to display information about the current Internet traffic. This is especially useful for gamers and users of fullscreen application, who can’t see the cFosSpeed status window. By using the keyboard LEDs the most important traffic statistics are indicated:
- ping:
- off, fair = slow blink, bad = fast blink
warns you if the ping time is too high - pcnt:
- fast blinking as packets are counted
informs you about any traffic to/from the internet - ts_effect:
- fast blink when a TX packet is prioritized
one of the ways to indicate the effects of Traffic Shaping - speed:
- maximum of total_rx_speed and total_tx_speed, 0-32%: off, 33-65%: slow blink, 66-98%: fast blink 99-100%: on
informs you, when you or another user / application uses (too) much bandwidth - ccnt:
- fast blink whenever the sum of TCP and UDP connections changes
you stay informed if some new connection is established - variance:
- 0-15ms: off, 16-127ms: slow blink, 128-511ms: fast blink, 512ms or more: on
informs you if line conditions (e.g. mobile connections) cause high ping variance
You can select the Num Lock and Scroll Lock LEDs to display any of the above values.
Hint: The actual script for controlling the keyboard LEDs is a javaScript, called led.js. So if you like to display other variables or use a completely different LED blinking scheme, feel free to change it to your needs.
cFosSpeed in other languages
>Writing a cFosSpeed multi-language file for your own language
Installation Instructions
- Download the language files and unzip them. You should get two text files.
- Put these text files in the same directory as the file cfosspeed.exe that you’ve downloaded from our web site.
- Execute cfosspeed.exe and select your language in the welcome dialog.
- Continue the installation.
- After a successful installation you can also change the language from the pop-up menu of the cFosSpeed taskbar icon.
Language Files
Disclaimer:
As a service to you, we have made the following cFos/cFosSpeed localizations available for free download. Since these free expansions have been created by customers for customers, cFos Software GmbH does neither assume liability nor provide technical support for any of them.
For any questions concerning a specific localization, please do contact the author directly. However, should you come across any significant translation errors, omissions or other irregularities (intentional or otherwise), please let us know briefly so we can check up on it.
Logitech keyboard support
cFosSpeed supports the Logitech gamer keyboards G19, G15, G13, G510 and compatible models. In order to use the display of such a gaming keyboard, the Logitech Gaming Software V7.00 or higher must be running. Then you can navigate to the cFosSpeed window settings menu and activate Logitech display support. Now the cFosSpeed status window is displayed on the keyboards display instead of the Windows desktop.
We suggest you use the following skins.
Logitech G19 skin
![]()
Logitech G13/G15/G510 skin
Logitech skins on YouTube

Translate cFosspeed into your language
cFosSpeed Language Files
Installation Instructions
- Download the language files and unzip them. You should get two text files.
- Put these text files in the same directory as the file cfosspeed-v500.exe that you’ve downloaded from our web site.
- Execute cfosspeed-v500.exe and select your language in the welcome dialog.
- Continue the installation.
- After a successful installation you can also change the language from the pop-up menu of the cFosSpeed taskbar icon.
Writing a cFosSpeed multi-language file for your own language
All cFosSpeed text shown on screen is stored in so called multi-language files cfspdiml.txt for the installer and speedml.txt for the daemon program. To add text in another language, new cfspdiml_*.txt and speedml_*.txt files need to be created. Here, the asterisk (*) is just a placeholder for the abbreviation of the language used. Thus, cfspdiml_it.txt and speedml_it.txt would be text files for an Italian version.
Note that it is, for instance, perfectly OK to have just the daemon text translated. In that case, only a corresponding speedml*.txt file would be required. Once created, any new language file(s) are simply copied to the installer or the installation directory.
Multi-language files must be saved in Unicode format (both UTF-16 and UTF-8 are supported). This can, for instance, be done by using the Windows Notepad text editor.
Each multi-language file has the following structure:
Note that a line starting with a slash ‘/’ is merely a comment, meaning its content will be ignored.
Before any keys can be defined, the appropriate Windows identifier for the new language needs to be specified first, by writing
#language <Windows id>
on a single line (e.g., “#language 1033” for English). A list of Windows language identifers can be found here. You can also use hexadecimal format, ie. “#language 0x0409” for English.
Now, text keys and the text they each represent can be specified, using the format below:
key = "Text";
Keys and corresponding text should be taken from an existing multi-language file and then be translated. The following rules apply:
- Text must always be in quotes (“)!
- For better readability within the multi-language file, individual text entries can run more than one line, but must be put in quotes on each line like this:
key1 = "The text for key1 starts here "
"continues here "
"and ends here.";
Keep in mind that line breaks in a text definition do in no way correlate with line breaks actually shown on screen. Hence, the example above would still be displayed as a single line of text. Note as well that the last (and only the last) line of text must end with a semicolon (;). - Explicit line breaks within a text can be specified by entering
\n. Line breaks in a text should kept in the translation. - A backslash
\is specified by two backslashes\\. %sand%?are both placeholders for text or numbers, which will be filled in at their position at run time. For example, the key forwelcome_line = "Welcome to %? v%?!";
could be displayed as “Welcome to cFosSpeed v1.05!” depending on the product and its current version number. In text containing more than one%?, the order of placeholders cannot be changed.- To allow repeated use of a placeholder within a text or to have the order of placeholders changed, some text may contain placeholders like
%1, %2, %3, ...For example, the key forwelcome_found_dir = "An existing installation of %1 v%2 has been detected in the directory %3.";
may be changed towelcome_found_dir = "In the directory %3 has been found an existing installation of %1 v%2.";
Again, if you are unsure what a placeholder stands for, feel free to contact us.
We’d like to give you, the translator, credit for your work. Therefore there are two special language keys available only for user-created multi-language files.
translator_name = "Your name";translator_msg = "Your message";
The translator name will be displayed in the cFosSpeed daemon language menu. The translator message will be displayed in a Windows message box if that language is selected in the cFosSpeed daemon language menu.
Net-Talk: Multiple cFosSpeeds on your LAN
Starting with version 5.13, cFosSpeed can send and receive statistical information about the traffic it is transmitting to other cFosSpeed drivers on the same LAN. The goal is to improve accuracy of multiple cFosSpeed drivers. If cFosSpeed knows about the traffic of other members of your LAN that are sending their traffic over the same router, it can shape more accurately. For instance, the measurement of ping variation depends on the fact that ping times were measured when no one else was transmitting any data.
One other nice advantage of Net_Talk is that you can see in your skin window the overall traffic of other members on your LAN. This might help to understand why a transfer is currectly very slow.
cFosSpeed with Net_Talk enabled will broadcast its statistics to all other members of your LAN 5 times per second. Statistics are transferred so often, so each member has recent data when it is doing shaping decisions. Data is transmitted in one UDP packet of about 1400 bytes in size. The packet is sent with TTL 1 to further insure that it can not be routed outside of your network. If you disable Net_Talk cFosSpeed will still listen for incoming Net_Talk data and use it.
Net_talk packets are never sent to the WAN adapter (Dial-Up networking) or with NDIS 6 to a WWAN adapter. That means that in a LAN, where each machine has cFosSpeed installed, but each connects to the Internet via Dual-Up Networking independently, instead sharing the same router, there will be no Net_Talk support. You do need to use cFosSpeed in “router mode” to use Net_talk and only the PCs that share the same router will participate in Net_talk.
There are some settings around Net_Talk:
Switch on or off Net_Talk for the current connection:
- Enter “spd set net_talk 0” to switch it off or “spd set net_talk 0” to switch it on.
Switch on or off Net_Talk for new connections:
- You can set the default Net_Talk setting for connections that have not yet been used and thus have not yet an entry in DATA.INI. To set that value enter “spd gset net_talk_default 0 -save” to start new connections with Net_Talk enabled or “spd gset net_talk_default 0 -save” to start with it disabled.
Change the UDP port number on which the statistics are transmitted:
- Enter “spd gset net_talk_port PPP -save” to set transfer from/to port number PPP. The default port number is 889. If you change this value, you have to change it for all members on your LAN.
To see which other members on the LAN use cFosSpeed, you can use the “spd ts” or “spd talkstat” command. Output looks like this:
    address         received last      version    LL method       shaper ping   offset

    me                 60471 0s ago    5.13.1675   0 pppoe             2

    sent blocks: 60471
“LL” shows if that member is using low latency. “ping” means the time from sending a net_talk packet to receiving a ping answer on your LAN (don’t confuse this with the ping time to a machine on the Internet.)
Task Offloading
Although cFosSpeed supports task offloading, it depends on a couple of factors:
- The network adapter must support it.
- There must not be other drivers in the stack which prevent it, e.g. certain anti-virus filter drivers, VMware or Virtual Box virtual network drivers, Wireshark packet capture. Newer drivers may work, but you have to check it out for yourself by opening the network adapter dialog and unchecking drivers.
Note: For configuration changes to become effective, you need to reboot your system.
- There may only be newer network drivers in the stack, at least NDIS 6.30.
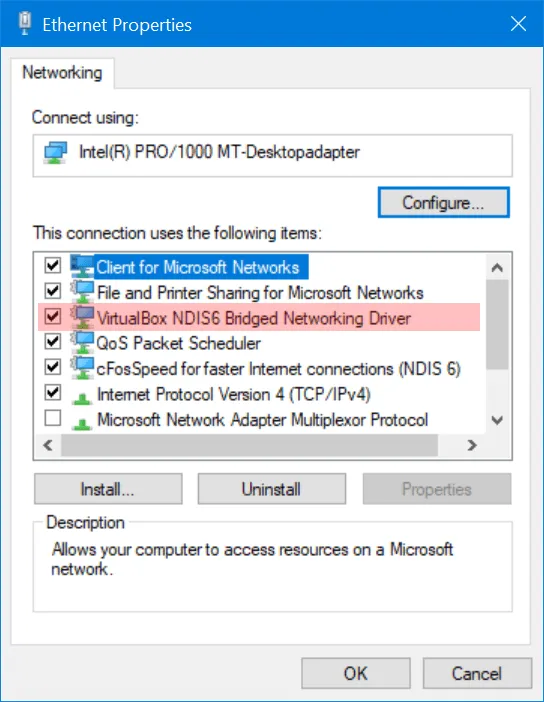
You can check, if task offloading is enabled by checking the flags for the active adapter in the cFosSpeed settings (Adapter Info): The following flags should be on for IPv4 / IPV6 receive and transmit: tcpchk, udpchk and for IPv4 also ipchk.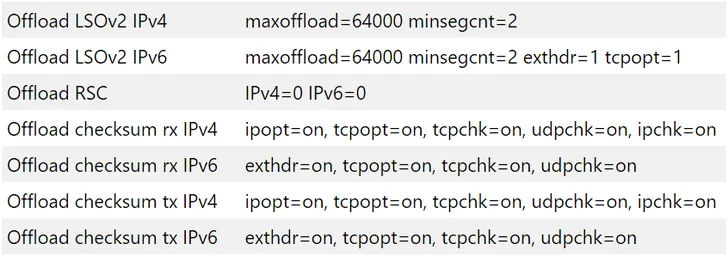
For Large Segment Offloading “Offload LSOv2 IPv4” and “Offload LSOv2 IPv6” should have a minsegcnt of 2 or more.
Currently Receive Segment Coalescing is only active in expensive adapters. If enabled, “Offload RSC” should be IPv4=1 and IPv6=1
How To
How to make a speed test
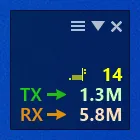
By using Traffic Shaping cFosSpeed continuously keeps track of the current line speed (receive and send). You can always switch on the line speed display in the Metro skin, so you see the bandwidth which was available for the last download and/or upload. To determine the current maximum speeds, you can download or upload a big file an see how these values change. So you alays stay informed about the current speed of your Internet connection.
We are currently working on a solution, so cFosSpeed conducts a measurement for the maximum connection speed automatically. Until then, the above method gives you a quick way to determine your bandwidth.

Switch speed display on/off
Speed display active
Prioritize Connections with Class Delay Management
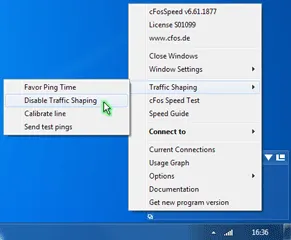
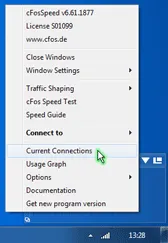
There are many different options for prioritizing a connection while it is currently running. For all of them, however, you need to right-click on your status window and click on Current Connections
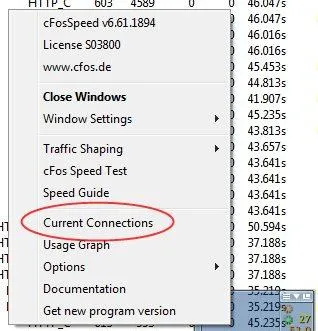
Options
You can now choose whether you want to prioritize a connection, protocol or program temporarily, or permanently prioritize a protocol or program
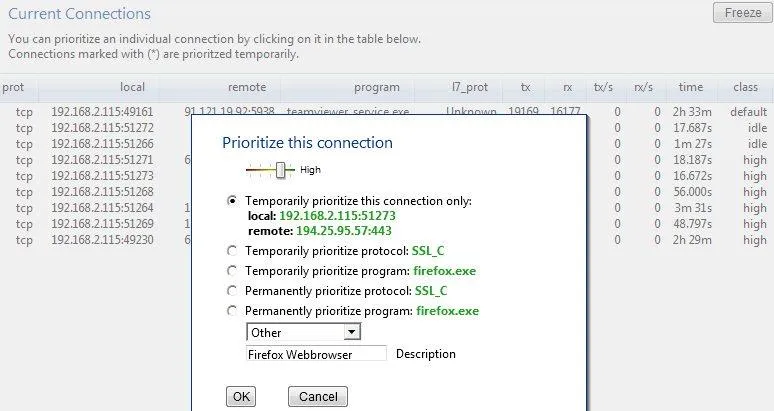
Prioritizing a connection temporarily
Prioritizing a protocol temporarily
Prioritizing a programme temporarily
Prioritizing a protocol permanently
Prioritizing a programme permanently
Use DiffServ/DSCP tagging to label traffic
Differentiated Services (DiffServ) is a Quality of Service (QoS) architecture. Usually, it is supported in closed domains (“DiffServ clouds”) like an organisation or a LAN. With DiffServ you can label each packet with a certain value (called Differentiated Services Code Point, DSCP) and that value is stored inside of the packet. So at the next hop of the packet, the value can be read and taken into account for further routing.
cfosSpeed supports for incoming packets (you can filter on the DSCP value) and on outgoing packets (you can set the DSCP value).
DiffServ labelling is useful in several scenarios:
- You have multiple machines that access the Internet and you use a router (boxed or Windows machine) to provide the connectivity to the Internet.
- You are part of an organisation that uses in-house DiffServ to divide its traffic into several classes.
- You use Windows for your desktop, but a Linux box for routing.
One problem with priorisation is that when you want to decide if a packet is to be prioritised or not you don’t have enough data, enough time, computational power or memory to do so. Routers are often small, very constrained embedded systems with few resources. But even if you use a full-grown Windows or Linux machine as a router some information about the data (like which program it was sent from) is already lost, since that information is not transmitted over the network.
So it is a good idea to label your packets at the origin and you can use cfosSpeed’s possibilities to accomplish that efficiently and very fine-grained (filter for programs, protocols, ports or manual filter expressions).
Here is how you do it. We assume that you have a Windows desktop whose traffic you want to prioritise (the “client”) and you have a router that routes your traffic (maybe among other traffic) to the Internet. Hopefully, that other traffic is also DS-labelled.
On your client you use cfosSpeed like everybody uses it and set up protocols, programs, etc. Furthermore, you set up some DSCP values. To do that click Start, programs, cfosSpeed, open console and enter “spd class”: you will see a listing of the traffic classes, like this:
    class highest -prio 100 -weight 400
    class higher -prio 90 -speed 40%,0 -weight 400
    class high -prio 80 -speed 40%,0 -weight 400
    class default -weight 100
    class low -prio 0 -speed 25%,-10 -weight 25
    class lowest -prio 0 -speed 25%,-30 -weight 6
    class drop
For each class you can set the DSCP value by the command “spd class C -dscp X” (sans quotes), where “C” is the class name and “X” is the DSCP value which is in the range of 0 and 63. The values are arbitrary, but 0 means “no DSCP set”. Other values might be in use in your organisation, ask your net admin. Make sure that class “highest” is sent out the fastest on your router and class “higher” still faster that “high”.
After you have set all the class values, a “spd class” might look like this:
    class highest -prio 100 -dscp 1 -weight 400
    class higher -prio 90 -speed 40%,0 -dscp 2 -weight 400
    class high -prio 80 -speed 40%,0 -dscp 3 -weight 400
    class default -dscp 4 -weight 100
    class low -prio 0 -speed 25%,-10 -dscp 5 -weight 25
    class lowest -prio 0 -speed 25%,-30 -dscp 6 -weight 6
    class drop
Now we have to switch off the traffic shaping on the client. Enter “spd set fixed 1;set txspeed 2g”. This will set the send speed to almost infinite, so no packets are queued locally.
On your router you can use the DSCP values to put the packets into the corresponding traffic class. Assuming the router uses cfosSpeed, you have to modify the filter settings to make use of the client’s DSCP values. Again (now on the router) click Start, programs, cfosSpeed, open console and enter “spd filter”. You will see a listing of all filter rules. It will contain some lines like this:
    18 rt-  -highest -c highest
    19 rt-  -higher -c higher
    20 rt-  -high -c high
Assuming the -highest filter is the first non-firewall filter and has number 18, enter the following commands:
    spd filter -I 18 -dscp 1 -c highest
    spd filter -I 19 -dscp 2 -c higher
    spd filter -I 20 -dscp 3 -c high
    spd filter -I 21 -dscp 4 -c default
    spd filter -I 22 -dscp 5 -c low
    spd filter -I 23 -dscp 6 -c lowest
This will sort all packets with DSCP values into the corresponding traffic queues on the router.
If you use some other system that Windows/cfosSpeed you have to find out how to use the DSCP value for routing. Under Linux iptables might be able to do that.
That’s it! All cfosSpeed settings made have been automatically saved and are active right away.
Additional comments:
DSCP tagging can be useful for load balancing as well. If you own a router that can utilise more than one Internet line at the same time, it might have a way to split the traffic on the various lines. A good solution might be to do DSCP tagging of traffic with cFosSpeed on the machine where the traffic originates and for the router to use the DSCP tags to send the traffic to one of the multiple lines to the Internet.
Links:
>RFC 2474—Definition of the Differentiated Services Field (DS Field) in the IPv4 and IPv6 Headers
Tip for Gamers
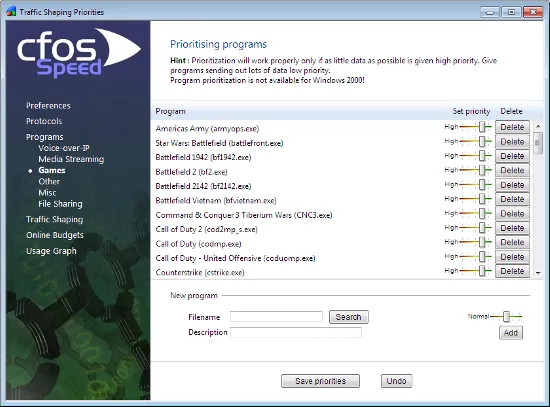
Since version 2.02 gamer prioritize their games for data transmisson. The settings can be done by selecting »Options » Priorities at the cFosSpeed Kontextmenu.
>Add online games to our Priolist!
>cFosSpeed, the filesharing solution for P2P networks
Prioritizing indiviual ports
If you know the TCP/UPD source or destination port of your application, you can prioritize its traffic like this:
(edit the section [filter] at the settings.ini file)
TCP Ports
[filters]
; dest port=1234
filter=-tcp-dport 1234 -c high
; source port=5678
filter=-tcp-sport 5678 -c high
UDP Ports
[filters]
; dest port=1234
filter=-udp-dport 1234 -c high
; source port=5678
filter=-udp-sport 5678 -c high
Accelerate your online games
How can I accelerate my online games?
Traffic Shaping technology does keep ping times low and transfer rates consistently high at the same time.
Still, to achieve optimal ping times, you should prioritize your game(s) as high as possible. You will find that we have already listed some of the currently most popular games under Program Settings. Should your game not be among the ones listed there, you can simply add it to the list.
A special case is the HTTP stream detection. If the detected protocol is HTTP, cFosSpeed tries to detect, if it is a video or audio stream. This works as follows:
If the user agent is one of the well-known players or has the substring “player” in it, cFosSpeed categorizes the connection as HTTP_STREAM_C or HTTP_STREAM_S. Otherwise if the content-type is audio or video it categorizes the connection as BSTREAM_C or BSTREAM_S. The BSTREAM_C/S connections are prioritized as “normal” so that the actual priority is determined by the program prioritization.
This allows you, for example in uncertain cases, to prioritize it according to your program use.
You can also let us know what online games you would like to have included on that list for future updates as well.
Please be careful to prioritize as few data and programs as possible in such a manner. This is because if you were to assign high priority to everything, you would be no better off than having nothing prioritized at all.
Alternatively, should the program name itself not be clear, you can also prioritize the ports used by the online game. If the TCP/UDP destination ports of an application are known, you can prioritize their data transfer as follows (by editing the [filter] section of the settings.ini file):
For TCP ports:
[filters]
; dest port=1234
filter=-tcp-dport 1234 -c high
For UDP ports:
[filters]
; dest port=1234
filter=-udp-dport 1234 -c highAfter making those changes and saving them, the new settings still need to be loaded. This is done by opening the console (under Start, Program, cFosSpeed) and entering “spd reload”. Your changes will take (and remain in) effect after the next time you restart your system.
Optimizing Connection Settings:
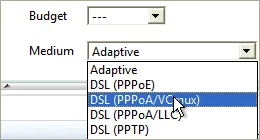
You can specify exactly what transfer medium you use under Connection Settings. The more information about a connection is available to cFos or cFosSpeed, the better ping times will be. Default is “Adaptive”. But if you were for instance using a DSL connection, you should select the appropriate DSL standard or protocol as your medium.
Favor Ping:
In addition, you can also use the settings in the context menu or status window to activate “Favor Ping”. A green arrow will then show up on the status window. This setting will have cFos or cFosSpeed do everything to keep ping times to a minimum but at the expense of transfer speed, which may slow down considerably.
Playing While Downloading:
If you are playing a game online without Traffic Shaping and run an upload or download at the same time, ping times to your gameserver will rise. Less data traffic means better (i.e., lower) ping. Especially with filesharing programs and other applications that send out lots of data, ping times often skyrocket resulting in serious lag. This will also slow down your in-game reaction time horrendously.
Traffic Shaping alleviates this problem by allowing filesharing and downloads to run in the background while gaming. This may still raise ping times minimally though. Therefore, we recommend you to keep “Favor Ping” activated at such times. By default, filesharing programs are set to very low priority. Now, this should not be taken to mean they are artificially slowed or even altogether stalled. What it does mean, however, is that such data will be briefly delayed when more important data like online game traffic needs to be transmitted. Only this priority scheme makes it possible to have filesharing programs run at maximum transfer rates while still using the same connection for other applications at the same time.
Improve Shared Connections
How to solve Internet congestion when many users share one Internet connection?
In restaurants, hostels, hotels, guest houses, on university campuses, office environments – whenever a lot of people share the same Internet connection – this Internet connection is often congested and the users experience up to several seconds of delay.
Here cFosSpeed can make a huge difference by prioritizing the traffic to and from the Internet. For example it can detect if a user uploads a bunch of photos or if some device downloads a big software update. cFosSpeed will slightly delay these big data uploads or downloads by reducing the bandwidth by about 1-2%. This reduces the ping time of the whole Internet connection, which allows highly responsive web browsing or even media streaming / VoIP phone calls and game traffic.
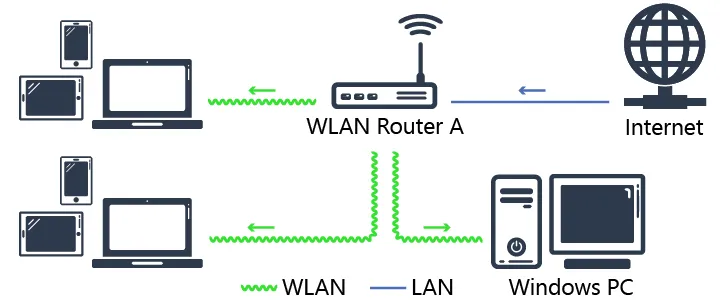
The usual state of most shared Internet connections.
This configuration will result in severe connection delays when some of the connected devices start massive up- or downloads, e.g. saving new photos or videos to cloud storage or downloading software updates. The problem can be solved by using the original router (Router A) for the Windows PC only and buying a cheap second WLAN router (WLAN Router B) for shared access.
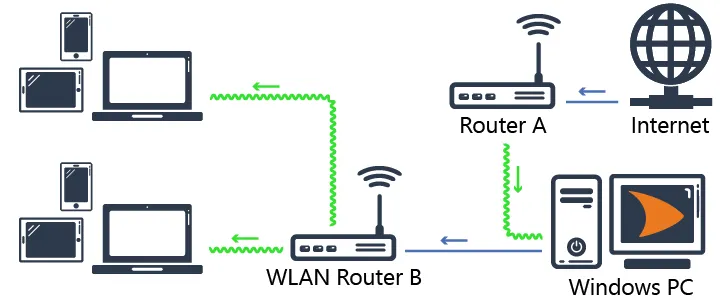
The new configuration with cFosSpeed prioritizing the entire Internet traffic of the WLAN network.
To improve overall performance, you may want to install an additional Ethernet port on your Windows PC to connect to Router A. We always recommend to use cable connections, since they produce less latency than WiFi.
Extended configuration with cFosSpeed, second LAN connection for improved latency and an additional WLAN Router B2 to increase range.
Connecting the WLAN router
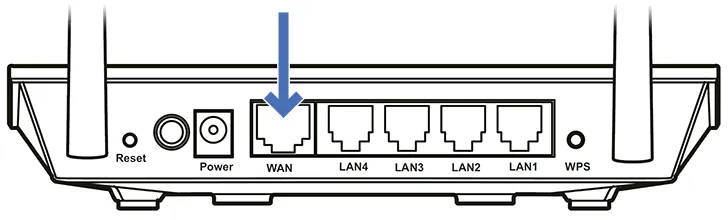
Connect the WAN port of WLAN Router B with the network port of the Windows PC
Setting up the Windows PC

Install cFosSpeed, following the installation instructions
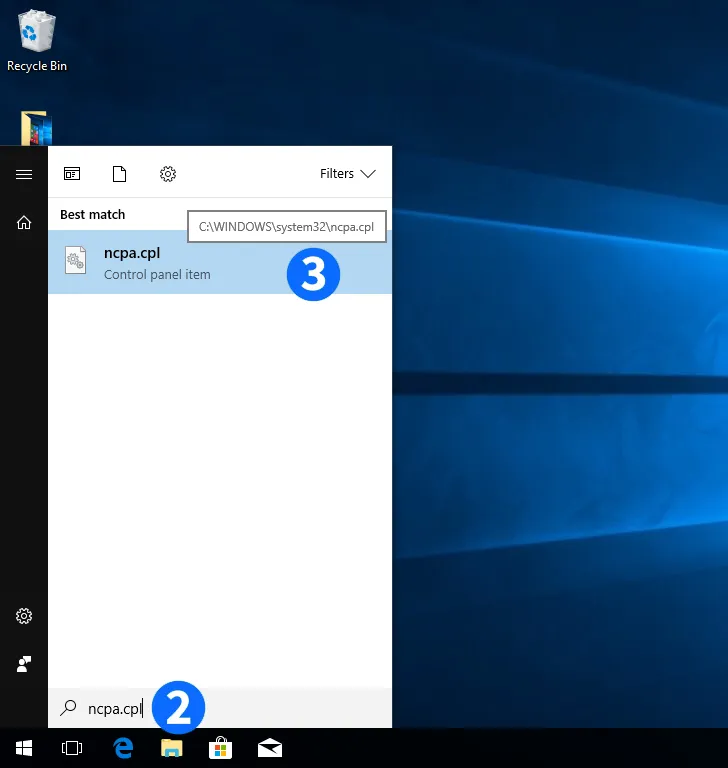

Press the "Windows" key and type ncpa.cpl

Click on the resulting control panel item entry
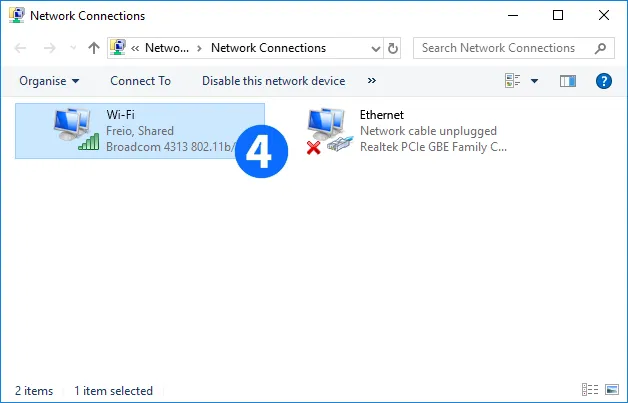

Right-click on the network device you want to share. It is the one that connects the Windows PC to the Internet
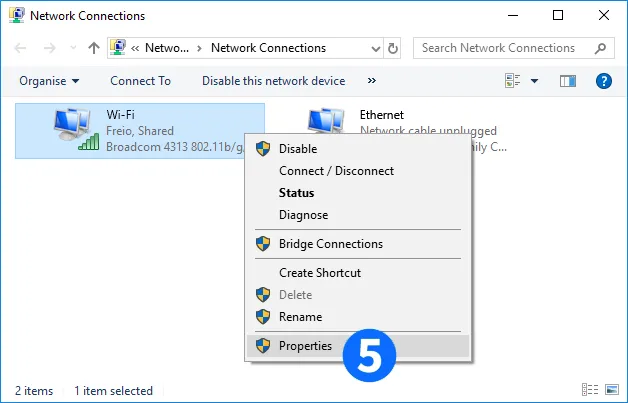

Click on "Properties"
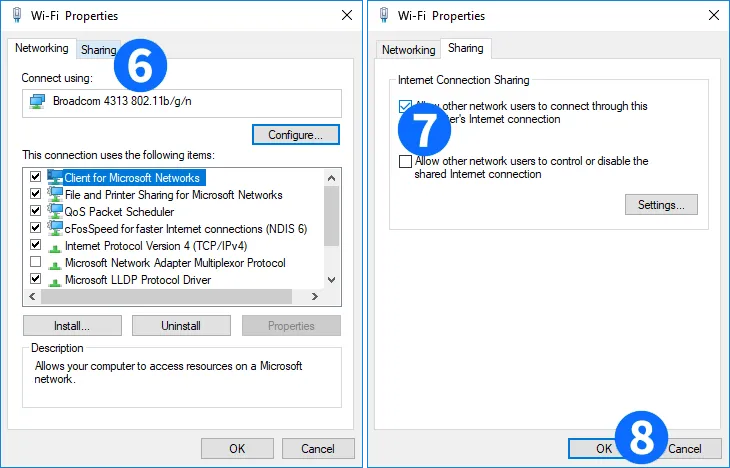

Click on "Sharing"

Click on "Check the upper check box to enable connection sharing. You may want to uncheck the lower box, if it isn't already"

Click on "OK"

The Internet connection on this device is shared now
Note: Newer versions of Windows 10 have a bug which may stop Internet Connection Sharing from working after a reboot.
By using our freeware tool >cFosICS you can fix this.
Setting up the WLAN router
This particular instruction is for the ASUS RT-N12E, which we chose for its moderate price and easy setup. Nevertheless, this kind of connection sharing should work with any other WiFi access router available at your place.

Connect to your router using an Ethernet cable or via WiFi. The router will show up as an open network (no password required) with the SSID ASUS_60. Now enter the router IP address (192.168.1.1) in the address bar of your browser to start setup
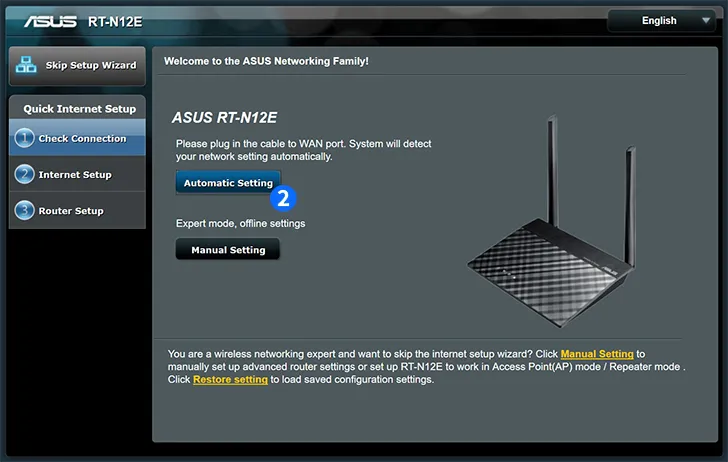
Click on "Automatic Setting"
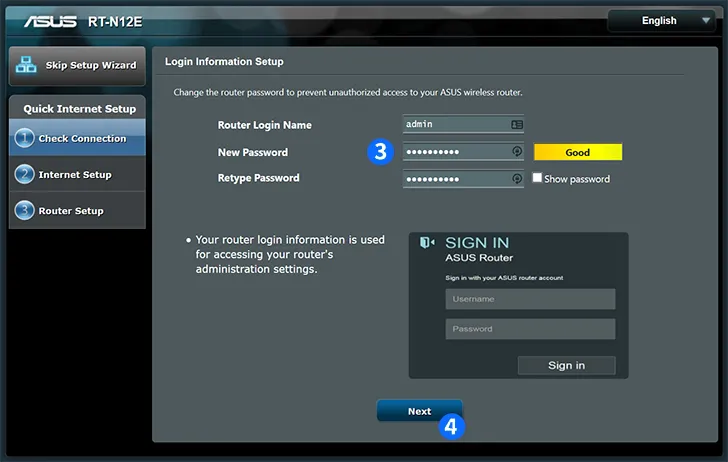
Enter a Router Login Name and the New Password
Click on "Next"
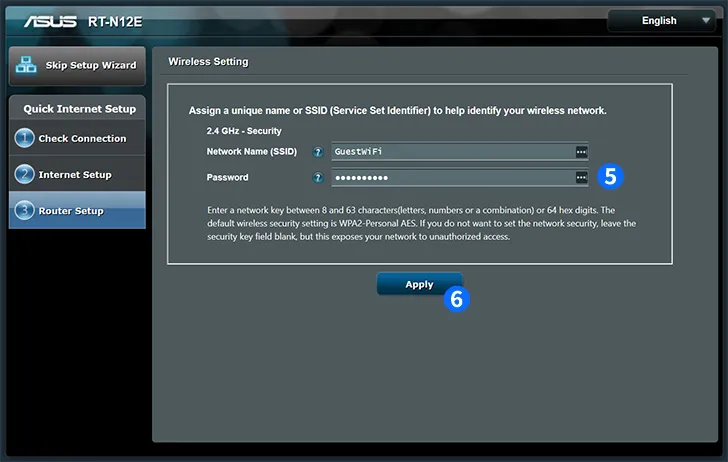
Enter a new SSID (e.g. GuestWiFi) and a WiFi password
Click on "Apply"
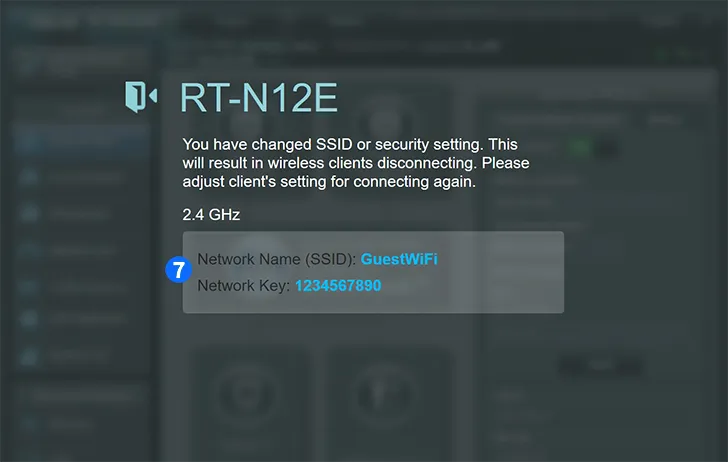
The route will now display a screen showing the new WiFi configuration. You may want to write this down, because it will be needed to connect with the router from now on
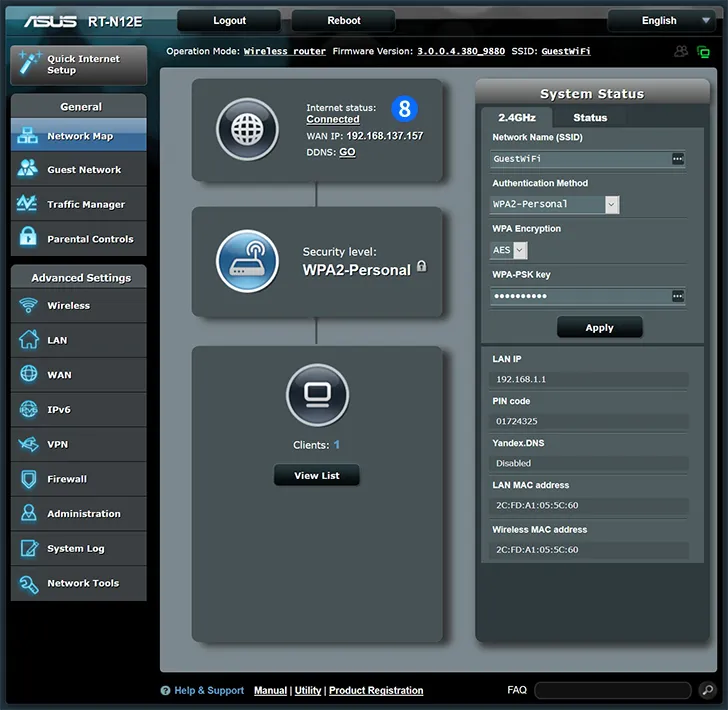
After reconnecting with the newly configured WiFi network, the router will show a page listing its current setup and connection status
Prioritarize a Port
Maybe the easiest way to prioritize a certain application is to use the programs / prioritization dialog. If this isn’t applicable you can create your own filter rule as follows:
First you have to determine which port your application uses and if it’s TCP or UDP. Use
spd -tcpview
or the cFos / cFosSpeed connection overview dialog to find your application. Then you set up the filter as follows:
filter=-tx -udp-sport / -udp-dport / -tcp-sport / -tcp-dport X -c classname.
You have to decide if it’s a source port or a destination port. In most cases there is a server on the Internet with a certain port, so it’s a destination port (dport). The filter rule would look like this:
filter=-tx -udp-dport X -c classname for UDP
or
filter=-tx -tcp-dport X -c classname for TCP
where X is the server’s port and classname the class you want the traffic sorted into, e.g. high or higher (but never highest) if you want to increase the priority or lower / lowest if you want to decrease the priority.
Now insert this new filter rule into settings.ini, section [filters]. For UDP in most cases it should be at the top of the list of the other filter rules. For TCP it should rather be at the end. You can use “spd fstat” to see if your rule matched.
After changing settings.ini you need a “spd reload” command to let cFos / cFosSpeed reload the filter rules.
Prioritarize a Program
First cFosSpeed tries to detect the Layer 7 Protocol for each connection. If it is not detected (i.e. the protocol is UNKNOWN) or the priority of the detected protocol is “normal”, then the program detection is used to determine the priority.
A special case is the HTTP stream detection. If the detected protocol is HTTP, cFosSpeed tries to detect, if it is a video or audio stream. This works as follows:
If the user agent is one of the well-known players or has the substring “player” in it, cFosSpeed categorizes the connection as HTTP_STREAM_C or HTTP_STREAM_S. Otherwise if the content-type is audio or video it categorizes the connection as BSTREAM_C or BSTREAM_S. The BSTREAM_C/S connections are prioritized as “normal” so that the actual priority is determined by the program prioritization.
This allows you, for example in uncertain cases, to prioritize it according to your program use.
Prioritization – Your important streams first
You can adjust the priority of the most common network protocols, so all programs using it automatically have the right priority. In addition, you can configure the priority of individual programs. This means downloads don’t cause lag while gaming or viewing videos, for example.

Overview of connections / On-the-fly prioritization of connections
In one glance you see which programs use your bandwidth. cFosSpeed let’s you temporary change the priority to speed up transfers or reduce latency for time-critical applications.
1) Decrease priority
2) Increase priority
Backup/restore all cFosSpeed settings?
cFosSpeed stores its settings in the following files:
C:\ProgramData\cFos\cFosSpeed
- data.ini
- global.ini
- settings.ini
- user.ini
C:\Users\[username]\AppData\Local\cFos\cFosSpeed
- user_data.ini
You can backup all 5 files.
In addition, if you want to keep the online budget log files you should backup the subdirectory logs: C:\ProgramData\cFos\cFosSpeed\logs.
To restore the settings just restore global.ini, user.ini, data.ini. Settings.ini is overwritten by new installations. Therefore if you also made changes in settings.ini, you need to apply these again in the new settings.ini. Otherwise use the settings.ini from the most recent installed version.
Generic Speed Guide
Thank You for using our Speed Guide!
This guide can either help you get the maximum out of your connection or solve problems with speed, ping time or connections.
No pings
cFosSpeed could not receive enough responses to it’s measurement pings. Please make sure your network equipment (firewall, router, etc.) allows ping responses, see Problems with Pings.
Is there traffic from other machines in your network?
If you have several PCs with cFosSpeed you can see the other computers by using the cFosSpeed Console.
C:\Program Files\cFosSpeed>spd ts
Make sure all PCs in the network have cFosSpeed installed. Also for speed tests, make sure only this computer sends/receives data.
Do you currently have control over the network usage for these tests?
Please make sure you have control over your network. Otherwise the speed and/or ping optimizations might be interfered by other PCs in the network.
Calibrate cFosSpeed optimally
Please make sure you have control over your network. Otherwise the speed and/or ping optimizations might be interfered by other PCs in the network.
Watch the video "How to calibrate your Internet connection"
(1/4) Click “Traffic Shaping > Calibrate line”

Then wait about 2-3 minutes until the status window indicates no or nearly no traffic.

Watch the video "How to calibrate your Internet connection"
(2/4) Now download with max. speed for at least 20secs.
Next upload with max. speed for 1-2 minutes. Repeat the upload 2-3 times.
Watch the video "How to calibrate your Internet connection"
(3/4) Open “Options -> Settings”

Watch the video "How to calibrate your Internet connection"
(4/4)

Hint: For the download and uploads you can also use our Speed Test page. Please ignore the values for download/upload speed from the Speed Test as long as cFosSpeed is not calibrated.
Can you calibrate cFosSpeed to 98% or above?
For the line calibration to work, cFosSpeed must receive Ping responses. Please check if “Pongs Received” in the adapter info is at least 50%.

If it is less than 50%, please have a look at our troubleshooting page Problems with Pings, otherwise you can Contact Us.
Speed too low
Traffic Shaping may cost 1-2% speed. This is a necessary consequence of the speed regulation for Traffic Shaping.
Test if the speed is also low with cFosSpeed uninstalled.
Is it still low?
If Yes, then it’s no cFosSpeed problem. In most cases the server you connect to may have speed problems.
Test if the speed is also low with Traffic Shaping disabled.
Is it still low?
The cFosSpeed network driver may cause this problem. Is your computer fast enough for your connection? Otherwise we would like to know about the problem.
Please send us an email, so we can have a closer look at your problem
Check the Low Latency Mode setting
Low Latency Mode active?
Try to turn it off in the cFosSpeed console:
C:\Program Files\cFosSpeed>spd gset latency 2 -save
If this helps, please let us know your network configuration by sending us an email.
Do you get the raw max. speed of your connection?
cFosSpeed can not increase the raw speed of your connection. It cannot make a 11Mbit/s connection out of a 10Mbit/s connection.
cFosSpeed can improve your Internet connection whenever you have several connections at the same time, like a long email send and web-surfing, or filesharing and web-surfing.
Does the cFosSpeed prioritization work for you?
(1/6) cFosSpeed tries to keep your ping low. cFosSpeed Traffic Shaping should result in max. bandwidth (especially with several simultaneous connections) while having minimal ping times (in fact the ping time should be nearly the ping time you get when not transferring data at all). There may be a trade-off between low ping time and transfer speed. If you can live with a higher ping time, you can try this in the cFosSpeed Console:
For a higher upload speed:
C:\Program Files\cFosSpeed>spd set tx_delay
tx_delay = 10000
C:\Program Files\cFosSpeed>spd set tx_width
tx_width = 1000
Write down the two values.
(2/6) Now double each of them and try the following:
C:\Program Files\cFosSpeed>spd set tx_delay 20000
tx_delay = 20000
C:\Program Files\cFosSpeed>spd set tx_width 2000
tx_width = 2000
If this doesn’t help, restore the old values.
C:\Program Files\cFosSpeed>spd set tx_delay 10000
tx_delay = 10000
C:\Program Files\cFosSpeed>spd set tx_width 1000
tx_width = 1000
(4/6)
For a higher download speed:
C:\Program Files\cFosSpeed>spd set tx_delay 10000
tx_delay = 10000
C:\Program Files\cFosSpeed>spd set rx_width
rx_width = 1970
Write down the two values.
(5/6) Now double each of them and try the following:
C:\Program Files\cFosSpeed>spd set rx_delay 40000
rx_delay = 40000
C:\Program Files\cFosSpeed>spd set rx_width 3940
rx_width = 3940
(6/6) If this doesn’t help, restore the old values.
C:\Program Files\cFosSpeed>spd set rx_delay 20000
rx_delay = 20000
C:\Program Files\cFosSpeed>spd set rx_width 1970
rx_width = 1970
Did this help?
There are (rare) cases when cFosSpeed RX shaping reduces the download speed.
To solve this problem try the following in the cFosSpeed Console:
C:\Program Files\cFosSpeed>spd gset rx_shape 0 -save
There are (rare) cases when cFosSpeed RX shaping reduces the download speed.
To solve this problem try the following in the cFosSpeed Console:
C:\Program Files\cFosSpeed>spd gset avoid_loss 0 -save
Did this help?
(1/2) Sometimes the speed measurements drifts over time because there is always an extreme amount of connections and a lot of UDP traffic. This can happen in some BitTorrent cases. Calibration works fine, but after a while the connections become slower and slower.
Only in such cases you can set the speed to fixed:
Get the current values by using the cFosSpeed Console:
C:\Program Files\cFosSpeed>6spd set maxtxacked
maxtxacked = 537274
C:\Program Files\cFosSpeed>spd set maxtxraw
maxtxraw = 537916
(2/2) Now choose a value between these two numbers and take 90% to 98% of it (510715 in this example).
Set it with
C:\Program Files\cFosSpeed>spd set fixed 1; set txspeed 510715
fixed = 1
txspeed = 510715
Pings too high
Is the Low latency Mode active?

Low latency Mode active?
Try to turn it on:
C:\Program Files\cFosSpeed>spd gset latency 1 -save
(1/2) Maybe the high ping times are caused by the server at the other end of the connection. This often happens with game servers. cFosSpeed cannot reduce your ping below the minimum which is determined by your connection / ISP. Whenever you use several connections simultaneously cFosSpeed can reduce the ping time and prioritize your traffic so that you get near minimum ping times while still using nearly all available bandwidth. This allow, for example, uploads / downloads during VoIP calls or online gameplay.
Uninstall cFosSpeed or disable Traffic Shaping

(2/2) Download hrping and – without any other traffic on your connection – try both Uninstall cFosSpeed or disable Traffic Shaping
C:\Program Files\cFosSpeed> hrping atlas-cfosspeed.com
C:\Program Files\cFosSpeed> hrping -u atlas-cfosspeed.com
Is the ping time still high?
Tip: For DSL connections use fastpath. WLAN typically has higher ping times as cable based networks. Mobile Internet may cause additional delay due to bad transfer conditions and/or congestion of the access point.Is there another PC in the network which sends/receives data?
Are your ping times good if this PC doesn’t use the internet?
You can limit this PC’s transfer rate. Install cFosSpeed on it and if this doesn’t help, limit this PC’s upload speed:
C:\Program Files\cFosSpeed> spd set tx_limit [value]
Maybe there is something wrong with the prioritization?
Please open “current connections” and check if each connection has the bandwidth it should have.

Is the prioritization correct?
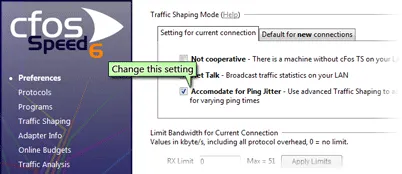
Please change the setting for “Accommodate for Ping Jitter” in “Options > Settings > Preferences”

Is the ping time better now?
Some equipment interferes with TCP transmissions. For example some drivers for Atheros WLAN adapters may cause high pings with downloads. Please install the most recent network drivers. For a test, use another network adapter and see if pings times are still high during downloads.
New drivers / other network card helped?
Is your cFosSpeed set to fixed speeds? Check this by typing the following into the cFosSpeed Console:
C:\Program Files\cFosSpeed> spd set fixed
fixed = 0
It should be 0, except for rare cases with a lot of BitTorrent connections and high UDP traffic.
If your cFosSpeed line calibration remains stable, you should set it to 0:
C:\Program Files\cFosSpeed> spd set fixed 0
or use smaller values for the fixed speed (try reducing the speed in 1% steps).
Prioritization
(1/2) Prioritization can only work, if not all data is prioritized. It works best if only a little of the traffic is prioritized high and the rest normal. cFosSpeed sends out all packets as fast as possible. But (only) when there traffic with different priorities then higher prioritized packets are sent first. This is how you can test whether the prioritization scheme works:
Clear the current statistics
C:\Program Files\cFosSpeed> spd cstat -clear
Transfer data for some time
(2/2) Examine the newly created statistics
Microsoft Windows [Version 6.1.7601]
Copyright (c) 2009 MIcrosoft Corporation. All rights reserved.
C:\Program Files\cFosSpeed> spd cstat
tx shaping is active; txspeed = 10000, max_queue_size = 3,910,065
class highest -prio 100 -weight 400
sent 8,433 ( 20%) packets 236,124 ( 6%) bytes
class higher -prio 90 -speed 40%,0 -weight 400
sent 22,285 ( 53%) packets 903,940 ( 25%) bytes
class high -prio 80 -speed 40%,0 -weight 400
sent 8,443 ( 20%) packets 2,242,980 ( 62%) bytes
class default -weight 100
sent 1,321 ( 3%) packets 62,095 ( 1%) bytes
class low -prio 0 -speed 25%,-10 -weight 25
sent 1,096 ( 2%) packets 132,167 ( 3%) bytes
The traffic in all classes above “default” should be no more than 20%-40%.
Is it more than 20%-40%?
(1/2) See which connections consume bandwidth. Transfer data for a time and look at the current connections


(2/2) Is the protocol or program you want to prioritize set to “high” or “higher” and everything else to “normal” or lower? If not, open the prioritize protocol or program dialog (under “Options > Settings”) and adjust the settings. You can also add a program, if it is missing.


>Connection problems
Please check, if “Automatic MSS (MTU) optimization” is activated:


Some servers rely on a maximum MSS/MTU, so you can try to turn it off.
Also check if “Net Talk” is activated. You could try if it helps to turn it off.
Tweaks. How to squeeze the maximum out of your connection
(1/5) Please check if cFosSpeed is calibrated

Watch the video "How to adjust the Medium/Protocol for your Internet connection"
(2/5) Please set the medium to your connection type

(3/5) Activate “Accommodate for Ping Jitter”

(4/5) Activate “Packet loss avoidance”

(5/5) You may also try “Automatic MSS (MTU) optimization”.

In many cases a slightly lower MSS/MTU gains a few % of transfer speed. But some servers rely on a maximum MSS/MTU, so turn off “Automatic MSS (MTU) optimization” if you experience problems
How to check whether you benefit from cFosSpeed Traffic Shaping
cFosSpeed cannot increase the raw speed of your Internet connection. Also it cannot reduce your ping time below the minimum ping of your Internet connection. So you can only measure the benefits of Traffic Shaping during active data transfer which uses up your available bandwidth.
- Upload at full speed for 1-2 minutes
- Download at full speed for 1-2 minutes
- Do a combined upload and download at full speed
During all 3 scenarios, use hrping in the cFosSpeed Console to measure your ping.
C:\Program Files\cFosSpeed> hrping -t -u atlas-cfosspeed.com
Now try all 3 scenarios with and without Traffic Shaping

In all scenarios you should see a lower ping time with Traffic Shaping enabled. In scenario 3 you may also experience a higher download speed. The upload speed may be slightly reduced, because cFosSpeed needs the upload bandwidth to send the ACKs for the download fast enough.
Create Dump after Blue Screen
Generating a Windows kernel memory dump
In case of a bluescreen while using our software we require a windows kernel memory dump to be able to look into the problem.
To generate the kernel memory dump please follow these steps:
To create the kernel memory dump adhere to the following settings of the function “kernel memory dump”
- At “START/Control Panel/System” under “advanced” open the “startup and recovery – settings”
- At “write debugging information” choose: “kernel memory dump”
- By clicking “OK” confirm the changes and close the window “advanced”
- By clicking “OK” confirm the changes and close the window “System” and then the window “Control Panel”
- If you are using XP restart your computer (not required when using Vista or higher version!)
Now a kernel memory dump will be generated as soon as a bluescreen appears and unless otherwise specified saved as MEMORY.DMP.
Please archive your memory dump as a RAR or Zip file (we recommend RAR or 7-zip). Then send it to us by email at support@atlas-tech-solutions.com.
Contact us if need be to inquire about submitting large files.
Surf the Web faster
How can I surf the Web faster?
Traffic Shaping technology does keep ping times low and transfer rates consistently high at the same time.
HTTP detection integrated in cFos and cFosSpeed serves to accelerate page loading times, especially during simultaneous uploads. Acceleration gains are higher the more individual elements need to be loaded on a given Web page.
Favor Ping:
If you are surfing a lot of pages (without major downloads), you may want to use the settings in the context menu or status window to activate “Favor Ping”. A green arrow will then show up on the status window. This setting will have cFos or cFosSpeed do everything to keep ping times to a minimum but at the expense of transfer speed, which may slow down considerably. However, depending on what application you are running, this may speed up loading Web pages even further.
Other Interactive Applications:
Both cFos and cFosSpeed come with integrated detection for major interactive applications like SSL, SSH, Telnet, IRC, and many others. This ensures low response times even during long uploads and downloads.
Should the standard priority scheme under Protocol Settings not be sufficient for your purposes, you can always prioritize any application either by name under “Program Settings” or add its port manually to the filter rules. This is especially advisable when running a server.
If the ports are known, you can prioritize their data transfer as follows (by editing the [filter] section of the settings.ini file):
For TCP ports:
[filters]
; dest port=1234
filter=-tcp-dport 1234 -c high
; source port=5678
filter=-tcp-sport 5678 -c high
For UDP ports:
[filters]
; dest port=1234
filter=-udp-dport 1234 -c high
; source port=5678
filter=-udp-sport 5678 -c high
After making those changes and saving them, the new settings still need to be loaded. This is done by opening the console (under Start, Program, cFosSpeed) and entering “spd reload”. Your changes will take (and remain in) effect after the next time you restart your system.
>cFosSpeed-Filter Manual (English)
Surfing and Filesharing (P2P):
By default, filesharing programs are set to very low priority. Now, this should not be taken to mean they are artificially slowed or even altogether stalled. What it does mean, however, is that such data will be briefly delayed when more important data is being transmitted. Only this priority scheme makes it possible to have filesharing programs run at maximum transfer rates while still using the same connection for other applications (like surfing the Web) at the same time.
Optimizing Connection Settings:
You can specify exactly what transfer medium you use under Connection Settings. The more information about a connection is available to cFos or cFosSpeed, the better ping times will be. Default is “Adaptive”. But if you were for instance using a DSL connection, you should select the appropriate DSL standard or protocol as your medium.
Create a Wifi Access Point with cFosSpeed
Enable>cFos Traffic Shaping for smartphones, tablets and other mobile devices.
Windows 7, 8 and 8.1 allow you to use your Wi-Fi adapter as an ad hoc Wi-Fi access point. So other devices can connect to your PC (instead of directly to the Wi-Fi router) and therefore can benefit from cFosSpeed Traffic Shaping.
cFosSpeed now has a context menu option to start and configure (or stop) the Wi-Fi access point easily.
If your PC is connected to the router via Wi-Fi, you can share the same adapter for the ad hoc Wi-Fi access point. Or you can use the Wi-Fi adapter exclusively for the Wi-Fi access point if your PC is connected to the router via network cable. In this case the Wi-Fi bandwidth is fully available for your mobile devices, like smartphone or tablet.
When you have cFosSpeed installed on this PC, the Wi-Fi data is routed through cFosSpeed and, via its Layer-7 protocol detection, cFosSpeed can prioritize the traffic. If you frequently use smartphones and tablets for VoIP or streaming traffic, like music or movies, we recommend to add a Wi-Fi adapter to your PC and route the traffic of your mobile devices through this PC and cFosSpeed.
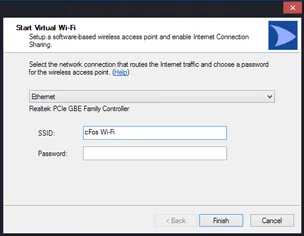
Manually set up a Wi-Fi access point (Windows 7 and above)
Open the command shell as Administrator:
C:\Program Files\cFosSpeed>netsh wlan set hostednetwork mode=allow
Open the command shell as Administrator:
C:\Program Files\cFosSpeed>netsh wlan set hostednetwork ssid=”cFos Wi-Fi” key=”your_password” keyUsage=persistent
Check with:
C:\Program Files\cFosSpeed>netsh wlan show hostednetwork
Start “Microsoft Virtual WiFi Miniport Adapter”.
C:\Program Files\cFosSpeed>netsh wlan start hostednetwork
Check with:
C:\Program Files\cFosSpeed>netsh wlan show hostednetwork
In the list of network connections the red cross next to “Microsoft Virtual WiFi Miniport Adapter” should have been disappeared.
Right click in the list of network connections on the active Internet connection and select “Properties” from the menu. Click the “Sharing” tab, and then select the “Allow other network users to connect through this computer’s Internet connection” check box.
Under “Home networking connection” select the connection that shows the “Microsoft Virtual WiFi Miniport Adapter” in the list of network connections.
Confirm with “OK”.
How to Create your own cfosspeed skin

All cFosSpeed versions do come with their own standard skins. Still, you are free to modify and change them to better suit your own needs and aesthetic preferences. In fact, we strongly encourage you to send us your own custom designs and share them with others!
This tutorial will guide you through the process of creating a new basic skin. Do note that most of the graphics used for this are already part of your cFosSpeed distribution, which is why the focus will be on teaching you several ways to integrate them into your own design.
Hint: When working on your skin, you may want to activate the cFosSpeed “test mode.” This will provide you with a quick and easy way to check if everything is working properly and in the right place.
(See the skin definition reference for details on skin testing.)
The INI file / [all] section
The INI file is a plain text file that determines how cFosSpeed displays status information on screen. Let’s just name ours skin.ini and save it to MySkin, a new folder we should first create as a subdirectory of the cFosSpeed main directory (e.g., C:\Program Files\cFosSpeed\MySkin). The new INI file must contain an [all] section listing version information, a skin name and background definition, much like the one shown below:
[all]
version=cFosSkin V1.0
name=MyFirstSkin
background=back.bmp
background_mask=backmask.bmp
Since there is only one version number at this point (V1.0), we’ll just go ahead and use it.
The skin will show up later in the program’s context menu under “Select Skin” by the name given to it in the second entry above.
The background for this skin is built from a simple square image filled with a color gradient (back.bmp) and a grayscale mask defining the skin’s actual shape (backmask.bmp).
For each individual pixel, the grayscale value of the background_mask determines the alpha value (i.e., opacity) of the resulting skin background, whereas the actual color information is taken from the background image. In the mask, black (0) denotes total transparency, while white (255) means full opacity.


If you get a chance to work with 32-bit *.TGA or *.BMP files, you can achieve the same result more easily by using a single image for both color and alpha information. In this case, all mask information is taken directly from that image, meaning there’s no need to define a separate background_mask section. For additional background-definition techniques, please refer to our skin definition reference page.
What we’ll do now to add some eye candy is have the skin blend in and out when it is being started. We’ll also take this opportunity to define a global R,G,B transparentcolor:
blend_time=300
blend_out_time=500
transparentcolor=255,0,0
A transparentcolor value doesn’t really need to be specified here, but doing so may help during skin creation by making it easier to check which pixels of an image are fully transparent. Remember that it remains valid for all the images we’ll use as part of this skin.
The font definition
Skins usually contain several text sections for conveying alphanumeric status information. The required parameters are typically entered individually for each respective section. However, there are some parameters that do depend on the font image chosen for a section rather than the section itself. Since such parameters are the same for all sections using a particular font image, it would be redundant – even nonsensical – to repeat them over and over again for each section. Thus, for the sake of economy, we use a font definition to write them down once and then refer back to this section as needed:
[font1]
fontbitmap=num_chars3.tga
framewidth=5
frameheight=8
fontbitmapchars=0 123456789KMGT.?
In this section, font1 is the name of the font. This will come into play later on when it’s used to assign that font to different text sections.
The fontbitmap is the bitmap containing the font image. For this tutorial, we chose a font that is part of the cFosSpeed “Numerical” skin and can either be found in the default_skin subdirectory of your cFosSpeed installation (e.g., C:Program FilescFosSpeeddefault_skin) or downloaded from here(unzip).

It contains a small frame for every character listed after fontbitmapchars – aligned from top to bottom.
Each frame is as wide and high as defined under framewidth and frameheight, respectively.
Note that the space (i.e., the “blank” character) should not be put at the beginning or end of the character list, as the program would not recognize it there.
And don’t worry about the “?” not being properly displayed – this is just a dummy we’ll later use to format text output.
There are also a lot of other advanced text definition methods available on our skin definition reference page.
The animation method
Now, we are ready to add the first graphical disp section to our skin. Let’s start with an animation. This method uses an image consisting of multiple frames, where the value of the assigned parameter determines which frame is being displayed at any given time. This new section will indicate incoming data traffic by moving a bullet each time a packet is received. For this purpose, we’ll use the rx_bullet.tga(unzip) image from the cFosSpeed “Liquid Crystal” skin:
[disp1]
value=rx_data_cnt
method=animation
rect=44,41,55,59
bitmap=rx_bullet.tga
mod=14
min=0
max=13
frames=14
The bitmap contains 14 frames to comprise a complete up-and-down cycle that can be run indefinitely. Because the rx_data_cnt parameter is a simple counter (meaning it will increase continuously while cFosSpeed is running), we’ll need to perform a mod(ulo) calculation to keep the value within the range of min and max.
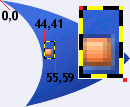
Positioning the motion is done by setting rect to the coordinates of the frame’s upper left corner and to those of a pixel just right of and below the frame’s lower right corner (both shown bright red in the magnified part of the sample image).
If we want a similar display for outgoing packets, this can be accomplished simply enough by copying this section and changing the disp name along with the value and rect entries:
[disp2]
value=tx_data_cnt
method=animation
rect=44,58,55,76
bitmap=rx_bullet.tga
mod=14
min=0
max=13
frames=14
What we have now are two displays representing two different parameters but still looking the same. We can improve on this design by making use of the transform key. One of the most powerful assets the skin definition language has to offer, this key permits mapping one color range to another (the correct notation for each range is Hue, Saturation, Value). Thus, source and destination range would have to be combined into one comma-separated list like this: Range1_Hue_Start, Range1_Sat_Start , Range1_Val_Start, Range1_Hue_End, Range1_Sat_End , Range1_Val_End, Range2_Hue_Start, Range2_Sat_Start , Range2_Val_Start, Range2_Hue_End, Range2_Sat_End , Range2_Val_End.
So, adding
transform1=15,0,0,40,255,255,100,0,0,120,230,210
to the parameters above would transform the color from orange to green, while also reducing saturation and brightness.![]()
The history method

For displaying incoming connection speed (rx_speed) as a bar graph, we’ll need another animation. Since it contains a 26-frame animation, the rx_bar.tga(unzip) image from the cFosSpeed “Liquid Crystal” skin lends itself particularly well to this.
Keep in mind though that the parameter here may change very rapidly, which could cause the animation to behave slightly erratically. So, we’ll have to smooth things out a bit. This can be accomplished with the history method. Not only does it offer a number of ways for displaying the progression of a value (consult our skin definition reference for a more detailed description), but it can also be used to calculate and display the arithmetic mean of the values a parameter assumes over any given time period.
[disp3]
value=rx_speed
method=history updatetime=240
historysize=1
hdisp1=rx_speed_disp
You may have noticed there is no bitmap but a hdisp1 entry instead. This is because the history method can handle multiple display sections for rendering value progression. These are defined as hdisp1,…,hdispN and can be used to create effects like the scrolling bar graphs of the moving fish-shaped packets of the cFosSpeed “Default” skin. For this bar graph, however, only one such section is needed. It should be given its own name though (to distinguish it from regular disp sections). Note that there is no need to enter a value here, because the value in the history section will be used for this section as well.
[rx_speed_disp]
method=animation
rect=54,41,108,59
bitmap=rx_bar.tga
min=0
max=100
frames=26
The min and max values define the range of the rx_speed parameter, which is best thought of as the percentage of available bandwidth.
Again, adding a similar display for the speed (tx_speed) of outgoing connections can be done simply by copying the previous sections, changing disp name, value and rect entries, and applying the same color transformation as for the tx_packet.
[disp4]
value=tx_speed
method=history
updatetime=240
historysize=1
hdisp1=tx_speed_disp
[tx_speed_disp]
method=animation
rect=54,58,108,76
bitmap=rx_bar.tga
min=0
max=100
frames=26
transform1=15,0,0,40,255,255,100,0,0,120,230,210
The text method
As great as a spiffy graphical display is, it often makes sense to have some more specific information displayed about a parameter’s current value as well. This is where the text method comes in handy (using the font definition we drew up earlier). Let’s say, for instance, we want to have incoming CPS shown as a numeric value. Then, we would have to add the following section:
[disp5]
value=rx_cps
method=text
font=font1
rect=50,32,80,40
style=d
flags=r
digits=6
decimals=1
unitchar=?
transform1=60,0,0,60,255,255,33,0,0,33,220,255
transform2=0,0,0,10,255,255,225,190,140,226,191,141

What this does is display the rx_cps parameter of cFosSpeed, which keeps track of the current CPS reception rate. By setting method to text and font to font1, we make sure the disp section uses the font we’ve already defined in step two.
The style is set to “d” (=decimal) with one digit after the comma. Setting the “r” flag will have the text right-aligned. Numeric value and measuring unit may take up to 6 digits. Seeing then how our font definition clearly specifies each digit to have a width of 5 and a height of 8 pixels, this would result in a rect of 30×8 pixels to be placed above the bar defined in [disp3].
Having the unitchar point to a “blank” character bitmap will prevent displayed numbers from shifting to the right when there is no measuring unit available. This happens when transfer rates fall outside available (T)era, (G)iga, (M)ega or (K)ilo byte ranges (e.g., when showing bytes only).
While transform1 shifts the color of the text from yellow to orange, transform2 decreases the intensity of the drop shadow, which is also part of the font bitmap.
For outgoing CPS, let’s now add the following:
[disp6]
value=tx_cps
method=text
font=font1
rect=50,77,80,85
style=d
flags=r
digits=6
decimals=1
unitchar=?
transform1=60,0,0,60,255,255,100,0,0,100,200,220
transform2=0,0,0,10,255,255,225,190,120,226,191,121
It should be obvious by now that this is basically the same as above – just with other rect coordinates. What’s also different here is that the transform1 key changes the color to green, while transform2 creates a slightly darker shadow.
The slider method
What we are going to do now is add a little LED-like display emitting a brief flash when changing states. Let’s just go with the led_green.bmp .
[disp7]
value=latency
method=slider
rect=111,50,117,56
bitmap=led_green.bmp
scale=2
stepsize=1
frames=3
min=0
max=2
updatetime=200
transform1=170,0,0,205,255,255,224,0,0,225,255,150
transform2=0,0,0,10,255,255,225,190,140,226,191,141
This section displays the value of the latency parameter (see our skin definition reference page), which can either be 0 (low latency is off) or 1 (low latency is on). With scale set to 2, the original parameter is projected onto a range from 0 to 2. In combination with stepsize, frames, min and max, this will have the animation run through all of its three frames each time the original value changes from 0 to 1. Animation speed is controlled by the value entered for updatetime, which determines the time each frame is shown in milliseconds.
Color transformations are used here to correct some minor glitches in the original bitmap’s shadow colors.
The activearea method
An activearea acts as a switch that can be put to a number of uses (see the skin definition reference page). It can, for instance, be used to start a program, open a URL, or toggle other disp sections’ visibility. And this is exactly what we’re going for here.

Let’s use the switch.tga(unzip) from the cFosSpeed “Default” skin, as it comes with “inactive”, “clicked” and “mouseover” states already in place.
[disp8]
method=activearea
bitmap=switch.tga
rect=110,58,119,65
action=toggle
target=disp7
blend_time=250
To have this section toggle the visibility of another, we first need to set action to “toggle” and target to the name of the section we want to control. Having the activearea fade in and out, as the mouse cursor enters or leaves it, can be done simply by assigning a value to blend_time (in milliseconds).
The motion method
A motion is an animation that is being played for as long as the assigned value stays within a certain range. Let’s use tcp3.tga from the cFosSpeed “Liquid Crystal” skin for displaying active TCP connections.
[disp9]
value=tcp_cnt
method=motion
bitmap=tcp3.tga
rect=30,13,46,30
min=1
idleframe=1
transform1=225,0,0,230,255,255,10,0,0,15,255,255
What this does is use the tcp_cnt parameter of cFosSpeed, which tracks the number of current TCP connections, while setting the min value to “1.” In other words, it will become active whenever one or more TCP connections are open.
The bitmap contains two frames. The first is completely transparent (i.e., filled with transparentcolor). This frame serves as the idleframe, meaning it will be displayed when the tcp_cnt is “0” and thus falls outside the range between min and max. Note that for what we’re trying to accomplish in this step, we can skip defining max altogether, because there is really no need to specify an upper limit here.
By contrast, the second frame is the image that will be shown if the tcp_cnt is “1” or more.
To make sure the motion stands out nicely from the background, we use transform1 to change its color from blue to red. And for providing precise numeric information, we also add a small text section displaying the number of active TCP connections.
[disp10]
value=tcp_cnt
method=text
font=font1
rect=46,21,61,29
style=n
digits=3
flags=br
transform1=50,0,0,70,255,255,50,0,0,70,230,220
transform2=0,0,0,10,255,255,225,190,140,226,191,141
Now, let’s do something a little more ambitious by adding the following motion:
[disp11]
value=ping_time
method=motion
bitmap=connect.bmp
rect=35,87,48,99
min=1
idleframe=1
updatetime=120
pause=2000
transform1=205,0,0,212,255,255,225,0,0,227,255,220
transform2=0,0,0,200,255,255,0,0,0,200,200,200
This one (connect.bmp ) contains seven rather than just two frames. Again, the first is a fully transparent idleframe.
The other frames compose an animation that is being played continuously while ping_time stays above zero. To control animation speed, updatetime is set to 120 ms. What we’ve also done is add a pause of 2,000 ms after each time the animation has run through (i.e., after its last frame finished playing).
Transformations are again used here to handle some problems with the original bitmap’s shadow colors.
For conveying accurate numeric values, we’ll again need a brief text section like the one below:
[disp12]
value=ping_time
method=text
font=font1
rect=50,87,65,95
style=n
digits=3
flags=br
transform1=50,0,0,70,255,255,200,0,0,201,64,255
transform2=0,0,0,10,255,255,225,190,120,226,191,121
Note that both text sections contain a “b” flag. What this does is make those sections empty (and thus invisible) while their value is zero.
The fader method
Now that the display is complete, there’s only one thing left for us to do – see to it that elements still remaining visible even when the status window is not in the “open” state (cFosSpeed: the network port is closed) disappear from the display. This is where we can employ the fader method provided by cFosSpeed:
[disp13]
value=open
method=fader
min=0
max=1
min_alpha=0
max_alpha=255
blend_time=1000
target=disp1,disp2,disp5,disp6,disp7
This fader changes the alpha value of all sections listed under target depending on the state of the “open” parameter – with min and max delimiting the range that activates the fader.
Initial and final alpha values for the fading process are set by min_alpha and max_alpha, respectively, while blend_time determines the duration of the fading process.
So, we now have a totally empty background when the program starts and no network connections are active.
This is the end of our short tutorial on how to create a cFosSpeed skin. Still, there are lots of additional options available for each method to further adapt your skin to your own individual needs and aesthetic preferences. Much more information on this is available on the skin definition reference page.
Have fun designing your own skins! 🙂
Tech Guide
Filter Expressions
Overview
cFosSpeed supports a number of different traffic classes set to different priorities. In effect, this means packets in classes with a higher priority are sent out prior to packets from classes with lower priority – even if low-priority packets arrived before high-priority packets in their respective class queues.
That way, cFosSpeed can prioritize specific packets permitting them to take the “fast lane” and zip past “normal” traffic. This priority system can be modified and expanded by the user with what we call “filter expressions.” These can be used to filter out packets and assign them to a desired traffic class.
Filter expressions consist of a series of “filter rules” that all need to be true for the entire expression to be true. If the entire expression is true, the packet is put into the corresponding class queue.
A list of filter expressions does allow you to filter for several different packets. This list is checked from top to bottom; the first filter expression found to be true (i.e., consisting only of true filter rules) is employed, ending the list traversal.
Packets not matching any particular filter expression are automatically assigned to the “default” class, which is a built-in class with priority 0.
A silly and simple example
A sample list of filter expressions is given below (the output looks like the “spd filter” output described later in this overview). Note that this sample is provided for illustration purposes only; it has no other use.
     0  -p icmp -c fast
     1  -tcp-sport 1234 -tcp-dport 5678 -c special
This would mean that if a packet is of IP protocol “icmp”, it would be assigned to “fast” class, ending traversal of the list.
If a packet does not match the first expression, then it will be checked for the second expression. In this case, the latter consists of two rules, which must both be true for the entire expression to be true (a boolean AND).
The “-tcp-sport” entry checks the TCP source port number. Accordingly, for this rule to be true, the packet must have IP protocol TCP and the TCP source port must be 1234.
Then, there is a second rule, which is true if (again) it’s a TCP packet and the TCP destination port is 5678.
Thus, all TCP traffic transmitted from port 1234 to port 5678 would be assigned to “special” class (which doesn’t exist by default).
If neither of the two rules apply to the packet (which should happen fairly often), it is put into “default” class instead.
Filter rules reference
Now let’s go into more detail.
Each rule can be negated by preceding it with a ‘!’ (exclamation mark) or by putting the ‘!’ in between the option name and value (if such a value exists). So it has to be “!-f”, but you could also use “!-p icmp” or “-p !icmp”.
Underlying most rules are one or more implicit assumptions; for instance, -tcp-length assumes it’s a TCP packet after all. These assumptions are listed with each rule. If a packet does not match the assumptions, the rule is false. Note that a rule with a non-matching implicit assumtion is false even if it is negated (by using ‘!’).
That is, a !-tcp-length 0 rule matches TCP packets of any length other than zero, but does not match any non-TCP packet.
If you need to specify a number, you can enter the number either in decimal (just type it in as is) or hexadecimal (prefix it with “0x”) format. For example, 16 and 0x10 both denote decimal number 16.
For some rules, a range of values can be entered. Allowable value ranges are:
- num
- like “99”.
A single number that must be matched exactly. As usual, the number can be entered either in decimal or hex format. - from:to
- like “42:99”.
Range of integers starting and including “from”, while also including and ending with “to”. If “from” is higher than “to”, the two values are exchanged. - :to
- like “:99”.
Short for “0:to”; in this example, short for “0:99”. - from:
- like “42:”.
Short for “from:0xffffffff”.
What’s more, a list of ranges can be entered for some rules. That is simply a concatenation of several ranges, separated by commas (,). For example, “1:2,3:4” is just another way of writing “1:4”. There must be no space around the comma.
Basic rules
- -tx
Transmit. True if the packet is sent. There is no implied assuption with this rule.
We maintain separate lists of filters for both transmit and receive. By using this rule you specify that a filter is only to be put on the transmit list. Since this can’t change in session, the rule is not re-evaluated each time a packet comes in; we call it a “cheap rule”.
- -rx
Receive. True if the packet is received. There is no implied assuption with this rule.
Comments of “-tx” rule apply analogously.
- -wan
- Packet is transmitted on a WAN port (i.e., on NDISWANIP device) in contrast to LAN port. Is always true for cFos. There is no implied assuption with this rule. This rule is “cheap”, too.
- -bridged
- Packet is transmitted on a LAN port and your modem works as a bridge, not as a router.
That is, the IP subnet is not your own, but your provider’s. There is no implied assuption with this rule. This rule is “cheap” only on a WAN port, since this is always considered bridged. - -eth
The port operates with Ethernet framing.
This is always true for cFosSpeed and always false for cFos. This rule is “cheap” and has no implied assumption.
- -ethp protocols
Ethernet protocol number.
This rule has the implied assumption that Ethernet framing is used, i.e., it is always false for cFos.
You can specify a list of ranges for “protocols”. Protocol numbers may be written in decimal or hex.
Some protocol numbers are:
- 0x800
- IP, Internet Protocol version 4
- 0x806
- ARP, Address Resolution Protocol
- 0x86dd
- IP, Internet Protocol version 6
For a more extensive list of protocol numbers see www.iana.org/assignments/ethernet-numbers.
- -ppp
The port operates with PPP framing.
This is always true for cFos and always false for cFosSpeed. This rule is “cheap” and has no implied assumption.
Details on PPP can be found in RFC 1661 (The Point-to-Point Protocol), www.ietf.org/rfc/rfc1661.txt.
- -pppp protocols
PPP protocol number.
This rule has the implied assumption that PPP framing is used, i.e., it is always false for cFosSpeed.
You can specify a list of ranges for “protocols”. Protocol numbers may be written in decimal or hex.
Some protocol numbers are:
- 0x21
- IP, Internet Protocol version 4
- 0x2d
- Van Jacobson Compressed TCP/IP
- 0x2f
- Van Jacobson Uncompressed TCP/IP
- 0x57
- IPv6, Internet Protocol version 6
- 0x8021
- Internet Protocol Control Protocol
- 0x8057
- IPv6 Control Protocol
- 0xc021
- Link Control Protocol
For a bigger list of protocol numbers see www.iana.org/assignments/ppp-numbers.
- -ipv4
- IP version 4. True if the packet is IPv4 and basically well-formed.
- -ipv6
- IP version 6. True if the packet is IPv6 and basically well-formed.
- -mp-header
The packet has a Multilink-PPP header.
This rule has the implied assumption that PPP framing is used, i.e., it is always false for cFosSpeed.
Details on PPP Multilink can be found in RFC 1990 (The PPP Multilink Protocol), www.ietf.org/rfc/rfc1990.txt.
- -mp-begin
The packet has the (B)eginning fragment bit set in the Multilink header.
This rule has the implied assumption that the packet has a Multilink PPP header, i.e., the rule is always false for cFosSpeed.
- -mp-end
The packet has the (E)nding fragment bit set in the Multilink header.
This rule has the implied assumption that the packet has a Multilink PPP header, i.e., the rule is always false for cFosSpeed.
- -mp-frag
The packet has in its Multilink header either no (B)eginning fragment bit set, or (E)nding fragment bit set, or both.
This rule has the implied assumption that the packet has a Multilink PPP header, i.e., the rule is always false for cFosSpeed.
- -rand prob chance
Pseudo-random number.
The rule returns true if a pseudo-random number between 1 and “prob” (borders included) is <= “chance”. “prob” must be between 1 and 2^32-1, “chance” can even be 0.
The pseudo-random numbers are generated by a comparatively poor generator (LCM style). It will still look “random” enough for packet-loss tests.
- Example: This rule will be true in 5% of all cases (statistically):
- -rand 100 5
IP header filter rules
Details on the IP v4 header can be found in RFC 791 (Internet Protocol), www.ietf.org/rfc/rfc0791.txt and details on the IPv6 header can be found in RFC 2460 (Internet Protocol, Version 6) www.ietf.org/rfc/rfc2460.txt.
IP header filter rules apply only to IP packets with a correct header and checksum (IPv4 only, IPv6 has no header checksum). These rules work on any IP packet, fragment or not.
- -s address-list
Source IP address.
There are several ways to specify “address-list”:
- adr
- like 1.2.3.4
or 2001:0db8:0000:0000:0000:ff00:0042:8329
or [2001:db8::ff00:42:8329]
This rule matches exactly one address with no wildcarding possible. - adr/netmask
- like 1.2.3.0/255.255.255.0
This can be used to specify an “IP subnet”. The match works as follows: If the address that is to be tested AND the “netmask” are equal to “adr”, then there is a match, otherwise not. This works just like IP routing rules. - adr/bits
- like 1.2.3.0/24
or 2001:0db8::/64
This is an alternative form of the adr/netmask approach above. Here, “bits” refer to the number of “1” bits, starting at the left of a 32-bit (IPv4) resp. 128-bit (IPv6) number. Thus, for IPv4 “/24” is 24 1-bits and eight 0-bits. In the regular format separated by dots, this would come out as 255.255.255.0 (since 255 is 11111111 in binary code). - adr,adr…
- like 1.2.3.0/24,4.5.6.7,8.9.0.0/255.255.0.0
or 2001:0db8::/64,[fe80::1],8.9.0.0/16
You can make a list of any of the above used notations and mix IPv4 and IPv6. Don’t leave any spaces and separate the items with a comma (‘,’).
- -d address-list
- Destination IP address, where “address-list” has the same format as explained for the -s filter.
- -l address-list
- Local IP address, where “address-list” has the same format as explained for the -s filter.
The local address is the source address of a sent packet and the destination address of a received packet. - -r address-list
- Remote IP address, where “address-list” has the same format as explained for the -s filter.
The remote address is the destination address of a sent packet and the source address of a received packet. - -p protocol
IP protocol, where “protocol” is either a decimal or hex number or one of the following hard-coded names:
- ICMP
- protocol number 1
- HOPOPT
- protocol number 0
- IGMP
- protocol number 2
- TCP
- protocol number 6
- UDP
- protocol number 17
- IPV6
- protocol number 41
- IPV6-ROUTE
- protocol number 43
- IPV6-FRAG
- protocol number 44
- GRE
- protocol number 47
- ESP
- protocol number 50
- AH
- protocol number 51
- ICMPv6
- protocol number 58
- IPV6-NONXT
- protocol number 59
- IPV6-OPTS
- protocol number 60
- MOBILITY
- protocol number 135
- -f
- IP datagram is not the first fragment (that is, the IP header field “fragmentation offset” is not equal to 0).
- -mf
- “More Fragments” bit in IP header set.
- -fragment
- Datagram is not a complete IP frame, but a fragment. That is, either “fragmentation offset” is not 0 or the “More Fragments” bit is set.
- -df
- “Don’t Fragment” bit in IP header set (IPv4 only, there is no such bit under IPv6).
- -tos type-of-service
Type of service.
“type-of-service” can be any decimal or hex number between 0 and 255. Note that TOS is neither used nor supported much any more. For details, see RFC 1349 (Type of Service, www.ietf.org/rfc/rfc1349.txt). See -dscp option below for a modern way of interpreting the TOS field. www.iana.org/assignments/ip-parameters lists common TOS values. Under IPv6 this rule refers to the “traffic class” field of the header.
- -dscp dscp-value
Differentialed Services Coding Point, an alternate way of interpreting the TOS field.
“dscp-value” can be a value between 0 and 63 or a range of such values. For details, see RFC 2474 (Differentiated Services, www.ietf.org/rfc/rfc2474.txt). See -tos option above for the traditional (now almost extinct) way of interpreting the TOS field.
- -ttl ttl-value
IP header field “Time to live”.
“ttl-value” can be a range of numbers between 0 and 255. See “range” below on how to specify a range.
- -length value
Length of the IP datagram or fragment, including the header.
You can specify a range for “value”, which is the length of the packet about to be send. With a fragment, it’s not the length of the reassembled datagram but the length of the individual fragment.
- -data-length value
Length of the data portion of an IP datagram, which is the length of the (reassembled) datagram minus the IP header length.
For IPv6, this does not include the HOPOPT, ROUTE, DESTOPTS, MOBILITY and FRAG extension headers. They are not considered part of the “data”.
You can also specify a range for “value”.- -ihl value
- Length of the IP v4 header, with values anywhere from 20 to 60 (IPv4 only). Again, you can specify a range for “value”.
- -s-mynet
- The source address is in your subnet.
- -d-mynet
- The destination address is in your subnet.
- -l-mynet
- The local address is in your subnet.
- -r-mynet
- The remote address is in your subnet.
- -s-bcast
The source address is the subnet directed broadcast address (IPv4 only, there is no such concept under IPv6). I.e., if your subnet is 192.168.1.0 and has subnet mask 255.255.255.0, this rule will match on source address 192.168.1.255.
Note that this filter will not match the limited broadcast address 255.255.255.255.
- -d-bcast
- The destination address is the subnet directed broadcast address. See -s-bcast for more info.
- -l-bcast
- The local address is the subnet directed broadcast address. See -s-bcast for more info.
- -r-bcast
- The remote address is the subnet directed broadcast address. See -s-bcast for more info.
- -s-iplist list
- The source address is listed in the iplist named ‘list’. For more on iplist’s see “IP-range lists”.
- -d-iplist list
- The destination address is listed in the iplist named ‘list’. For more on iplist’s see “IP-range lists”.
- -l-iplist list
- The local address is listed in the iplist named ‘list’. For more on iplist’s see “IP-range lists”.
- -r-iplist list
- The remote address is listed in the iplist named ‘list’. For more on iplist’s see “IP-range lists”.
- -ip-opt list
- Packet has at least one of the listed IP-options in its header (IPv4 only). The options can be set in decimal or hex and are separated with a comma, like “131,137”. A list of IP-options is here: www.iana.org/assignments/ip-parameters.
UDP header filter rules
Details on the UDP header can be found in RFC 768 (User Datagram Protocol, www.ietf.org/rfc/rfc0768.txt). Note that each UDP header is prefixed by an IP (v4 or v6) header, since UDP needs IP for transmission.
UDP header filter rules apply only to packets with a correct IP header, protocol set to UDP, and correct UDP header checksum. In addition, they must either be unfragmented or the last fragment that completes the reassembled datagram.
- -udp-sport ports
UDP source-port number, or a range of several such ports, or a list of ranges (see above on how to specify them).
A UDP connection is identified by the following four values: source IP address, source UDP port number, destination IP address, and destination UDP port number. So, whenever you send a UDP packet from A to B, the packet always contains those four values.
Since these filter rules are only used for outgoing data packets, “source port” always refers to the port number of the connection on your (local) side.
- -udp-dport ports
UDP destination-port number, or a range of several such ports, or a list of ranges (see above on how to specify them).
See -udp-sport for more on port numbers.
Since these filter rules are only used for outgoing data packets, “destination port” always refers to the port number of the connection on the remote side.
- -udp-lport ports
Local UDP port number, or a range of several such ports, or a list of ranges (see above on how to specify them).
See -udp-sport for more on port numbers.
- -udp-lport ports
Remote UDP port number, or a range of several such ports, or a list of ranges (see above on how to specify them).
See -udp-sport for more on port numbers.
- -udp-length value
Length of the UDP data portion including the UDP header as mentioned in the UDP header.
Since the UDP header is as well counted in “value”, even the smallest UDP packet possible would have a length of 8. Note that this is different from the concept of -tcp-length (see below).
- -udp-prog programnames
Name of the program that sent the datagram.
Note: This only works starting with Windows XP and it only works if the program is running on the same machine as cFosSpeed is (that is, it does not work if cFosSpeed is used on a router and the program is running on a client).
“programnames” can be:
- program name
- Must be a full file name with extension, but no path (like ftp.exe). Case does not matter. If the program name includes a space, put it in quotes (like “the best.exe”).
- @section name
- The name of a section in settings.ini that contains names of programs (like @lowprogs with a [lowprogs] section somewhere is settings.ini).
- @file/section name
- The name of a section in “file”. “file” can be a fully specified pathname or “user.ini” to specify user.ini in cFosSpeed directory. The handling is otherwise like that of “@section” above.
- list
- A comma delimited form of the above. There must be no spaces before or after the commas. Example: ftp.exe,telnet.exe,”the best.exe”,@lowprogs
See “Managing program names” later on how to manage keys in sections.
TCP header filter rules
Details on the TCP header can be found in RFC 793 (Transmission Control Protocol, www.ietf.org/rfc/rfc0793.txt). Note that each TCP header is prefixed by an IP (v4 or v6) header, since TCP needs IP for transmission.
TCP header filter rules apply only to packets with a correct IP header, and protocol set to TCP. They must be either unfragmented or the last fragment that completes the reassembled datagram.
- -tcp-sport ports
TCP source port number, or a range of them, or a list of ranges (see above on how to specify them).
A TCP connection is identified by the following four values: source IP address, source TCP port number, destination IP address, and destination TCP port number. So, whenever you send a TCP packet from A to B, the packet always contains those four values.
Since these filter rules are only used for outgoing data packets, “source port” always refers to the port number of the connection on your (local) side.
- -tcp-dport ports
TCP destination port number, or a range of several such ports, or a list of ranges (see above on how to specify them).
See -tcp-sport for more on port numbers.
Since these filter rules are only used for outgoing data packets, “destination port” always refers to the port number of the connection on the remote side.
- -tcp-lport ports
Local TCP port number, or a range of several such ports, or a list of ranges (see above on how to specify them).
See -tcp-sport for more on port numbers.
- -tcp-rport ports
Remote TCP port number, or a range of several such ports, or a list of ranges (see above on how to specify them).
See -tcp-sport for more on port numbers.
- -tcp-length value
Length of the TCP data portion, also know as the “TCP segment.”
In contrast to the concept of -udp-length or -icmp-length, this does not include TCP header length, meaning that the smallest TCP packet possible has a -tcp-length of 0.
- -thl value
- TCP header length, with values anywhere from 20 to 60. You can also specify a range for “value”.
- -tcp-flags mask result
Check for the presence of certain flags in the TCP header.
The value of the TCP flags in the header are ANDed with “mask” and the packet is matched if that equals “result”. Both “mask” and “result” must be specified as a list of flags. Recognizable flags are: FIN, SYN, RST, PSH, ACK, and URG. ALL stands for all six of them and NONE for none.
- Examples:
- -tcp-flags SYN SYN
- means: if the SYN bit is set (regardless of the other bits), then the rule matches.
- -tcp-flags ALL SYN
- means: if only the SYN bit is set and all others are zero, then the rule is a match.
- -tcp-flags SYN,ACK ACK
- means: if SYN is not set and ACK is set, we have a match.
- -tcp-flags URG,PSH NONE
- means: if neither URG nor PSH are set, it’s a match.
- -syn
- Synonymous for “-tcp-flags SYN,RST,ACK SYN”, meaning it only matches the first packet in the TCP three-way-handshake.
- -tcp-prog programnames
Name of the program that sent the segment.
Note: This only works starting with Windows XP and it only works if the program is running on the same machine as cFosSpeed is (that is, it does not work if cFosSpeed is used on a router and the program is running on a client).
To learn how to specify “programnames” see -udp-prog rule.
- -tcp-connections range
- Number of total TCP connections is in “range”. Half-open connections are counted as well. The number of connections doesn’t need to exactly match either side’s count, since cFosSpeed uses its own TCP connection tracking.
- -tcp-opt list
- Packet has at least one of the listed options in its TCP header. The comments of “-ip-opt” apply. A list of TCP-options is here: www.iana.org/assignments/tcp-parameters.
- -tcp-session value
Packet is part of a TCP connection that is in state “value”. Possible states are:
- 0
- A TCB has been created
- 1
- At least one side has sent a SYN
- 2
- Both sides have sent SYNs
- 3
- Both sides have sent SYNs that have been ACKed: connection established
- 4
- At least one side has sent a FIN
- 5
- Both sides have sent FINs
- 6
- Both sides have sent FINs that have been ACKed: connection closed
- 7
- At least one side has sent a RST
- 8
- At least one side has sent a FIN that has been ACKed: connection half-closed
- -tcp-session-dadr value
There is a TCP connection in state “value” between the same source and destination address as this packet.
Possible states are the same as listed under “-tcp-session”.
This rule only implies that the packet is a valid IP packet, but not necessarily TCP.
- -tcp-initiated direction
Check which side initiated the TCP connection.
“tx” means that the first SYN was sent from local, “rx” that the first SYN was received from the net.
- -tcp-seq range
TCP sequence number (subtracted by the initial sequence number) on the particular TCP connection.
TCP keeps your sent data in sequence. So even if packets get lost, corrupted or out of order on the way from source to destination host, TCP will get it right for you (yeah!). To achieve this, TCP packets have a sequence number, so TCP knows the correct order of them. This sequence number is increased with every byte that is transmitted on the connection.
The filter rule lets you use the sequence number as a means of how many bytes have been transmitted on the connection.
“range” can be a range of numbers.
I.e. “-tcp-seq :500” will only match TCP packets that cover the first 501 bytes in their connection (0 to 500, inclusive).
- -tcp-cnt range
TCP packet counter for this particular connection.
This counter is increased by one with each packet sent.
UDP and TCP combo rules
Sometimes you have to specify the same rules for UDP and TCP ports. This can be done by the following combo rules.
The assumptions for UDP and TCP packets each still apply.
- -sport ports
- If it’s a UDP packet, synonymous for “-udp-sport ports”; if it’s a TCP packet, synonymous for “-tcp-sport ports”. Otherwise, there is no match.
- -dport ports
- If it’s a UDP packet, synonymous for “-udp-dport ports”; if it’s a TCP packet, synonymous for “-tcp-dport ports”. Otherwise, there is no match.
- -lport ports
- If it’s a UDP packet, synonymous for “-udp-lport ports”; if it’s a TCP packet, synonymous for “-tcp-lport ports”. Otherwise, there is no match.
- -rport ports
- If it’s a UDP packet, synonymous for “-udp-rport ports”; if it’s a TCP packet, synonymous for “-tcp-rport ports”. Otherwise, there is no match.
- -prog programnames
Name of the program that sent the segment.
Note: This only works starting with Windows XP AND it only works if the program is running on the same machine as cFosSpeed is (that is, it does not work if cFosSpeed is used on a router and the program is running on a client).
To learn how to specify “programnames” see -udp-prog rule.
- -l7-prot protnames
Check if packet belongs to a TCP connection resp. UDP pseudo-connection with a certain layer-7 protocol. A list of supported layer-7 protocols is in settings.ini, sections highprots, normalprots, lowprots and lowestprots.
For certain protocols (like IRC, Telnet, file sharing, etc.) there is a further check built in: if the rule is about to match and the class the packet will be queued into is higher than default, then the connection must not be in “bulk mode”. cFosSpeed uses statistics to estimate if the connection is is bulk mode, i.e. if data is being constantly sent in large amounts. If the connection is assumed to be in bulk mode, then the -l7-prot rule does not match. This is to prevent protocols that can be used for both bulk and interactive transfer to clog the high classes if the protocol is in bulk mode. This auto-bulk-detection can be switched off by typing the command “spd gset bulk_detect 0”.
This rule has the implied assumption that layer-7 detection is on, i.e. that global variable l7_detect is 1.
ICMP filter rules
Details on the ICMP for IPv4 header can be found in RFC 792 (Internet Control Message Protocol, www.ietf.org/rfc/rfc0792.txt) and details on the ICMPv6 header can be found in RFC 4443 (Internet Control Message Protocol (ICMPv6) for IPv6, www.ietf.org/rfc/rfc4443.txt). Note that each ICMP header is prefixed by an IP (v4 or v6) header, since ICMP needs IP for transmission.
ICMP header filter rules apply only to packets with a correct IP header, protocol set to ICMP or ICMPv6, and correct ICMP checksum. Such packets must also be either unfragmented or the last fragment that completes the unfragmented datagram.
- -icmp-type type – or – -icmp-type type/code
Check for ICMP v4 type and code (if specified).
Both “type” and “code” can be any number between 0 and 255. If you specify no “/” and no code, it will match only on the “type” value. Otherwise, the “code” value must match as well.
You can specify a list of type or type/code as well. Use commas to separate the entries in the list.
- -icmpv6-type type – or – -icmpv6-type type/code
Check for ICMPv6 type and code (if specified).
The syntax and semantics for this rule are like -icmp-type.
- -icmp-length value
Length of the ICMP data portion, including the ICMP header. This is the IP v4 or v6 datagram length minus the IP header length.
Again, “value” can also be a range of values.
VLAN rules
Details on VLAN can be found in IEEE 802.1Q (e.g. on Wikipedia).
The VLAN rules (except -is-vlan) only apply if the packet has a VLAN header at all.
- -is-vlan
- Matches if a packet has a VLAN header.
- -vlan-prio range
- VLAN packets have a 3 bit priority field (i.e. the priority is 0-7). If this VLAN priority is in “range”, this rules matches.
- -vlan-id range
- VLAN packets also have a 12 bit ID field (i.e. 0-0xfff or 0-4095). If the ID is in “range”, this rule matches.
Standard rules
cFosSpeed ships with five traffic classes, called “highest”, “higher”, “high”, “low” and “lowest”. To assign traffic to these classes, we have combined sensible rules into mega-rules.
If you remove the standard rules, you will most likely disable or damage the traffic-shaping operation of cFosSpeed. So, it’s an excellent idea to leave them in place and just add your own rules below these rules!
- -highest
This feeds packets to the “highest” class.
All cFosSpeed pings are matched by this rule.
- -higher
This feeds packets to the “higher” class.
All TCP ACKs are matched by this rule. ACK is an empty TCP packet with no RST or FIN set.
- -high
This feeds packets to the “high” class.
This rule matched all (by default) prioritized traffic: ICMP, DNS and NTP (on UPD), FTP command, POP, IMAP, Telnet, SSH, HTTP, HTTPS (on TCP).
- -low
- This feeds packets to the “low” class.
Traffic Shaping and other Internet tuning methods
Broadband users in particular want to get the absolute max out of their connection. But even narrowband users may benefit from Internet tuning on their low-speed connections.
What tuning methods are there?
Registry-Tweaks
An entire line of so-called “registry-tweak” programs has sprung up based on the assumption that changing various Internet protocol parameters may boost data-transfer speed. In essence, what such programs do is simply change the values of certain parameters rather than have the user edit the corresponding registry entries manually. Typically, the following parameters are thus adjusted:
- MTU/MSS:
Transmission of each packet entails a certain packet overhead, which is always the same – regardless of what size the transmitted packet may be. Thus, sending out packets that are as large as possible would seem to be one probable way to cut back on overall overhead. For instance, a TCP/IP packet sent via DSL/PPPoE has an overhead of 48 bytes (i.e., almost 10 percent for a 500-byte packet). If no value for Maximum Transfer/Transmission Unit (MTU) is specified in the registry, TCP will determine packet size itself through a process called “Path MTU Discovery.” It will do so in such a manner that packets sent will always be of the largest size that can still be handled by all intervening transmission nodes. For DSL/PPPoE, maximum MTU is 1,492 bytes, which corresponds to an overhead of approximately 3 percent. This value really doesn’t need to be set, since Windows already maximizes it through Path MTU Discovery. MSS usually equals MTU-40. - TcpWindowSize:
This parameter controls the maximum number of bytes the remote TCP may send before an acknowledgment must be received. Lacking such acknowledgment, the sender is forced to wait, thus resulting in dramatic drops in transfer rate. Unless the user specifies otherwise, Windows determines the value for this parameter based on packet size (12 * MSS). The greater the latency, the larger the TcpWindowSize needs to be to avoid having the sender wait. Thus, assuming a connection speed of 1,024 kbit/s and 150ms of ping time to server, TcpWindowSize must at least be 2,000 bytes. Should further delays occur, even that wouldn’t suffice anymore. This is why a lot of tuning programs tend to jack TcpWindowSize up inordinately. The problem is that while running an upload, the upload competes with acknowledgments for available bandwidth, meaning the transfer rate will plummet nevertheless. Furthermore, huge TcpWindowSize does also increase latency, which can quickly turn VoIP or online gaming into an exercise in frustration. For instance, at a TcpWindowSize of 64k or higher, latency will rise to more than 400ms, which is absolutely unacceptable for VoIP. - TTL:
This value indicates how often any given packet may be passed on from node to node until it reaches its destination. Changing this value has no appreciable effect whatsoever on transfer speed. Can you spell “placebo software?”
Traffic Shaping
So, in a nutshell, some registry tweaks may sometimes yield greater speed (though often at the cost of significantly higher latency).
Traffic Shaping is then the next logical step in improving data-transfer speed without sacrificing performance elsewhere. It works by sorting data packets according to importance prior to sending them, thereby ensuring all time-critical data are being sent out first. TCP acknowledgments, for example, are highly prioritized so that they are always received in time, which means download data can be transmitted without interruption.
However, the more data are transmitted simultaneously, the more data congestion will likely occur. Therefore, effective Traffic Shaping should ensure not too much data are being sent simultaneously, as this also tends to affect ping times and VoIP speech quality. The more protocols Traffic Shaping can distinguish, the more responsively a system will perform while multiple applications are being run on it at the same time. For instance, Traffic Shaping can be used to accelerate surfing speed by having the corresponding DNS requests prioritized. FTP command, Telnet, SSH and similar protocols can also be prioritized in this fashion.
Since Traffic Shaping boosts transfer rates by reducing latency, it does yield higher speed irrespective of how much bandwidth may be available. This is especially valuable seeing how latency problems during simultaneous use of multiple Internet connections cannot be compensated for by additional bandwidth.
ACK filtering
During each download, acknowledgments take up about 5 percent of the available download bandwidth in upstream direction. The problem here is that upstream bandwidth is much lower than downstream bandwidth for ADSL and broadband cable. This also means there may not be enough upload bandwidth left to achieve full download speed, not to mention that it is always desirable to have some upstream bandwidth available for other uses. For this reason, ACK filtering reduces the size of acknowledgment packets as much as possible without decreasing download rates. In this manner, the bandwidth needed for handling acknowledgments can often be cut in half.
Data compression
It is always nice to be able to compress user and/or protocol data. For Web servers, so-called “GZIP compression” lends itself particularly well to this. With it, the text on Web pages can be compressed to about half the original size prior to transmission. Leading Web browsers like the Internet Explorer or Mozilla Firefox do support GZIP compression. The Web server is also smart enough to send uncompressed data instead when dealing with old browsers that do not support GZIP. Therefore, there is to our knowledge no drawback to using GZIP. Unfortunately, it can only be activated by a Web server’s administrator.
Modems and ISDN make use of V.42bis and Stac data compression, respectively. Both reduce the amount of text data transmitted between dial-in node and modem or ISDN board by roughly one half. Thus, these compression methods could conceivably double transfer speed in both direction for types of data (like text) that can be compressed well. But because image files account for most of the data servers must transmit for today’s Web sites, our experience has generally been that this kind of compression makes very little difference. The same is true if a server is sending data already compressed in GZIP format.
In contrast, VJ compression (also known as IP-header compression) does not minimize the size of user data but only that of protocol data. Assuming a standard narrowband packet size of 576 bytes, this can effectively cut TCP/IP header size from 40 to 3 bytes, resulting in a reduction of packet overhead from approximately 7 to 0.5 percent. While this is of great interest for low-speed modem and ISDN connections, it is very rarely if ever used for broadband connections. DSL and cable providers would much rather sell their clients more bandwidth.
Download accelerator
Many servers permit downloads at no more than a predefined maximum download rate. The idea behind most download accelerators is to circumvent this by downloading a file in several segments at the same time through multiple connections to the same server. This does indeed often lead to higher download rates.
Web accelerator
The ability to use cell phones for wireless (yet typically very slow) Internet access has dramatically increased the demand for having Web-page data compressed prior to transmission. Such precompression might also be useful for modem or ISDN connections. Providers of Web accelerator software maintain their own servers with broadband connections to the Internet. These are needed to first load the desired data, compress it, and then send it through the bottleneck of the modem, ISDN or radio-network connection.
But due to the large image files involved, the gain thus yielded by conventional compression methods can only be marginal at best. This is why more and more Web accelerators have begun to manipulate image data as well. To make some headway there, images are usually reduced in color depth and resolution. Given the small size of their displays, this poses little if any problem with respect to cell phones. But on desktop computers it may well result in a clearly discernible loss in quality for desktop applications.
Installation of the respective browser add-on is required for using the services of a Web accelerator – as is in most cases payment of a monthly fee or surcharge. Using web accelerators does yield little appreciable gain in speed on broadband connections. Countervailing this is a possible increase in latency, since the Web accelerator is interposed between server and client.
Faster Connection
Switching to a rate plan that gives you higher connection speed is still the safest way to improve bandwidth and thus achieve better data transmission rates. This as such won´t improve ping times though. And neither will it prevent downloads from slowing dramatically, even stalling altogether, when data is being uploaded at the same time. That’s why it is ideal to combine any bandwidth upgrade with Traffic Shaping technology.
Brief Comparison of Tuning Methods:
| Tuning Methods | Pros | Cons | |
|---|---|---|---|
| Registry Tweaks | potential gain in speed may be available for free | high latency | |
| Traffic Shaping | higher speed lower ping times | – | |
| ACK Filter | higher speed | – | |
| Data compression | gain in speed (mostly for texts) | – | |
| Download-accelarator | potential gain in speed | – | |
| Web-accelarator | faster surfing speed | higher latency, reduced quality | |
| Faster Connection | faster speed | – | |
cFosSpeed offers both – Traffic Shaping and ACK-filtering. In addition, it automatically optimizes MTU and TcpWindowSize!
Links
TCP/IP-Tuning
@ heiseNetze (german)
RWIN Expansion
Benefits of activating “Automatic RWIN expansion”
See how cFosSpeed improves Internet Explorer downloads
See how cFosSpeed improves Mozilla Firefox downloads
See how cFosSpeed improves Cygwin SCP downloads
YouTube playlist with submissions of award winners
See how cFosSpeed improves Cygwin SCP downloads
Technical background
TCP Auto-Tuning measures the RTT of connections at the beginning and if data is sent. For connections with only received data and no data to send, this measurement can become inaccurate, so the resulting RWIN remains too small. You can easily verify this behavior with a fast Internet connection and high latency, for example a 50Mbit/s connection from Europe to America or a mobile broadband connection.
Results of cFosSpeed RWIN-Expansion-Award 2012
A lot of users don’t get the maximum speed available for their Internet connection. In many cases the TCP Auto-Tuning of Windows 7/ Windows Vista cannot use the full download speed. In other cases the downloading programs are not written for today’s high speed connections. cFosSpeed’s RWIN expansion now accelerates these downloads by dynamically expanding the receive window size of the TCP connection to a value suitable for the current connection. This leads to unexpected speed improvements!
For example, we could double the download speed with Internet Explorer and nearly triple the speed of mobile UMTS downloads.
To demonstrate these dramatic speed improvements, we (with the help of our users) compiled a list of scenarios in which the new cFosSpeed RWIN Expansion achieves these huge speed improvements.
Technical Reference
This reference is divided into several sub-pages:
- Traffic classes
- Filter expressions – Rules you can use to filter packets to traffic classes
- IP lists – Load large lists of IP addresses in Emule or Protowall/Peerguardian format
- Net_talk – Multiple cFosSpeed’s communicating in your LAN
- Miscellaneous information
- DATA.INI
That’s it.
Have fun shaping your traffic!
Great Voice-over-IP (VoIP) speech quality
Not only is minimal latency absolutely essential for Voice-over-IP, it is the single most important factor in improving speech quality.
Traffic Shaping technology does keep ping times low and transfer rates consistently high at the same time.
RTP detection integrated in cFos and cFosSpeed permits prioritizing VoIP and other live streams (like conference channels).
Its prioritization can be adjusted under Protocol or Program Settings. Should a particular live stream not be recognized, you can prioritize the respective program by name.
Please note that some programs (like VoIPBuster, IxChariot) only use RTP but not the corresponding RTCP connection. For these, you should deactivate strict RTP verification in the settings.
Dropouts During Download:
VoIP connections usually suffer from dropouts when downloads are simultaneously run at full speed. Thanks to their integrated RX shaping, cFos and cFosSpeed help avoid this problem by keeping ping times consistently low.
Please note that some programs (like VoIPBuster, IxChariot) only use RTP but not the corresponding RTCP connection. For these, you should deactivate strict RTP verification in the settings.
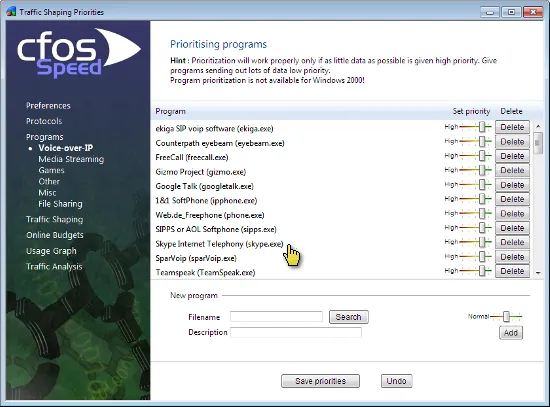
Skype:
Skype employs a proprietary encrypted protocol that cannot be detected by a Layer-7 analysis without considerable effort. To allow users to prioritize Skype nevertheless, we have entered it in our program list.
VoIP via Router Prioritization:
Some routers (like the Fritz!Box) are equipped with phone jacks. If a jack is used, all VoIP data will be transmitted directly to the Internet bypassing cFosSpeed entirely. Such routers may restrict the available bandwidth when a VoIP call is made causing a negative impact on Traffic Shaping performance. Therefore we recommend making VoIP calls from your computer, not the router, to allow cFosSpeed to detect and prioritize them.
Optimizing Connection Settings:
You can specify exactly what transfer medium you use under Connection Settings. The more information about a connection is available to cFos or cFosSpeed, the better ping times will be. Default is “Adaptive”. But if you were for instance using a DSL connection, you should select the appropriate DSL standard or protocol as your medium.
Favor Ping:
VoIP Software in use with cFosSpeed
- 1&1 SoftPhone
- Counterpath Bria
- Counterpath Eyebeam
- Counterpath X-lite Pro
- ekiga SIP voip software
- FreeCall
- Gizmo Project
- GlobalIP Ninja Lite
- Google Talk
- iPhone
- Ixia IxChariot
- SIPPS or AOL Softphone
- Skype Internet Telephony
- SparVoip
- Teamspeak
- Ventrilo
- VoipBuster
- VoipCheap
- Web.de Freephone
- WOIZE
- Xfire
- X-Lite
- X-PRO
- Yahoo Messenger
Measurements with IxChariot
We tested our software using IxChariot (a network performance testing tool provided by Ixia) to evaluate the benefits of cFosSpeed Traffic Shaping. For this purpose, we monitored the VoIP parameters with IxChariot while performing multiple uploads.
You can easily notice that without cFosSpeed normal VoIP communication is not possible during an upload, but it proceeds almost unaffected when using cFosSpeed.
In particular, you can see the MOS value (https://en.wikipedia.org/wiki/Mean_opinion_score) decreasing rapidly towards 1 after starting the upload. This means that the connection has become unusable for voice transfer. When using cFosSpeed the value doesn’t decrease – the speech transmission retains its high quality.
hrPing - High-precision ping utility
Why another Ping utility?
Many Ping utilities are already available, one is even released with Windows itself, called Ping. But hrPing has some advanced features other Pings have not.
In short:
- Graphical display of ping results
- Uses high resolution timers, so ping times are accurate to the usec
- Can ping as well with UDP packets or ICMP timestamp messages
- Times and handles ICMP error replies as well
- Can have multiple pings “in-flight”, no need to wait for a reply before sending the next ping
- Improved statistics
- Size sweep: Send increasing packet sizes
- Can show only a summary of results
- Is a Traceroute and a Pathping as well
You can do much more with hrPing than with Windows Ping.
More text, please.
Like every Ping, hrPing sends “ICMP Echo Request” packets to the remote computer and listens to the matching “Echo response” packets. What’s more, hrPing can send UDP packets and ICMP timestamp packets as well. Not all packet types pass all firewalls and networks equally easy. With hrPing you have the possibility to vary. (-M and -u switches)
What’s more, hrPing times the round trip delay in microseconds (1/1000 msec). This is usually done by using the Windows’ “Performance Counter” which has a resolution of some MHz. You can even ask hrPing to use the CPU’s “Time Stamp Counter” which is incremented with the CPU’s clock cycle. You can’t get any more accurate with standard PCs today!
The next thing Windows Ping can not do is send more than one ping packet at a time. Windows Ping always sends one packet, waits for the reply, then prints its output line, repeat.
hrPing sends out one ping packet every x milliseconds (you can adjust this time with the -s parameter) while listening for incoming replies and printing the output if there is any.
The reason why you should like this is easy: with broadband you often have a delay of some 40 msec, while the upstream bandwidth of the whole connection is some 500 kbytes/sec. So, with a “standard” ping packet of 60 bytes (IP header + ICMP header + ping payload) you can send thousands of packets before you get the first reply. If you want to test line conditions, throughput, etc. this “overlapped” way of sending is really helpful.
Plus, hrPing has much better statistics than Windows Ping. You get the round trip times for ICMP error message replies as well! This way you can e.g. monitor the delay of a TTL exceed. hrPing counts the replies and error messages separately, so the global statistics don’t mess up one another. Plus, for the statistically inclined, hrPing calculates the standard deviation as well, to show you how much the values “jiggle”. hrPing shows you the standard deviation of the timings as well as the average times.
hrPing displays the IP identification field of the replies and thus makes it possible to do “silent load measurements”; see german c’t magazine 23/2003, p. 212 for details. (-I switch)
When sending a lot of packets hrPing’s “Summary mode” comes in handy: it will suppress the printing of each reply on its own line, but instead print a summary for all replies so far and a summary for the last 10 seconds (time can be adjusted). This lets you keep a nice overall view. (-y switch)
Is there more? Yes: hrPing can send out pings with increasing sizes: the “Size Sweep” function, where after each send, the size is increased until it reaches a maximum, then reset. Plus, we do some math when processing the replies and estimate the line speed, if the data is conclusive enough. (-l and -L switches)
Ah, one more thing: hrPing is a traceroute (-r switch) and a pathping (-p switch) as well 🙂
There’s a lot more goodies hidden in hrPing, just use it and you will find out about small but useful features.
And this is how to use it:
hrPING [<options>] <host>
<host> may be the IP address or the hostname. In the latter case the name will be resolved to its address at the beginning of the ping loop.
There are a couple of options that let you specify the data you’re sending:
| -f | Set Don’t Fragment flag in packet. |
Set the “Don’t fragment” bit in the IP header of the PING packet. Default is not set.
| -i TTL | Time To Live. |
Set the “Time To Live” value in the IP header of the PING packet. Default is 255.
| -v TOS | Type Of Service. |
Set the “Type Of Service” bits in the IP header of the PING packet. Default is 0. It is possible that Windows erases or overwrites this field when sending the packet. Furthermore, TOS is deprecated nowadays. hrPing will use IP_HDRINCL option to set TOS.
| -l size | Send buffer size (ICMP payload size). |
How may bytes payload should be send? Remember that each packet is of the form: IP header (20 bytes) + ICMP header (8 bytes) + payload. You may only specify the payload size. Minimum is 0, maximum is 64k-1-20-8, i.e., 65507 bytes. Default is 32 bytes.This works for UDP mode as well, but not for ICMP timestamp mode. There the ICMP length is always 10 bytes.
| -l s1[:s2[:i]] | Size sweep: send buffer size from s1 to s2 step i |
With this syntax hrPing will start sending a payload of s1 bytes, increase the payload by i bytes for each send (if i was set, otherwise increment by 1) until s2 is reached or exceeded and then restart with s1 bytes. This switches the correlation calculation on that tries to see if there is a correlation between the size of the packet you send and the time it takes for a reply.
| -L size | Total IP datagram size (ICMP payload size + 28). |
Same as the above, only that this size here is the size for the total IP datagram.
| -L s1[:s2[:i]] | IP datagram size (payload size + 28, default 60) [with sweep] |
Analogue as above for -l s1[:s2[:i]]
| -M | Send ICMP timestamp requests |
This will send out ICMP timestamp requests and print ICMP timestamp replies. In the reply there is the send time off the other side in milliseconds, so it’s possible to distinguish between delay that was caused sending and delay that was caused when receiving. These numbers have only millisecond resolution. To synchronise clocks hrPing will calculate the clock offset from the first ICMP timestamp reply, assuming that half of the delay came from each direction.
| -u [port] | Send UDP packets (port 7 by default) |
You can send UDP packets as well. This causes UDP packets to be send to and from port port. Hopefully, the other side has no UDP port under that port number and will reply with a “port unreachable” message, which will be counted as a proper reply.
Options that allow you to specify how hrPing operates:
| -t | Ping the specified host until stopped. |
Loop forever. You can abort hrPING any time with CTRL-C or CTRL-Break. Unlike Windows PING, hrPING will still print the statistics gathered so far when you abort. CTRL-C waits for some time for replies still to come in before it aborts. If you are fed up with waiting, press Ctrl-C 5 times. Ctrl-Break just prints the statistics, but doesn’t abort. That’s nice in quiet mode or with many replies.
| -n count | Number of echo requests to send. |
Specify the number of PING packets to send. Default number is 4. For traceroute or pathping modes (see below) this specifies the number of pings per hop. For tracerroute mode, the default number is 3.
| -w timeout | Timeout in milliseconds to wait for each reply. |
Maximum timeout to wait for a reply. This time applies when hrPing is waiting for the last replies to come in. Furthermore, hrPing will even count a reply as timeouted if it took too long. Default is 2000 milliseconds.
| -s time | Interval in milliseconds between packets. |
This is the number of milliseconds between sending of two PING packets. hrPINGwill try to stick to this number quiet accurately. If sending took a little longer for one packet it will send out the next packet a little earlier. Default is 500 milliseconds. (You can use decimals for a very fine grained interval: -s5.4 will send a packet every 5400 microseconds on average.)
| -c [num] | Concurrent sending of up to num pings at a time (default 1) |
Try to keep a maximum of num pings in transmission without a reply. When either a reply comes in or a timeout occurs, send more pings, so num pings are again in flight.-c (without a number) effectively turns off overlapped send/receive, since a second ping is only sent after a reply to the first or an timeout. This, together with the -w option make hrPing behave like Windows’ ping.
| -r [count] | Be a traceroute (do count pings each hop, default 3) |
hrPing contains a traceroute utility! It works almost the same as Windows TRACERT, except that you can specify how many packets are sent per hop, default is three. By default, IP addresses are not resolved to names. Use -a to do that.
| -a [hop] | Resolve addresses to names for traceroute (start at hop) |
This tries to resolve the IP addresses into DNS names. If you specify hop hrPing will not try to resolve the first hop-1 hops, since they are often not resolvable and it only costs time to try (and who has time nowadays?)
| -p | Trace path to destination, then ping all hops on path |
Do a path ping: work like traceroute to get the adresses on the path to a given destination, then ping each of them individually (-u and -M honoured as well as other options that make sense (-l, even with size sweep, -c, -s, -w, etc). At the end, print some statistics for all hops on the path.
And some options control the output:
| -lic | Show public license and warranty. |
We need you to accept the software license. This is done the first time you start hrPING. If you want to re-read it, use this option.
| -fwhelp | Print firewall help text |
Remarks on how to set up the Windows firewall to let hrPing’s packets pass.
| -F file | Log output into file as well, even if -q is set |
All output is logged to file file as well as to the screen. If -q options are set, all output goes to log file, even if it’s not printed to the screen.
| -T | Print timestamp in front of each line |
Preceed each line of output with a timestamp of the form
“2012-05-22 18:19:53.508: “
| -q[r|e|t] | Be quiet (-qr=no replies, -qe=no errors, -qt=no timeouts) |
Be quiet. Use -qr to not print replies, -qe to not print IMCP error messages or -qt not to print timeouts.
| -y [sec] | Print summary of the last sec secs (default 10) |
Be quiet, but print a summary of all packets (with counts and statistics) and one of packets of the last sec seconds. Useful with small -s send delays or long sends (-t or high -n).
| -g -G |
Show graph of the ping times. To do that, grping.exe is started. More on that later on. Use -gg to close graph on hrping exit. Use -G to utilize a already running grping.exe.
| -? -h | Help |
Prints a help screen, -?? or -hh prints an even longer one.
And then, we have options for the connoisseur:
| -I id | Set ICMP id field to id |
Set the “Identification” IP header field to the value specified. It is possible that Windows erases or overwrites this field when sending the packet.
| -W | “warm up” with one uncounted echo request at beginning |
If specified, hrPING will send one uncounted ping before all others. This “warm up” is useful with some firewalls that somehow cause the first block to be much slower than the following ones. -s, -w apply.
| -A | Abort after the first echo reply (-AA => or error) |
Loop as long as there are no proper replies (or even error messages if -AA).
| -H | Use IP_HDRINCL socket option (default for UDP or with TOS) |
With this option set, hrPing sets up his IP headers for send itself, otherwise Windows does it. -H is selected automatically with -u or -v, because it doesn’t work otherwise.
| -E file | Stop pinging if file exists |
This is nice for batch files or for coordinating with a background job. hrPing will loop as long as usual (i.e. depending on -t or -n options), but will furthermore check for the existence of file. If file comes into existence, hrPing will exit the loop.
| -diag | Diagnose your connectivity: send different packet types |
Send all kinds of different packets (ICMP echo, ICMP timestamp, UDP) with high and low TTL to the destination and see if we get an answer. That might be useful to check what is coming through your firewall or ISP.
| -K | Wait for any key press when done |
Useful if hrPing is started from Windows Explorer.
| -qr time | Suppress all replies under time msec |
Suppress all reply outputs under time msec, but write them still to the logfile, if provided.
| -O ofs | Set time offset in msec for timestamp mode |
Specify the time offset between your time and the receiver’s time by hand, otherwise hrPing will do that on the first reply.
| -D | Print debug info |
Well, somewhere debug info is printed. I don’t want to be too specific. Actually, it’s a secret. 🙂
You can mess around with the timer, if you want:
| -perfcnt | Use performance counter (default) |
Use the performance counter of Windows. Usually, it’s pretty accurate (some MHz). That’s the default.
| -tsc | Force RDTSC usage. |
hrPING automatically decides if it uses the CPU’s timestamp counter (TSC) or the operating system’s performance counter for timings. On some CPU’s the TSC is not reliable, since it doesn’t tick at the same speed all the time. On multiprocessor systems, not all TSC have to tick exactly in sync. In almost all cases, hrPING will use the performace counter. If you want to force TSC usage, use -tsc, but hrPing will only use the TSC if it thinks it’s accurate.
| -mmtime | Use multimedia timer; not very accurate |
Use Windows’ multimedia timers. They should be at least accurate to the msec.
| -tick | Use Windows GetTickCount; very inaccurate! |
Use the standard Windows timer. That usually has a resoltion of 15 msec or so. Berk!
| -prec | Measure timer precision |
Not sure how accurate the timer is? Measure it!
Return codes:
For ping mode:
- 0
- All sent pings were answered with their proper replies.
- 1
- All sent pings were answered with their proper replies or ICMP error messages.
- 2
- At least some pings were answered with either their proper replies or ICMP error messages.
- 3
- No replies at all.
- 9
- Error.
For traceroute mode:
- 0
- Reached destination
- 2
- At least some pings were answered with either their proper replies or ICMP error messages.
- 3
- No replies at all.
- 9
- Error.
Now a test run:
Ping us:
C:\> hrPING www.example.com
This is hrPING v5.00 by cFos Software GmbH -- http://www.cfos.de

Source address is 192.168.2.106; using ICMP echo-request, ID=cc09
Pinging www.example.com [123.45.67.89]
with 32 bytes data (60 bytes IP):

From 123.45.67.89: bytes=60 seq=0001 TTL=55 ID=becc time=42.803ms
From 123.45.67.89: bytes=60 seq=0002 TTL=55 ID=becd time=43.768ms
From 123.45.67.89: bytes=60 seq=0003 TTL=55 ID=bece time=44.842ms
From 123.45.67.89: bytes=60 seq=0004 TTL=55 ID=becf time=43.449ms


    Packets: sent=4, rcvd=4, error=0, lost=0 (0.0% loss) in 1.546366 se
    RTTs in ms: min/avg/max/dev: 42.803 / 43.715 / 44.842 / 0.737
    Bandwidth in kbytes/sec: sent=0.155, rcvd=0.155
You see that hrPing numbers the packets in ascending order. The sequence numbers of the replies are listed (if there are out-of-sequence packets, hrPing will write “SEQ=” instead of “seq=”, so you notice).
Notice the times in microseconds (milliseconds with 3 decimals)
Furthermore, we see the TTL, which is the TTL of the sender, minus the number of hops the packet took to come here. I guess TTL was initially set to 64, so it took the packet 10 hops to come here (64-55+1=10, TTL is only decremented on forward, not on the first send).
Plus, hrPing prints the number of bytes in the received packet and the IP identification field.
Please also notice the statistics with average and standard deviation (which is a measure of how wide the data points are spread out. So 4, 6, 4, 6 has a smaller deviation than 1, 9, 1, 9, even though the average is the same).
Now let’s look at a second test run:
Try to ping us:
C:\> hrPING -i1 www.example.com
This is hrPING v5.00 by cFos Software GmbH -- http://www.cfos.de

Source address is 192.168.2.106; using ICMP echo-request, ID=140d
Pinging www.example.com [123.45.67.89]
with 32 bytes data (60 bytes IP), TTL 1:

From 192.168.2.1: TTL count exceeded; bytes=56 seq=0001 TTL=64 ID=33b7 time=0.990ms
From 192.168.2.1: TTL count exceeded; bytes=56 seq=0002 TTL=64 ID=33b8 time=1.237ms
From 192.168.2.1: TTL count exceeded; bytes=56 seq=0003 TTL=64 ID=33b9 time=0.578ms
From 192.168.2.1: TTL count exceeded; bytes=56 seq=0004 TTL=64 ID=33ba time=1.041ms


   Packets: sent=4, rcvd=0, error=4, lost=0 (0.0% loss) in 1.514205 sec
   RTTs in ms: min/avg/max/dev: 0.578 / 0.961 / 1.237 / 0.239
   Bandwidth in kbytes/sec: sent=0.158, rcvd=0.147
Notice that this is a list of ICMP error messages, yet there are still the sequence numbers and round-trip-times listed.
Measure the delay of your connection:
We use the smallest ping available and we use the shortest route available. We could use traceroute mode to find the first hop and ping that one. But experience shows that the hops often don’t answer to pings. So we use a trick: we send out packets with TTL 2: they will be bounced on the first external hop, since hop 1 is my internal router (use TTL 1 instead if you are directly connected to the Internet). (The trick is not new, this is how traceroute works.)
C:\> hrping -i2 -l0 www.example.com
   This is hrPING v5.00 by cFos Software GmbH -- http://www.cfos.de

   Source address is 192.168.2.106; using ICMP echo-request, ID=a40e
   Pinging www.example.com [123.45.67.89]
   with 0 bytes data (28 bytes IP), TTL 2:

   From 217.0.119.53: TTL count exceeded; bytes=56 seq=0001 TTL=254 ID=0000 time=17.168ms
   From 217.0.119.53: TTL count exceeded; bytes=56 seq=0002 TTL=254 ID=0000 time=16.634ms
   From 217.0.119.53: TTL count exceeded; bytes=56 seq=0003 TTL=254 ID=0000 time=16.740ms
   From 217.0.119.53: TTL count exceeded; bytes=56 seq=0004 TTL=254 ID=0000 time=16.342ms

   Packets: sent=4, rcvd=0, error=4, lost=0 (0.0% loss) in 1.529537 sec
   RTTs in ms: min/avg/max/dev: 16.342 / 16.721 / 17.168 / 0.296
   Bandwidth in kbytes/sec: sent=0.073, rcvd=0.146
So, the minimum delay seems to be some 16.3 ms. If you increase the number of tries you might find an even smaller delay, but it’s not very likely it will shrink a lot more:
 C:\> hrping -i2 -l0 -n1000 -q -s20 www.example.com
   This is hrPING v5.00 by cFos Software GmbH -- http://www.cfos.de

   Source address is 192.168.2.106; using ICMP echo-request, ID=040b
   Pinging www.example.com [123.45.67.89]
   with 0 bytes data (28 bytes IP), TTL 2:

   Packets: sent=1000, rcvd=0, error=1000, lost=0 (0.0% loss) in 20.001239 sec
   RTTs in ms: min/avg/max/dev: 15.501 / 16.181 / 19.551 / 0.547
   Bandwidth in kbytes/sec: sent=1.399, rcvd=2.799
So, the real minimum seems to be around 15.5 ms. We might want to run hrPing all the time to see how well our line is. We can do that and instruct hrPing to be silent and only display a summary:
 C:\> hrping -i2 -l0 -t -y www.example.com
   This is hrPING v5.00 by cFos Software GmbH -- http://www.cfos.de

   Source address is 192.168.2.106; using ICMP echo-request, ID=1807
   Pinging www.example.com [123.45.67.89]
   with 0 bytes data (28 bytes IP), TTL 2:

  Total:
     Packets: sent=85, rcvd=0, error=85, lost=0 (0.0% loss) in 42.042626 sec
     RTTs in ms: min/avg/max/dev: 15.815 / 18.558 / 34.122 / 5.022
     Bandwidth in kbytes/sec: sent=0.056, rcvd=0.113

      Last 10 seconds:
     Packets: sent=20, rcvd=0, error=20, lost=0 (0.0% loss) in 9.531548 sec
     RTTs in ms: min/avg/max/dev: 16.040 / 23.758 / 34.122 / 7.203
     Bandwidth in kbytes/sec: sent=0.058, rcvd=0.117
   [Aborting...]
   Packets: sent=85, rcvd=0, error=85, lost=0 (0.0% loss) in 42.042626 sec
   RTTs in ms: min/avg/max/dev: 15.815 / 18.558 / 34.122 / 5.022
   Bandwidth in kbytes/sec: sent=0.056, rcvd=0.113
This will continue to show a summary (to end it I pressed Ctrl-C). The summary shows that we had an increased ping time in the last 10 seconds. This is no wonder, since I ran an upload at the same time.
What is my line speed?
hrPing has this nice size sweep feature. Let’s try it:
 C:\> hrping www.example.com -l0:1400:96 -n20 -s20
   This is hrPING v5.00 by cFos Software GmbH -- http://www.cfos.de

   Source address is 192.168.2.106; using ICMP echo-request, ID=e80d
   Pinging www.example.com [123.45.67.89]
   with 0-1400 bytes data (28-1428 bytes IP):

  From 123.45.67.89: bytes=28 seq=0001 TTL=55 ID=bf45 time=43.591ms
   From 123.45.67.89: bytes=124 seq=0002 TTL=55 ID=bf46 time=42.699ms
   From 123.45.67.89: bytes=220 seq=0003 TTL=55 ID=bf47 time=44.006ms
   From 123.45.67.89: bytes=316 seq=0004 TTL=55 ID=bf48 time=43.198ms
   From 123.45.67.89: bytes=412 seq=0005 TTL=55 ID=bf49 time=44.212ms
   From 123.45.67.89: bytes=508 seq=0006 TTL=55 ID=bf4a time=43.859ms
   From 123.45.67.89: bytes=604 seq=0007 TTL=55 ID=bf4b time=44.744ms
   From 123.45.67.89: bytes=700 seq=0008 TTL=55 ID=bf4c time=45.763ms
   From 123.45.67.89: bytes=796 seq=0009 TTL=55 ID=bf4d time=44.257ms
   From 123.45.67.89: bytes=892 seq=000a TTL=55 ID=bf4e time=46.415ms
   From 123.45.67.89: bytes=988 seq=000b TTL=55 ID=bf4f time=46.215ms
   From 123.45.67.89: bytes=1084 seq=000c TTL=55 ID=bf50 time=45.993ms
   From 123.45.67.89: bytes=1180 seq=000d TTL=55 ID=bf51 time=46.744ms
   From 123.45.67.89: bytes=1276 seq=000e TTL=55 ID=bf52 time=46.761ms
   From 123.45.67.89: bytes=1372 seq=000f TTL=55 ID=bf53 time=47.214ms
   From 123.45.67.89: bytes=28 seq=0010 TTL=55 ID=bf54 time=43.284ms
   From 123.45.67.89: bytes=124 seq=0011 TTL=55 ID=bf55 time=43.345ms
   From 123.45.67.89: bytes=220 seq=0012 TTL=55 ID=bf56 time=44.738ms
   From 123.45.67.89: bytes=316 seq=0013 TTL=55 ID=bf57 time=44.561ms
   From 123.45.67.89: bytes=412 seq=0014 TTL=55 ID=bf58 time=44.263ms

   Packets: sent=20, rcvd=20, error=0, lost=0 (0.0% loss) in 0.434017 sec
   RTTs in ms: min/avg/max/dev: 42.699 / 44.793 / 47.214 / 1.337
   Bandwidth in kbytes/sec: sent=26.727, rcvd=26.727
   Correlation: 91.6%, estimated speed: 281.11 kbytes/sec
As you can see, the “bytes=” are increasing, since the proper reply to a ping packet with N bytes is a pong packet with N bytes. Furthermore, you may notice that the reply time is increasing slightly with the packet size. We do some statistics on it (linear regression and correlation) and get a correlation coefficient: 91.6%. Generally, a correlation of 50% or more is called “correlated”, of 80% or more “highly correlated”. That means: the larger the packet, the larger the time and time is proportional to packet size. hrPing estimates the speed to be some 280 kbytes/s. As a matter of fact, that is too slow, but measurements show smaller throughputs the longer the route is. Let’s try the same with hop 2 (the first external hop):
 C:\> hrping www.example.com -l0:1400:96 -n20 -s20 -i2
   This is hrPING v5.00 by cFos Software GmbH -- http://www.cfos.de

   Source address is 192.168.2.106; using ICMP echo-request, ID=9c01
   Pinging www.example.com [123.45.67.89]
   with 0-1400 bytes data (28-1428 bytes IP), TTL 2:

  From 217.0.119.53: TTL count exceeded; bytes=56 seq=0001 TTL=254 ID=0000 time=16.164ms
   From 217.0.119.53: TTL count exceeded; bytes=80 seq=0002 TTL=254 ID=0000 time=16.125ms
   From 217.0.119.53: TTL count exceeded; bytes=80 seq=0003 TTL=254 ID=0000 time=16.271ms
   From 217.0.119.53: TTL count exceeded; bytes=80 seq=0004 TTL=254 ID=0000 time=16.524ms
   From 217.0.119.53: TTL count exceeded; bytes=80 seq=0005 TTL=254 ID=0000 time=17.250ms
   From 217.0.119.53: TTL count exceeded; bytes=80 seq=0006 TTL=254 ID=0000 time=16.856ms
   From 217.0.119.53: TTL count exceeded; bytes=80 seq=0007 TTL=254 ID=0000 time=17.577ms
   From 217.0.119.53: TTL count exceeded; bytes=80 seq=0008 TTL=254 ID=0000 time=17.362ms
   From 217.0.119.53: TTL count exceeded; bytes=80 seq=0009 TTL=254 ID=0000 time=18.080ms
   From 217.0.119.53: TTL count exceeded; bytes=80 seq=000a TTL=254 ID=0000 time=17.851ms
   From 217.0.119.53: TTL count exceeded; bytes=80 seq=000b TTL=254 ID=0000 time=18.158ms
   From 217.0.119.53: TTL count exceeded; bytes=80 seq=000c TTL=254 ID=0000 time=18.372ms
   From 217.0.119.53: TTL count exceeded; bytes=80 seq=000d TTL=254 ID=0000 time=19.002ms
   From 217.0.119.53: TTL count exceeded; bytes=80 seq=000e TTL=254 ID=0000 time=18.442ms
   From 217.0.119.53: TTL count exceeded; bytes=80 seq=000f TTL=254 ID=0000 time=18.895ms
   From 217.0.119.53: TTL count exceeded; bytes=56 seq=0010 TTL=254 ID=0000 time=16.676ms
   From 217.0.119.53: TTL count exceeded; bytes=80 seq=0011 TTL=254 ID=0000 time=16.259ms
   From 217.0.119.53: TTL count exceeded; bytes=80 seq=0012 TTL=254 ID=0000 time=16.400ms
   From 217.0.119.53: TTL count exceeded; bytes=80 seq=0013 TTL=254 ID=0000 time=16.941ms
   From 217.0.119.53: TTL count exceeded; bytes=80 seq=0014 TTL=254 ID=0000 time=17.573ms

   Packets: sent=20, rcvd=0, error=20, lost=0 (0.0% loss) in 0.407530 sec
   RTTs in ms: min/avg/max/dev: 16.125 / 17.338 / 19.002 / 0.911
   Bandwidth in kbytes/sec: sent=28.464, rcvd=3.808
   Correlation: 95.2%, estimated speed: 428.86 kbytes/sec
This is more like it (I have about 500 kbytes/sec upstream). The estimated speed is only shown if there is a correlation of at least 40%, otherwise the estimation is too vague. Linear regression is very sensitive to stray data. Often you ping 50 times and get 49 good replies (say in the 50 msecs) and one that is way too high (say 150 msec). Normally, this would badly offset your correlation and linear regression. But if you know a reasonable upper limit for your replies, you can filter out the stray replies with the -w option, which sets the maximum time to wait for a reply. The trick here is that hrPing counts replies as timeouts, even if they arrived back, but it took longer than the timeout time. In our above example, you may use a -w60 to filter out the stray 150 msec peak. If you have no idea what timeout time to use, try a -w with the average time plus 2-3 times the deviation.
Graphics!
To have hrPing open a window as well and graph the results type this:
 C:\> hrping www.example.com -t -i2 -g
   This is hrPING v5.00 by cFos Software GmbH -- http://www.cfos.de

   Source address is 192.168.2.106; using ICMP echo-request, ID=cc09
   Pinging www.example.com [123.45.67.89]
   with 32 bytes data (60 bytes IP), TTL 2:

  From 217.0.119.53: TTL count exceeded; bytes=80 seq=0001 TTL=254 ID=0000 time=16.494ms
   From 217.0.119.53: TTL count exceeded; bytes=80 seq=0002 TTL=254 ID=0000 time=16.673ms
   From 217.0.119.53: TTL count exceeded; bytes=80 seq=0003 TTL=254 ID=0000 time=16.017ms
   From 217.0.119.53: TTL count exceeded; bytes=80 seq=0004 TTL=254 ID=0000 time=16.532ms
   From 217.0.119.53: TTL count exceeded; bytes=80 seq=0005 TTL=254 ID=0000 time=16.969ms
   From 217.0.119.53: TTL count exceeded; bytes=80 seq=0006 TTL=254 ID=0000 time=16.910ms
   From 217.0.119.53: TTL count exceeded; bytes=80 seq=0007 TTL=254 ID=0000 time=16.335ms
   [Aborting...]

   Packets: sent=7, rcvd=0, error=7, lost=0 (0.0% loss) in 3.027021 sec
   RTTs in ms: min/avg/max/dev: 16.017 / 16.561 / 16.969 / 0.305
   Bandwidth in kbytes/sec: sent=0.138, rcvd=0.185
This will open a window and show the ping times. After aborting, the window will stay open. In the window you can select the time scale that is shown and you can choose to show an average of the values, with different average times. If you like the window to be automatically closed when hrPing closes (even on Ctrl-C), use -gg instead of -g.
You can have multiple graphs in one window
Start the first hrPing regularly:
   C:\> hrping www.example.com -t -i2 -g
   This is hrPING v5.00 by cFos Software GmbH -- http://www.cfos.de
   [...]
After that, start the second hrPing with a -G instead:
   C:\> hrping www.example.com -t -G
   This is hrPING v5.00 by cFos Software GmbH -- http://www.cfos.de
   [...]
This will produce two graphs in the same window. Nice! 🙂 You find the hrPing textual reply lines annoying? Add a -y to get a summary or a -q to leave it away altogether.
System requirements:
hrPING should work well on all systems running Windows XP and above (Vista, Windows 7, Windows 8 previews and the server OSes Server 2003 and 2008 as well).
Usually, you have to be a member of the Administrator group to run hrPing, since hrPing uses “raw sockets”.
Under XP, you can open access to raw sockets for every user by setting the following Registry key under HKEY_LOCAL_MACHINE to 1 (DWORD): System\CurrentControlSet\Services\Afd\Parameters\DisableRawSecurity This feature was removed in Vista. 🙁
Traffic Shaping Guide
Traffic classes
cFosSpeed has two built-in traffic classes: “default” and “drop”. All traffic that isn’t matched by anything else goes to “default”. Its implicit priority is 0.
You can use “drop” to delete a packet and don’t send it at all. This allows you to do your own little firewalling with it (only for outbound traffic). “Drop” has no priority.
Used to order classes, “priority” is entered as an integer. To avoid confusion, no two classes should be assigned the same priority value. Packets of a traffic class with higher priority are sent prior to packets belonging to a traffic class with lower priority.
“Priority” is usually a positive value for regular classes. However, you can specify “low prio” classes with a negative priority value. Packets in low prio classes are only sent out if there is no high and no default class traffic ready for transmission.
This concept is exactly the opposite of high prio class. With high prio classes, you can mark specific packets to be sent out in front of other data. With low prio classes, you can mark specific packets to be sent out after other data. Beware that specifying rules for low classes can easily lead to “starving” connections, because all other data would then take precedence.
In addition, all traffic classes can be assigned a speed setting. The speed setting determines up to how many bytes/second the class priority will remain in effect. Beyond that, packets are treated as being in the default class. That way, for instance, you could prioritize traffic, but only if it does not exceed, say, 1000 bytes/second. Once that speed is exceeded, the traffic would not be prioritized any more.
The speed settings can done in percent as well, where 100% denotes the total speed of the connection. Specifying “-speed 20%” and “-speed 20perc” means the same. Speed settings of low classes must have a priority value that is used in case the speed is exceeded. It looks like this: “-speed 20%,-10”.
As an example take the setting “-prio 0 -speed 20%,-10”. Traffic in this class is sent out with priority 0 (i.e., default) if it’s slower than 20% of the maximum speed and with priority -10 otherwise.
Standard configuration
cFosSpeed comes preconfigured with five different traffic classes (in addition to the two built-in classes):
- highest -prio 100 -weight 400
- Only special cFosSpeed traffic sent out to measure latency is assigned to this class. This must not be changed and there must be no other traffic going into class highest but the -highest traffic nor must there be a class with higher or same prio. If there was, cfosspeed shaping would degrade in quality. Also see -highest rule.
- higher -prio 90 -weight 400 -speed 40%,0
- This class encompasses all TCP ACK packets. See -higher rule for more. The -speed setting is to ensure that if there is a flood of TCP ACKs other packets get their share of the bandwidth as well.
- high -prio 80 -weight 400 -speed 40%,0
- This class includes different kinds of traffic that are by default prioritized; see -high rule. The -speed setting is in for the same reason than in -higher.
- low -prio 0 -speed 20%,-10 -weight 25
- This class will get FTP data and SMTP (i.e., mail) uploads. We want these types of data to be sent out only if there is no other traffic that is most likely interactive.
- lowest -prio 0 -speed 20%,-30 -weight 6
- This class gets P2P traffic and other traffic that is sent out all the time in the background. We want it to give way to ANY other traffic that is sent.
Traffic Shaping for Filesharing (P2P)
Thanks to cFosSpeed Traffic Shaping, you can finally use the full upstream bandwidth (with eMule, Kazaa or BitTorrent etc.) and make it available to other filenet users – without adversely affecting other Internet applications.
The problems with filesharing software
Running filesharing programs (like eMule, Kazaa or BitTorrent) will usually take up most if not all upstream channel bandwidth, which leaves the connection prone to high ping times. Not only does this mean filesharing communication itself will run slowly (source requests may take a full 1 or 2 seconds rather than just a few milliseconds), but it will also choke other Internet applications to a crawl. By the same token, download rates may plummet, since TCP ACKs are not being sent out in time. The browser will also become noticeably less responsive while surfing the Net.
A popular workaround offered by many filesharing programs is to put an artificial cap on the upload rate.
However, if you are simultaneously running a mail upload in addition to a filesharing upload, both will compete for available upstream bandwidth. How much bandwidth each of these uploads will eventually receive is basically left to happenstance. In some cases, this may even lead to termination of all TCP connections (TCP connection starving).

The priority scheme integrated in cFos and cFosSpeed (re)organizes data packets in a manner that ensures maximum download rates for filesharing programs. In addition, cFos and cFosSpeed deprioritize filesharing data transfer. Now, this should not be taken to mean such traffic is artificially slowed or even altogether stalled. What it does mean, however, is that such data will be briefly delayed when more important data is being transmitted. Only this priority scheme makes it possible to have filesharing programs run at maximum transfer rates while still using the same connection for other applications at the same time.
For instance, if you have a filesharing program running in the background when surfing the Net, there will only be a brief, minimal slowdown in P2P traffic while a new page is being loaded. Likewise, when sending out longer e-mails, P2P upload rates may briefly drop somewhat while the mail is being transmitted. Once the mail is sent, all uploads will continue at full speed again. The only alternatives would be to postpone transmission of the mail “forever” or artificially limit transfer bandwidth for filesharing somehow. But this would also mean a loss of bandwidth even when no other application is using the same connection.
cFosSpeed is thus optimized for use with filesharing (p2p) software, allowing users to have such a program run in the background without noticing its regular Internet activity.
Therefore, we suggest setting Kazaa etc. to “unlimited upload” while deactivating the “speed sense” option, since cFosSpeed will already optimize Internet traffic anyway.
Icon skin
Since most users have their filesharing programs run 24 hours a day, cFosSpeed comes with its own icon skin for this, making it possible to keep track of the connection without needing to have a separate status window open at all times.
Prioritization:
Quite a few users have one PC set aside specifically for filesharing and route P2P traffic (e.g., via Internet Connection Sharing) through a main computer directly hooked up to the Internet. In this case, the Layer-7 Protocol Detection integrated in cFos and cFosSpeed permits prioritization of the most important P2P networks like BitTorrent, eDonkey 2000 (eMule, etc.), Kazaa, Gnutella(2), Kademlia, and Direct Connect.
Prioritizing Programs:
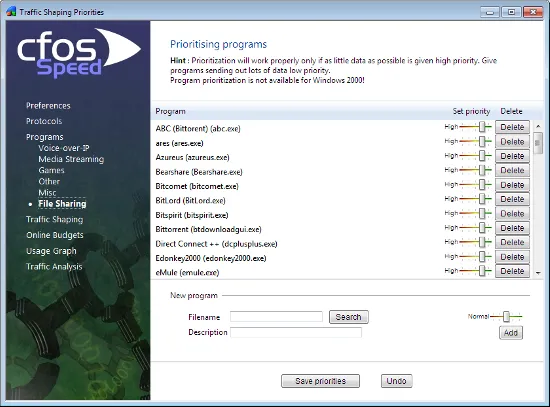
cFos and cFosSpeed also permit prioritizing programs by their name. Many of the most important programs have already been included in our program setting list. This way of prioritizing is especially useful when the Layer-7 detection cannot recognize and assign data properly (as would, for instance, be the case with encrypted P2P traffic).
Optimizing Connection Settings:
You can specify exactly what transfer medium you use under Connection Settings. The more information about a connection is available to cFos or cFosSpeed, the better ping times will be. Default is “Adaptive”. But if you were for instance using a DSL connection, you should select the appropriate DSL standard or protocol as your medium.
Traffic Shaping
How does Traffic Shaping work?
cFosSpeed uses Traffic Shaping to reorder Internet data packets in such a way that urgent traffic is transferred first and the rest of the data later. This results in significant reduction of latency (lag) and typically also results in connection speed up.
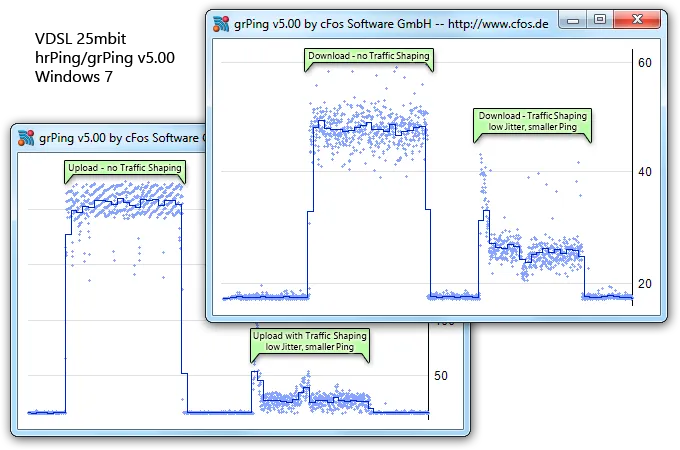
Internet Tuning / Traffic Shaping
- If ACKs are not sent fast enough, downloads may be slow during uploads (the classic Traffic Shaping).
- Windows TCP Auto-Tuning may result in too slow downloads. cFosSpeed’s RWIN expansion can increase the speed. cFosSpeed can also accelerate downloads for certain applications (see test results).
- cFosSpeed keeps the overall ping time low, even during heavy uploads and downloads.
Prioritization – Your important streams first
- With the cFosSpeed prioritization scheme you can always give all your programs full bandwidth, because cFosSpeed decides which streams must be prioritized.
- For example Game-Traffic, VoIP, or Audio/Video content will be prioritized higher than uploads / downloads.
- Your filesharing may use unlimited speed of your Internet connection, but it will be slowed down when you have important traffic.
- The whole prioritization scheme is configurable and you can change the prioritization on-the-fly.

Benefits
- Full download rate during upload
- Consistently quick response time of your Internet even under heavy load
- Substantially less lag in online games
- Improved VoIP speech quality
- Nice status window (with skins), so you always see what’s going on
cFosSpeed under the hood
Packet flow through the various modules of cFosSpeed
Mouse over/tap each box for further explanations.
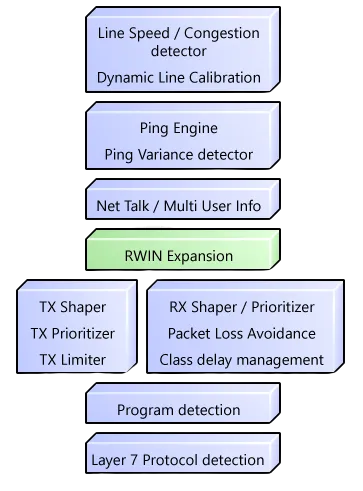
Makes the most of the available bandwidth while minimizing ping time
1 of 9Improves Traffic Shaping of connections with high latency fluctuations, e.g. mobile connections
2 of 9Improves performance when several PCs share one connection
3 of 9Boosts download speeds for high speed connections with high latency
4 of 9Priority scheme / on-the-fly prioritization / filter rules
5 of 9Allows configuration of max. speeds for protocols & programs
6 of 9Priority scheme / on-the-fly prioritization / filter rules
7 of 9Classifies non-standard protocols, like game-traffic, etc.
8 of 9Detects most common protocols, like HTTP, Mail, VoIP, Filesharing, etc.
9 of 9More on Traffic Shaping
Traffic Shaping:
How Traffic Shaping works is explained here: Internet Acceleration with Traffic Shaping
There can only be one Traffic Shaper. Several Traffic Shapers after one another have disadvantages for the transfer speed. Therefore deactivate Traffic Shaping in your router. Also deactivate ACK prioritization.
In addition cFos / cFosSpeed offers RX shaping. This provides good ping times for downloads. It is activated by default.
Deactivate with:
spd gset rx_shape 0 -save
Activate with:
spd gset rx_shape 1 -save
Layer 7 protocol analysis:
cFos and cFosSpeed can analyze the data of the connections and recognize the most important protocols used in the Internet. This also works for protocols which don’t use the default ports. In addition it allows to prioritize data of PCs which are connected to your PC via Internet Connection Sharing or other routing software.
The following protocols are supported:
   Standard:          HTTP, FTP, POP3, SMTP, IMAP4
   VoIP:              RTP, RTCP, SIP
   Special:           Telnet, SSH, SSL, IRC, DNS, (S)NTP, RPC
   Filesharing (P2P): eDonkey, Kazaa, Bittorrent, Kademlia, Gnutella(2), Direct Connect
   Streaming Media:   HTTP-Streams with various players, as well as RTSP
The analyzer can distinguish between client and server mode. The dialog under “options” -> “settings”, “protocols” allows a precise prioritization of each protocol. In addition there is a dialog for program prioritization, if the layer-7 analysis doesn’t recognize some other protocol.
to support the analysis there is a logging mode, too. cFosSpeed creates log files of connections in the installation directory. The maximum file size is 100k, but you can to max. size X by the command.
spd gset max_session_dump_size X
    activate logging:    spd gset dump_sessions X; gset dump_tcp_data 1
    deactivate logging:  spd gset dump_sessions 0
Values for X are:
    0=don't log connections.
    2=log, but delete automatically if no data except TCP SYN has beed transferred.
    3=log, like 2, but delete automatically if the proccol was recognized by the layer-7 analysis
    4=log, never delete
Program prioritization:
If cfos / cFosSpeed cannot recognize the protocol with layer-7 analisys, it tries to dermine the name of the program, which created this connection (XP or later). In the dialog for program prioritization under “options” -> “settings” you can assign each program one of five priorities. If your program is not in the list you can add it in the respective category. We also appreciate suggestions for other programs which should be in the list. Please report them here:
/traffic-shaping-priority-list/
Here is a list of programs already in the list:
https://atlas-cfosspeed.com/traffic-shaping-priority-list/#priority-list
Tips for the prioritization:
- Only use high prioritization for a small part of the tranferred data. If you use high prioritization for all data, it is actually the same situation as if you had prioritized nothing.
- Use low prioritization for filesharing. Then you can disable traffic limits in your filesharing software. This means your filesharing software can now use the whole bandwidth of your internet connections, with disturbing other traffic. Only in the short time, when you, for example, send mail, the P2P traffic is slowed down. This policy gives filesharing software the maximum bandwidth, while allowing use of the internet connection for other applications simultaneously.
VoIP recognition:
cFos / cFosSpeed can recognize VoIP (RTP) by an analysis of the UPD data packets. There is a strict and a relaxed check. the strict check is default and assumes there is a RTCP connection for each RTP connection. If you use VoIP software which has no RTCP connections you can disable (in “options” -> “settings”) the strict RTP check, e.g. for VoIPBuster.
Individual Traffic Shaping rules:
cFos and cFosSpeed have a filter language with rules to prioritize packets. See cFosSpeed Filter Expressions for details.
Traffic Chaping Options
What is Traffic Shaping?
Traffic Shaping prioritizes data transfer on Internet connections in such a way that you can actually use your maximum bandwidth in both directions. In addition, cFos and cFosSpeed control data transfer to ensure ping times always remain minimal. For more information, please refer to our explanation of Traffic Shaping
How can I determine the benefits of cFos Traffic Shaping myself?
You should notice the following effects:
- Smooth surfing / Web-site loading
- Maximum download rate while uploading
- Low ping times during upload, download, and while filesharing
- Gaming connections remain responsive even during simultaneous data transfer
- Better line quality for Voice-over-IP (VoIP)
You don’t have to believe this, but you can measure it by yourself: Manual
How do I optimally calibrate cFos / cFosSpeed?
- Clear the traffic shaping data by clicking on “clear calibration data”
- Make a short full-speed download. (5-10 seconds)
- Make a longer full-speed upload (30 sec – 1 min).
It is important that this upload is as fast as possible, i.e., that the server you’re sending to is near and powerful (like your mail server or some fast FTP server). moreover, it is important that you have no downloads running while you do this upload. with an upstream of 256 kbit/s you need to send some 2 mbyte to the other side. - That’s it. The connection is well calibrated if you have a full-blast upload and still have low ping times (both can be watched in the status window).
Watch the video "How to calibrate your Internet connection"
Traffic Shaping Options
For each connection, you can adjust the following settings:
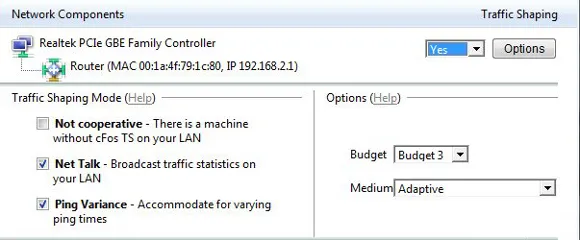
Traffic Shaping Mode (Multi-User version)
Not cooperative – There is a machine without cFos TS on your LAN
You use your connection with several other machines simultaneously and at least one of them has no cFos Traffic Shaping.
Net Talk – Broadcast traffic statistics on your LAN
To improve accuracy, send Traffic Shaping statistics to other PCs on your local (home) network. No data is sent to the Internet.
Ping Variance – Use advanced Traffic Shaping to accommodate for varying ping times
Gather ping statistics to accommodate for variation in ping times; especially useful for mobile/wireless connections.
Medium/Protocol
- Adaptive: cFos/cFosSpeed will adapt to your connection automatically. Use this setting only if you are not sure what your connection type is. Otherwise, select the setting that applies to your connection. The better the chosen setting fits your connection type, the lower ping times should be.
- DSL (PPPoE): Most widespread DSL protocol (commonly used in the USA, Germany, Eastern Europe, and other major markets).
PPPoE explanation @ wikipedia.org - DSL (PPPoA/Vcmux): Common standard in Great Britain.
PPPoA explanation @ wikipedia.org - DSL (PPPoA/LLC): Occasionally used in Great Britain
PPPoA explanation @ wikipedia.org - DSL (PPTP): Older DSL standard still in use in some parts of France.
PPTP explanation @ wikipedia.org - Cable: Internet via TV cable with bandwidth that may vary slightly according to usage and time of day.
Cable technique @ wikipedia.org - ISDN: 8 or 16 kbytes, bidirectional, PPP in HDLC frames
ISDN explanation @ wikipedia.org - IP over AAL5: IP data transfer via ATM
ATM Adaptation Layer @ wikipedia.org - RFC 1483/2684: DSL over ATM bridging
- Frame Count: Transfer speed varies with the number of data packets transmitted per time interval. Sometimes used in Greece.
- Mixed Raw IP/Frame Count: Downstream traffic is handled as in “Frame Count”, upstream traffic as in “Cable”. Used by some cable providers like ish.
Set up the right medium/protocol if you know exactly which transfer medium/protocol is used. If in doubt, use Adaptive.
How do I optimally calibrate cFos / cFosSpeed?
- Clear the traffic shaping data by clicking on “clear calibration data”
- Make a short full-speed download. (5-10 seconds)
- Make a longer full-speed upload (30 sec – 1 min).
It is important that this upload is as fast as possible, i.e., that the server you’re sending to is near and powerful (like your mail server or some fast FTP server). moreover, it is important that you have no downloads running while you do this upload. with an upstream of 256 kbit/s you need to send some 2 mbyte to the other side. - That’s it. The connection is well calibrated if you have a full-blast upload and still have low ping times (both can be watched in the status window).
Traffic Shaping Priority List
Suggesting a program and its executable file for Traffic Shaping prioritization
We are looking for users who’d be interested in sending us their standard Traffic Shaping priority settings for programs not already included in our Traffic Shaping Priority List.
This is how you do it:
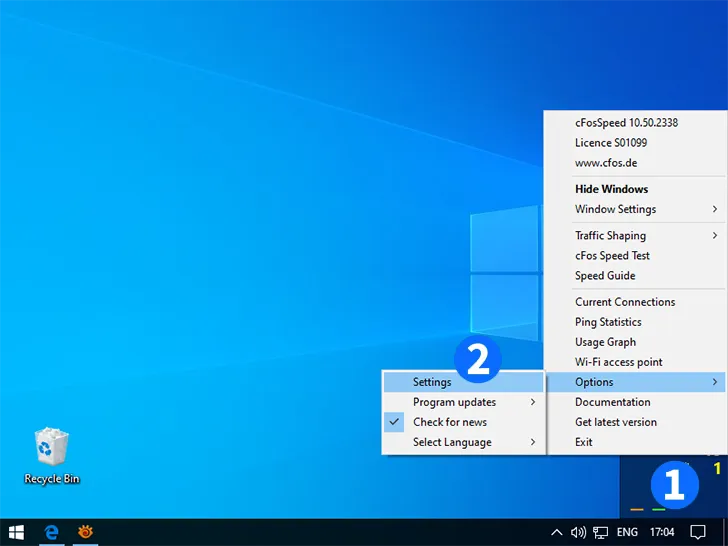
Right click on the cFosSpeed status window
Select "Options -> Settings"
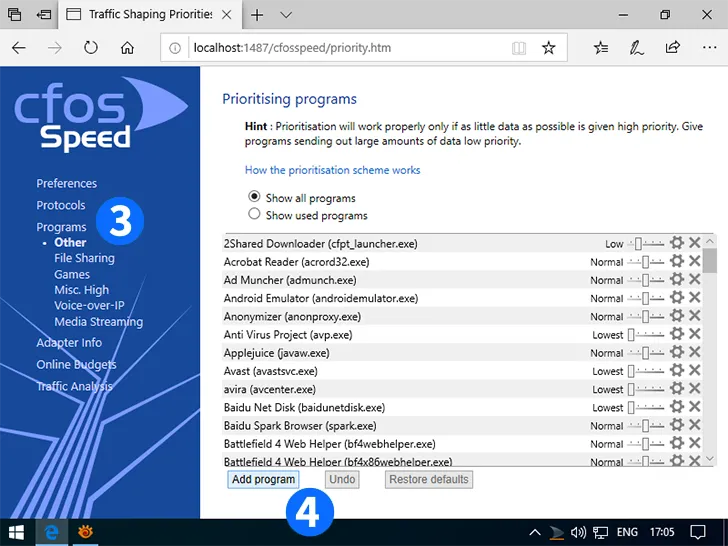
Click on "Programs"
Click on "Add program"
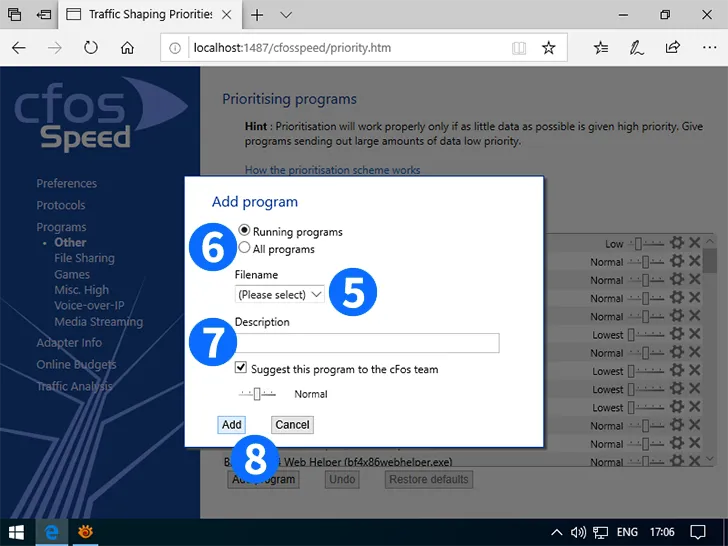
Select the program from the selection box
If the program isn't currently active, click the "All programs" radio button and select the program from the extended list
Add a description of the program
Click on "Add"
>How prioritization works
Traffic Shaping Priority List
cFos/cFosSpeed can prioritize the traffic of individual programs. This list contains programs, already prioritized by cFos/cFosSpeed.4Story » 4story.exe
4game Launcher » innova.launcher.exe
5E Arena matchmaking » 5eclient.exe
7 Days to Die » 7daystodie.exe
9 Dragons Game Launcher » ndlauncher.exe
9 Dragons » ninedragons.exe
ACME gplay » gplay.exe
Ablion Online » albion-online.exe
Aeria Games Launcher » nwzlauncher.exe
Aeria Ignite » aeria_launcher.exe
Age of Conan » ageofconan.exe
Age of Empires 2: Definitve Edition » aoe2de_s.exe
Age of Empires » empiresx.exe
Age of Wushu Launcher » fxlaunch.exe
Age of Wushu » fxgame.exe
AikaGlobal » aikalauncher.exe
Aion: The Tower of Eternity » aion.exe
Aion » aion-final.exe
Alien Swarm » swarm.exe
Aliens versus Predator 2 » lithtech.exe
All Points Bulletin » apb.exe
Alliance of Valiant Arms (A.V.A) » ava.exe
Allods Online » aogame.exe
American Truck Simulator » amtrucks.exe
Americas Army » aagame.exe
Americas Army » armyops.exe
Among Us » among us.exe
Anomaly Zone » anomalyzone.exe
Anthem » anthem.exe
Apex Legends DX12 » r5apex_dx12.exe
Apex Legends » r5apex.exe
ArcheAge » archeage.exe
Ark Survival Evolved » shootergame.exe
ArmA II » arma2.exe
Arma 3 updater » gameupdater.exe
Arma 3 » arma3.exe
Arma 3 » arma3_x64.exe
Armored Warfare » armoredwarfare.exe
Asphalt 8 Airborne » asphalt8.exe
Asphalt 9 Legends » asphalt9_w10_x86_rtl.exe
Assassin’s Creed Vahalla » acvahalla.exe
Assassin’s Creed Vahalla » acvahalla_plus.exe
Assetto Coras Racing Simulator » assettocorsa.exe
Astellia » astellia.exe
Atlas » atlasgame.exe
Atom RPG » atom.exe
Audition Dance Game » audition.exe
AvatarStar » avatarstar.exe
BGroom » bgroomlobby.exe
Back 4 Blood » back4blood.exe
Baffler’s Standalone 3 » bafflerstandalone3.exe
Baidu Yun Guanjia » baiduyunguanjia.exe
BandMaster » bandmaster.exe
Battle.Net Setup » battle.net-setup.exe
Battle.net Desktop App » battle.net.exe
BattleBlock Theater » battleblocktheater.exe
BattleForge » battleforge.exe
Battlefield 1942 » bf1942.exe
Battlefield 1 » bf1.exe
Battlefield 2042 Launcher » bf2042_launcher.exe
Battlefield 2042 » bf2042.exe
Battlefield 2142 » bf2142.exe
Battlefield 2 » bf2.exe
Battlefield 3 » bf3.exe
Battlefield 4 » bf4.exe
Battlefield 4 » bf4_x86.exe
Battlefield 5 » bfv.exe
Battlefield Bad Company 2 » bfbc2game.exe
Battlefield Heroes » bfheroes.exe
Battlefield Play4Free » bfp4f.exe
Battlefield Vietnam » bfvietnam.exe
Betfred Poker » casino.exe
Black Desert Launcher » blackdesertlauncher.exe
Black Desert » blackdesert64.exe
Black Squad » blacksquadgame.exe
BlackShot Online » blackshot.exe
Blackfire » malauncher.exe
Blade & Soul » bnsr.exe
Bless Unleashed » bless.exe
Blizzard Downloader » blizzarddownloader.exe
Blizzard or Age of Forgotten Empires launcher » launcher.exe
Blood Strike » bloodstrike.exe
Bloodline Champions » bloodlinechampions.exe
Borderlands 2 » borderlands2.exe
Borderlands 3 » borderlands3.exe
Borderlands » borderlands.exe
Brawlhalla » brawlhalla.exe
Bulletstorm » shippingpc-stormgame.exe
Cabal Online » cabal.exe
Cabal Online » cabalmain.exe
Caliber » caliber.exe
Call Of Duty – World at War » codwawmp.exe
Call of Duty – United Offensive » coduomp.exe
Call of Duty 2 » cod2mp_s.exe
Call of Duty 4 – Modern Warfare » iw3mp.exe
Call of Duty Black Ops II » t6mp.exe
Call of Duty Black Ops » blackopsmp.exe
Call of Duty Modern Warfare 2 » iw4mp.exe
Call of Duty Modern Warfare 3 » iw5mp.exe
Call of Duty Modern Warfare » modernwarfare.exe
Call of Duty WWII » s2_mp64_ship.exe
Call of Duty: BOCW » blackopscoldwar.exe
Call of Duty: Black Ops 4 » blackops4.exe
Call of Duty: Black Ops III » blackops3.exe
Call of Duty: Modern Warfare installer » modern-warfare-setup.exe
Call of Duty » codmp.exe
Civilization V » civilizationv_dx11.exe
Clash of Clans Client » clash-win64.exe
Combat Arms » combatarms.exe
Combat Arms » engine.exe
Command & Conquer 3 Tiberium Wars » cnc3.exe
Company of Heroes » coh.exe
Company of heroes » reliccoh.exe
Conan Exiles » conansandbox.exe
Conquer Online » conquer.exe
Conquerors Blade » proven_ground_client.exe
Continent of the Ninth Launcher » c9launcher.exe
Continent of the Ninth » c9.exe
Counter Strike » cs.exe
Counter-Strike 1.6 » cstrike.exe
Counter-Strike 2 » cs2.exe
Counter-Strike Global Offensive » csgo.exe
Counter-Strike Online » csolauncher.exe
Counter-Strike Online » cstrike-online.exe
Counterstrike Condition Zero » czero.exe
e
Cross Fire Launcher » cf_g4box.exe
CrossFire » crossfire_x64.exe
Crossfire launcher » cflauncher.exe
Crossfire » crossfire.exe
Crossout launcher » crossoutlauncher.exe
Crossout » crossout.exe
Crysis 2 » crysis2.exe
Cyberpunk 2077 » cyberpunk2077.exe
DCS World Game digitalcombatsimulator » dcs.exe
DCS World Game digitalcombatsimulator » dcs_updater.exe
Dark Souls II » darksoulsii.exe
Dark Souls III » darksoulsiii.exe
Dark Souls » darksouls.exe
Darkspore » darkspore.exe
Dawn of War 2 » dow2.exe
Day Of Infamy 64bit » dayofinfamy_x64.exe
Day Of Infamy » dayofinfamy.exe
.exe
DayZ Launcher » dayzlauncher.exe
DayZ » dayz_x64.exe
Dead Space 2 » deadspace2.exe
Dead by Daylight » deadbydaylight-win64-shipping.exe
Dead by Daylight » deadbydaylight.exe
Death Stranding » ds.exe
Deceit » deceit.exe
Deep Rock Galactic » fsd-win64-shipping.exe
Defense of the Ancients » dota.exe
Delta Force – Black Hawk down » dfbhd.exe
Depth Game » depthgame.exe
Destiny 2 » destiny2.exe
DiRT 2 » dirt2_game.exe
DiRT 3 » dirt3.exe
Diablo 2 » d2r.exe
Diablo II or Renegate » game.exe
Diablo III » diablo iii.exe
Diablo III » diablo iii64.exe
Diablo Immortal » diabloimmortal.exe
Diabotical » diabotical.exe
Don’t Starve » dontstarve.exe
Don’t Starve » dontstarve_steam.exe
Doom 3 » doom3.exe
Doom Eternal » doometernalx64vk.exe
Dota 2 » dota2.exe
Dragon Nest Launcher » dnlauncher.exe
Dragon Nest » dragonnest.exe
Drakensang Online » dro_client64.exe
Drakensang Online » thinclient.exe
Dream ACE » dreamace.exe
Dungeon Fighter Online » dnf.exe
Dungeon Runners » dungeonrunners.exe
Dungeons & Dragons Online » dndclient.exe
DzoGame Launcher » dzolauncher.exe
EGO Play Launcher » egoplay.exe
ELSWord Online » elsword.exe
EVE Online » evelauncher.exe
EXBO (Stalcraft) Launcher » exbolauncher.exe
Eesident Evil 3 » re3.exe
Elden Ring » eldenring.exe
Elder Scrolls Online » eso.exe
Elder Scrolls Online » eso64.exe
Elite Dangerous Launcher » edlaunch.exe
Elite Dangerous » elitedangerous64.exe
Elyon » elyon.exe
Enlisted » enlisted.exe
Entropia Universe » entropia.exe
Epic Games Launcher » epicgameslauncher.exe
Escape from Tarkov » escapefromtarkov.exe
Escape from Tarkov » escapefromtarkov_be.exe
Euro Truck Simulator 2 » eurotrucks2.exe
EuroAion » euroaion.exe
Eve Online Launcher » exe
file.exe
Eve online » eve.exe
EverQuest II » everquest2.exe
Everquest Landmark » landmark.exe
Everquest Landmark » landmark64.exe
F.E.A.R. » fear.exe
F1 2010 » f1_2010_game.exe
F1 2011 » f1_2011.exe
FIFA 04 » fifa4zf.exe
FIFA 06 (EA Sports) » fifa06.exe
FIFA 11 » fifa.exe
FIFA 13 » fifa13.exe
FIFA 16 » fifa16.exe
FIFA 18 » fifa18.exe
FIFA 19 » fifa19.exe
FIFA 20 » fifa20.exe
FIFA 21 » fifa21.exe
FIFA 22 » fifa22.exe
FIFA 23 » fifa23.exe
FIFA ONLINE 3 (Vietnam) » fo3vnlauncher.exe
FIFA ONLINE 3 » fo3launcher.exe
FIFA Online 2 » ff2client.exe
FIFA Online 3 Launcher » fifalauncher.exe
FIFA Online 3 » fifazf.exe
FIFA Online 4 Launcher » fifa4launcher.exe
Factorio » factorio.exe
Fall Guys: Ultimate Knockout » fallguys_client.exe
Fall Guys: Ultimate Knockout » fallguys_client_game.exe
Fallout 76 » fallout76.exe
Fantasy Tennis » ft_launcher.exe
Far Cry 5 » farcry5.exe
Far Cry » farcry.exe
Farming Simulator 19 » farmingsimulator2019game.exe
Farming Simulator 22 » farmingsimulator2022game.exe
Fifa Online 2 » gameloader.exe
FightCade » fightcade.exe
Final Fantasy XIV launcher » ffxivboot.exe
Final Fantasy XIV launcher » ffxivlauncher.exe
Final Fantasy XIV » ffxiv_dx11.exe
Final Fantasy XIV » ffxivgame.exe
Fishing Planet » fishingplanet.exe
FiveM App » fivem_b2189_gtaprocess.exe
FiveM GTA 5 Mod » fivem_b2372_gtaprocess.exe
FiveM GTA V Multiplayer » fivem_b2545_gtaprocess.exe
FiveM » fivem.exe
FiveM » fivem_gtaprocess.exe
Flatout Ultimate Carnage » fouc.exe
FlyffPhilippines » flyff.exe
For Honor » forhonor.exe
Forged Alliance » forgedalliance.exe
Fortnite Game Launcher » fortnitelauncher.exe
Fortnite » fortniteclient-win64-shipping.exe
Fortnite » fortniteclient-win64-shipping_be.exe
Fortnite » fortniteclient-win64-shipping_eac.exe
Forza Horizon 4 » forzahorizon4.exe
Forza Horizon 5 » forzahorizon5.exe
FreeJack » freejackclient.exe
FreeStyle2 Street Basketball » launchersteam.exe
Freelancer » freelancer.exe
Freestyle Street Basketball 2 » freestyle2.exe
Freestyle Street Basketball » freestyle.exe
G365 Win launcher » g365launcher.exe
GTA IV » gtaiv.exe
GTA San Andreas Multiplaer » gta_sa.exe
GTA: San Andreas-Multiplayer » samp.exe
GTR » gtr.exe
Game Launcher » _launcher.exe
Game patcher » lugpatch.exe
GameRanger game service » gameranger.exe
Gameloop App » qmemulatorservice.exe
Games for Windows – LIVE » gfwlclient.exe
Gamvip for PC » gamviplauncher.exe
Gears of War 5 » gears5.exe
Gears of War » geargame.exe
Genshin Impact » genshinimpact.exe
Genshin Impact » yuanshen.exe
GetAmped2 » ga2.exe
Ghost Recon Breakpoint » grb.exe
Ghost Recon Online » ghostrecononline.exe
Gitz WC » gitzwc.exe
Global Agenda Game » globalsgenda.exe
Global Strike » ssjj_battleclient_unity.exe
Granado Espada » ge.exe
Grand Chase » grandchase.exe
Grand Theft Auto V Launcher » gtavlauncher.exe
Grand Theft Auto V » gta5.exe
Grand Theft Auto V » playgtav.exe
Guild Wars 2 64bit » gw2-64.exe
Guild Wars 2 » gw2.exe
Guild Wars » gw.exe
Gundam Online » gundamonline.exe
H1Z1 MMORPG » h1z1.exe
Half-Life » hl.exe
Halflife 2 » hl2.exe
Hall of Legends Team Battle » hallclient.exe
Halo Custom Edition » haloce.exe
Halo Infinite » haloinfinite.exe
Halo The Master Chief Collection » mcc-win64-shipping.exe
Halo » halo.exe
Hangame Poker » hangamepoker.exe
Hearthstone » hearthstone.exe
Hedone Beta » hedone.exe
Hell Let Loose » hll-win64-shipping.exe
Heroes and Generals » heroesandgeneralsdesktop.exe
Heroes and Generals » hng.exe
Heroes of Might and Magic » heros.exe
Heroes of Newerth » hon.exe
Heroes of the Storm » heroes of the storm.exe
Heroes of the Storm » heroesofthestorm_x64.exe
Hitman 2 Silent Assassin » hitman2.exe
Honkai Impact 3rd » bh3.exe
Hunt: Showdown » huntgame.exe
Hyper Scape » hyperscape.exe
IL2 Battle of Stalingrad » il-2.exe
Icarus » icarus-win64-shipping.exe
Identity V » dwrg.exe
Insurgency 64bit » insurgency_x64.exe
Insurgency Sandstorm » insurgencyclient-win64-shipping.exe
Insurgency » insurgency.exe
Ironsight » ironsight.exe
JX2 » so2game.exe
JX3 » jx3clientx64.exe
Kalonline » kalonline.exe
KartRider » kartrider.exe
Killing Floor 2 » kfgame.exe
Killing Floor » killingfloor.exe
Kingdom Hero II » kh2.exe
Knight Online » knightonline.exe
Knives Out hack » hyxd.exe
LAN Games by Garena Online » langames.exe
Launcher Heavy Metal Machines and Wooduan Games » wdlauncher.exe
Launcher for Albion Online » albionlauncher.exe
Launcher for Escape from Tarkov » bsglauncher.exe
League Of Legends Launcher » lolpatcher.exe
League Of Legends Launcher » lolpatcherux.exe
League of Legends Client » lol.exe
League of Legends Client » lolclient.exe
League of Legends launcher » riotclientservices.exe
League of Legends » league of legends.exe
League of Legends » leagueclient.exe
League of Legends » leagueclientux.exe
League of Legends » leagueclientuxrender.exe
Left 4 Dead 2 » left4dead2.exe
Left 4 Dead Dedicated Server » left4dead.exe
Legend Online Client » legendonline.exe
Lesta Game Center API » lgc_api.exe
Lesta Game Center » lgc.exe
Lifeafter » lifeafter.exe
Lineage 2 GoD l » llineageii.exe
Lineage 2 launcher » nclauncher2.exe
Lineage 2 » l2.exe
.exe
Lineage 2 » l2.exe
Lineage W » lineager.exe
Live for Speed » lfs.exe
Lord of the Rings Online » lotroclient.exe
Lost Ark » lostark.exe
Lost Saga Online Client » lostsaga.exe
Lost Saga » lswebbroker.exe
MIR 4 Global Launcher » mir4g.exe
MIR 4 Launcher » mir4launcher.exe
MIR 4 » mir4.exe
MORDHAU Game » mordhau-win64-shipping.exe
MS Flightsimulator 9 (2004) » fs9.exe
MS Flightsimulator X » fsx.exe
MU Online » mu.exe
Magicite » magicite.exe
Magicka » magicka.exe
MapleStory SEA » maplestory.exe
MechWarrior Online » mwoclient.exe
Medal of Honor 2010 MultiPlayer » mohmpgame.exe
Medal of Honor: Pacific Assault » mohpa.exe
Medal of Honor: Spearhead » moh_spearhead.exe
Medal of Honor: Warfighter » mohw.exe
Medal of Honor » mohaa.exe
Mega Mu Online » main.exe
Men of War Squad Assault » mow_assault_squad.exe
Mercenary Ops » marsgame.exe
Metin 2 » metin2.exe
Metin 2 » metin2client.exe
Microsoft Flight Simulator (2020) » flightsimulator.exe
Midnight Club 2 » mc2.exe
Minecraft Launcher » minecraftlauncher.exe
Minecraft SP » minecraftsp.exe
Minecraft Vimeworld » vimeworld.exe
Minecraft Windows 10 Edition » minecraft.windows.exe
Minecraft » minecraft.exe
Monster Hunter World » monsterhunterworld.exe
Mortal Kombat 11 » mk11.exe
Mount&Blade Warband » mb_warband.exe
Mr. Bridge Tutorial Software » mr.bridge.exe
Mu Antigo Online Game Server » muantigo.exe
MuawAy » jogar.exe
NBA 2K21 » nba2k21.exe
NBA2K Online » nba2konline.exe
NBA2K20 » nba2k20.exe
NC Soft Launcher » nclauncher.exe
NCSOFT Launcher » playnclauncher.exe
NFS Underground 2 » speed2.exe
NFSC CARBON » nfsc.exe
Nakara Bladepoint » narakabladepoint.exe
Need For Speed World » nfsw.exe
Need for Speed – Most Wanted » speed.exe
Need for Speed Payback » needforspeedpayback.exe
Need for Speed » nfs16.exe
Neverwinter » neverwinter.exe
New World Online Client » newworldlauncher.exe
New World » newworld.exe
Nexuiz » nexuiz.exe
No Man’s Sky » nms.exe
OnLive » onlive.exe
Operation Arrowhead » arma2oa.exe
Operation Flashpoint Dragon Rising » ofdr.exe
Operation Flashpoint » operationflashpoint.exe
Operation7 » operation7.exe
Origin EA game manager » origin.exe
Outriders » outriders-win64-shipping.exe
Overwatch » overwatch.exe
Pactify Minecraft for PvP » pactify.exe
Paladins – Champions of the Realm » paladins.exe
Paladins – Champions of the Realm » paladinseac.exe
Pangya » projectg.exe
Path of Exile (64bit) » pathofexile_x64.exe
Path of Exile on Steam » pathofexile_x64steam.exe
Path of Exile » pathofexile.exe
Path of Exile » pathofexilesteam.exe
Payday 2 » payday2_win32_release.exe
Perfect World » elementclient.exe
Perfect Worlds or Star Trek Online » gameclient.exe
Phantasy Star 2 » pso2.exe
Phasmophobia » phasmophobia.exe
Phoenix Firestorm Second Life Viewer » firestormos-releasex64.exe
Planetside 2 64bit » planetside2_x64.exe
Planetside 2 » planetside2.exe
Plarium Play Launcher » plariumplay.exe
PlayerUnknown’s Battleground PUBGLite » pubglite-win64-shipping.exe
PlayerUnknown’s Battlegrounds » exe
cpubg.exe
PlayerUnknown’s Battlegrounds » tslgame.exe
PlayerUnknown’s Battlegrounds » tslgame_be.exe
PlayerUnknown’s Battlegrounds » tslgame_eac.exe
PlayerUnknown’s Battlegrounds Lite » pubglite.exe
Playstation Now launcher » psnowlauncher.exe
Point Blank Launcher » pblauncher.exe
Point Blank » pointblank.exe
PokerStars » pokerstars.exe
Prius » prius.exe
Pro Evolution Soccer 2011 » pes2011.exe
Pro Evolution Soccer 2012 » pes2012.exe
Pro Evolution Soccer 2013 » pes2013.exe
Pro Evolution Soccer 2016 » pes2016.exe
Pro Evolution Soccer 2019 » pes2019.exe
Pro Evolution Soccer 2020 » pes2020.exe
Pro Evolution Soccer 2021 » pes2021.exe
Pro Evolution Soccer 4 » pes4.exe
Pro Evolution Soccer 5 » pes5.exe
Pro Evolution Soccer 6 » pes6.exe
Project Zomboid » projectzomboid64.exe
QQChess » qqchess.exe
Quake 3 » quake3.exe
Quake Champions » quakechampions.exe
QuakeLive » quakelive_steam.exe
RAGE Multiplayer » ragemp_v.exe
RF Online » rf.exe
RF commanders » rfc.exe
RIFT » rift.exe
Radmir Role Play » radmir_launcher_ex.exe
Raft » raft.exe
Ragnarok Online II » ro2client.exe
Ragnarok Online » ragexe
.exe
Ragnarok Online » ragnarok.exe
Rainbow Six Vegas 2 » r6vegas2_game.exe
Ravenshield » ravenshield.exe
Red Dead Redemption 2 » rdr2.exe
Red Orchestra 2 » rogame.exe
Red Orchestra » redorchestra.exe
Remnant: From the Ashes » remnant-win64-shipping.exe
Return to Castle Wolfenstein » wolfmp.exe
Revelation Online Game » tianyu.exe
Ring of Elysium » europa_client.exe
Rising Storm 2: Vietnam » risingstorm2.exe
Rising Storm 2: Vietnam » vngame.exe
Roblox Oblivion Launcher » robloxplayerlauncher.exe
Roblox Oblivion » robloxplayerbeta.exe
Rocket League » rocketleague.exe
Rogue Company » roguecompany.exe
Rohan Online » rohanclient.exe
Rules of Survival » ros.exe
RuneScape » runelite.exe
RuneScape » runescape.exe
Runes of Magic » runesofmagic.exe
Russian Fishing 4 launcher » rf4launcher.exe
Russian Fishing 4 » rf4_x64.exe
Rust game » rust.exe
Rust game » rustclient.exe
Rusty Hearts » rustyhearts.exe
S4 League » hgwc.exe
SCUM » scum.exe
SMITE » hirezlauncherui.exe
SMITE » smite.exe
STALKER: Shadow of Chernobyl » xr_3da.exe
Sea of Thieves » sotgame.exe
Secret Lab » scpsl.exe
Section 8: Prejudice » s9-win32-f.exe
Silent Hunter 3 » sh3.exe
Silkroad Online » silkroad.exe
Silkroad Online » sro_client.exe
Singularity Alpha Viewer » singularityalphaviewer.exe
Sirus.Su » run.exe
Sniper Ghost Warrior » sniper_x86.exe
SnowRunner » snowrunner.exe
So3dplus Seal Online » so3dplus.exe
Softnyx Game Launcher » nyxlauncher.exe
Soldier Front » soldierfront.exe
Soldier of Fortune2 – Double Helix » sof2mp.exe
SpaceCowboys » spacecowboys.atm
Special Force 2 » sf2.exe
Special Force » specialforce.exe
Spellbreak » spellbreak.exe
Splinter Cell Conviction » conviction_game.exe
Squad Tactical FPS » squadgame.exe
Stalker Online » stalkeronline.exe
Star Citizen » starcitizen.exe
Star Rail » starrail.exe
Star Trek Online » star trek online.exe
Star Wars Battle Front 2 » starwarsbattlefrontii.exe
Star Wars Squadrons » starwarssquadrons.exe
Star Wars-The Old Republic » swtor.exe
Star Wars: Battlefield » battlefront.exe
StarCraft – Broodwar » starcraft.exe
StarCraft II » sc2.exe
StarCraft II » sc2_x64.exe
Starcity Online 2.1 » xingame.exe
Stay Out Game » sogame.exe
Street Fighter 6 » streetfighter6.exe
Street Fighter V » streetfighterv.exe
Stronghold 2 » stronghold2.exe
Super People » bravohotelclient-win64-shipping.protected.exe
Survarium » survarium.exe
SwordOnline » vggame.exe
TDX tower defense » tdxw.exe
THIEN LONG BAT BO » tlbb.exe
Tactical Ops » tacticalops.exe
Tekken 7 » tekkengame-win64-shipping.exe
Tencent Gameloop » androidemulatoren.exe
Tencent Games launcher/updater » tgp_daemon.exe
Tera » tera-launcher.exe
Tera » tera.exe
Test Drive Unlimited 2 » testdrive2.exe
The 10th Zone » cfhd-the10thzone.exe
The Forest » theforest.exe
The Incredible Machine » tim.exe
The War Z » warz.exe
Tianchang 2M 天常2M » purple.exe
Tibia » tibia.exe
Titan » projecttitan.exe
Titanfall 2 » titanfall2.exe
Tlauncher Minecraft » tlauncher.exe
Tom Clancy’s Rainbow Six Siege » rainbowsix.exe
Tom Clancy’s Rainbow Six Siege » rainbowsix_vulkan.exe
Tom Clancy’s The Division 2 » thedivision2.exe
Tom Clancy’s The Division » thedivision.exe
Tower of Fantasy » tof_launcher.exe
Twelve Sky 2 » twelvesky2.exe
Unreal Tournament 2003 » ut2003.exe
Unreal Tournament 2004 » ut2004.exe
Unreal Tournament » unrealtournament.exe
Unturned » unturned.exe
Urban Terror » iourbanterror.exe
VAutoPK » autopk.exe
VNG game launcher » paio.exe
VTC Game Launcher » vtclauncher.exe
Valheim » valheim.exe
Valheim » valheim_server.exe
Valorant » valorant-win64-shipping.exe
Valorant » valorant.exe
Valve Source Dedicated Server » srcds.exe
Vietcong » vietcong.exe
Viewer for Second Life » firestorm-releasex64.exe
Vindictus » vindictus.exe
Volamtruyenky » game_y.exe
Vua Đột Kích » vuadotkich.exe
War Robots » warrobots.exe
War Thunder » aces.exe
WarRock » warrock.exe
WarZ Launcher » warzlauncher.exe
Warcraft III » war3.exe
Wareface » gamedx11.exe
Warface » gamecenter.exe
Warface » warfacemycomsteamloader.exe
Warframe » warframe.x64.exe
Wargaming.net World of Tanks » wgc.exe
Wargaming.net » cef_subprocess.exe
Warhammer Online » warpatch.exe
Warhammer Vermintide 2 » vermintide2.exe
Watch Dog: Legion » watchdogslegion.exe
WeSing Karaoke » wesing.exe
WebZen’s Game Launcher » wzlauncher.exe
Will to Live EasyAntiCheat Launcher » wtl.exe
Will to Live » wtl-win64-shipping.exe
Wolcen:Lords of Mayhem » wolcen.exe
Wolfenstein: Enemy Territory » et.exe
World Of Tanks Launcher » wotlauncher.exe
World War Z » wwzretailegs.exe
World in conflict online » wic_online.exe
World of Pirates (WoP) » client.exe
World of Tanks Blitz » wotblitz.exe
World of Tanks » tanksblitz.exe
World of Tanks » worldoftanks.exe
World of Warcraft 64bit » wow-64.exe
World of Warcraft Classic » wowclassic.exe
World of Warcraft Loader » agent.exe
World of Warcraft » wow.exe
World of Warplanes » worldofwarplanes.exe
World of Warplanes » worldofwarplanesmonitor_x64.exe
World of Warships Launcher » wowslauncher.exe
World of Warships » worldofwarships.exe
World of Warships » worldofwarships64.exe
XVM World of Tanks » xvm-stat.exe
Yu-Gi-Oh! Master Duel » masterduel.exe
YuYanOL » aclientm.exe
Zingplay » zingplay.exe
Zula Launcher » zula_launcher.exe
Zula » zula.exe
aika online » aikasm.exe
dekaron » dekaron.exe
eFootball » efootball.exe
iRacing DirectX 11 » iracingsim64dx11.exe
iRacing » iracingservice64.exe
lock on-2 » simulator.exe
osu! » osu!.exe
pokemon online » po.exe
rFactor » rfactor.exe
sZone-Online » szoneonline.exe
seal online » so3d.exe
sudden attack » suddenattack.exe
talesrunner » trgame.exe
theHunter Call of the Wild » thehuntercotw_f.exe
yugioh online 3 » yo3.exe
zapusk » 4game_zapuskatr.exe
атлантика » atlantica.exe
1&1 SoftPhone » ipphone.exe
123 » fsbox.exe
12 » c+wclient.exe
3CX » 3cx.exe
Aircall » aircall.exe
AliWangWang » aliim.exe
Atinad Iranian Messenger Client for Warcraft » atinad.exe
Aurora Communicator » aurora.exe
CBox » cbox-cctv5+.exe
Counterpath eyebeam » eyebeam.exe
DingTalk Messenger » dingtalk.exe
Discord » discord.exe
Discord » discordptb.exe
FACEIT Client » faceit.exe
Facebook or Chrome or MSN or ZDF Messenger etc. » messenger.exe
Fetion » fetionfx.exe
FreeCall » freecall.exe
Garena Messenger » garenamessenger.exe
Garena Room Joiner » garena_room.exe
Garena+ » garena.exe
Gizmo Project » gizmo.exe
Google Talk » googletalk.exe
KOOK voice chat » kook.exe
LINE messaging app » line.exe
LINE messaging app » lineapp.exe
MS Windows Phone App » yourphone.exe
Megalink » megalink.exe
Microsoft Skype » skypeapp.exe
Microsoft Teams » msteams.exe
Microsoft Teams » teams.exe
Miranda Instant Messenger » miranda32.exe
Mumble VOIP client » mumble.exe
Net Talk » nettalkg.exe
Nexon Messenger Service (Combar Arms) » nmservice.exe
Njnja Lite » ninjali.exe
PCMan » pcman.exe
PSI Instant Messenger » psi.exe
Paltalk Messenger » paltalk.exe
QQ » qq.exe
QQ » qqlogin.exe
Race07 » race_steam.exe
Radmin » rserver3.exe
Raidcall » raidcall.exe
SIPPS or AOL Softphone » sipps.exe
Skype Business » lync.exe
Skype Internet Telephony » skype.exe
Skype Messenger » skypehost.exe
Skypekit » skypekit.exe
Slack » slack.exe
Sonar » sonarhost.exe
SparVoip » sparvoip.exe
Talk On » talkonmain.exe
Teamspeak 3 (32 bit) » ts3client_win32.exe
Teamspeak 3 (64 bit) » ts3client_win64.exe
Teamspeak » teamspeak.exe
Telegram Messenger » telegram.exe
Transformice » transformice.exe
VcGuard » vcg.exe
Ventrilo » ventrilo.exe
Viber Media/Messenger und Videochat » viber.exe
VoipBuster » voipbuster.exe
VoipCheap » voipcheap.exe
VoipDiscount » voipdiscount.exe
WOIZE » woize.exe
WeChat messenger » wechat.exe
Web.de-Freephone » phone.exe
WhatsApp Desktop » whatsapp.exe
Windows Live Communications Platform » wlcomm.exe
Windows Live Messenger » msnmsgr.exe
Wirofon İstemcisi » wirofon.exe
X-Lite 4 » x-lite4.exe
X-Lite » x-lite.exe
X-Pro » x-pro.exe
XTLS X-Ray Client » xray.exe
Xfire » xfire.exe
Y!Supra » y!supra.exe
YY Voice » yy.exe
YahELite » yahelite.exe
YahVox Domination v1.1 » yahvox_domination_v1.1.exe
YahVox » yahvox.exe
Yahoo Messenger » yahoomessenger.exe
Zalo messenger » zalo.exe
Zoiper » zoiper.exe
Zoom video conferencing » zoom.exe
aMSN messenger » amsn.exe
ekiga SIP voip software » ekiga.exe
iPhone » voipclient.exe
inSpeak Communicator » inspeak.exe
magicJack » magicjack.exe
mediaget » mediaget.exe
ACE Stream System » ace_engine.exe
ACE StreamPlayer » ace_player.exe
AIMP Music Player 3 » aimp3.exe
AIMP Music Player » aimp.exe
Audials One » audials.exe
Disney Plus » disneyplus.exe
Emby Server for Windows » embyserver.exe
Foobar2000 » foobar2000.exe
GameCap Video Capture Recorder » gamecap.exe
GeForce Now Streaming » geforcenowstreamer.exe
HelloTV » hellotv-uwp.exe
IP-TV Player » iptvplayer.exe
ITunes » itunes.exe
Internet Radio » rarmaradio.exe
Internet TV 2050 » internettv.exe
Joost » tvprunner.exe
KuGou Music Streaming » kgservice.exe
Last FM – Online Radio » lastfm.exe
Livestreamer » livestreamer.exe
MPlayer » mplayer.exe
Mail.Ru Агент » magent.exe
Mansycam webcam » manycam.exe
Media Player Classic – Home Cinema » mpc-hc.exe
Media Player Classic » mplayerc.exe
Music Center for PC » musiccenter.exe
MyRadar Weather Streaming » myradar.windows.exe
NetEase Cloud Music » cloudmusic.exe
OBS Open Broadcaster Software » obs-browser-page.exe
OVT » ovt.exe
Oculus VR Service » ovrserver_x64.exe
Online Radio Tuner » onlineradiotuner.exe
Open Broadcaster Software » obs.exe
Open Broadcaster Software » obs64.exe
PPTV » pplive.exe
Paragon Last Minute » plmg.exe
PlayStation Remoteplay Client » remoteplay.exe
Plex Media Server » plex media server.exe
Portable TS Player » tsplayer.exe
PotPlayer » potplayer64.exe
PotPlayer » potplayermini64.exe
Potplayer » potplayermini.exe
Prime Video App » primevideo.exe
QQ live streaming » qqlive.exe
Qvod Player » qvodplayer.exe
Radio365 » radio365_dlg.exe
Radioweb Player » radiowebplayer.exe
RealPlayer » realplay.exe
Replay Media Catcher » armcp.exe
STREMIO media center » stremio.exe
Sam Broadcaster » sambc.exe
Screamer Radio » screamer.exe
Serence KlipFolio » klipfolio.exe
SopCast » sopcast.exe
SpeedBit Video Accelerator » videoaccelerator.exe
Spotify » spotify.exe
Steam Streaming Client » streaming_client.exe
TCO!stream Client » tclient.exe
TIDAL Music Streaming » tidal.exe
TIDAL Webplayer » tidalplayer.exe
TV for Windows Media Player or RealPlayer » tv.exe
The KMPlayer » kmplayer.exe
Tivibu » tvplayer.exe
Twitch Desktop App » twitchui.exe
Twitch Streaming App » twitchagent.exe
Twitch Studio » twitchstudio.exe
Ubisoft Share Play Client » shareplayclient.exe
VLC media player » vlc.exe
VRChat Virtual Reality Chat-Room » vrchat.exe
VooV Meeting » wemeetapp.exe
Winamp » winamp.exe
Windows Media Player » wmplayer.exe
XBMC / Kodi Media Player » xbmc.exe
XSplit Broadcaster » xsplit.core.exe
Xbox Live Entertainment Platform » video.ui.exe
Zattoo TV Streaming » zattoo.exe
jetaudio » ietaudio.exe
ABC (Bittorent) » abc.exe
ApexDC » apexd-x64.exe
Bearshare » bearshare.exe
BiglyBT bittorrent client » biglybt.exe
BitLord » bitlord.exe
Bitcomet » bitcomet.exe
Bitcomet » bitcomet_x64.exe
Bitspirit » bitspirit.exe
Bittorrent Web » btweb.exe
Bittorrent » bittorrent.exe
CryptLoad » cryptload.exe
Deluge Bittorrent Client » deluge.exe
Deluge Bittorrent Client » deluged.exe
Direct Connect ++ » dcplusplus.exe
Edonkey2000 » edonkey2000.exe
FlylinkDC++ Data Manager » flylinkdc_x64.exe
FreeRapid Downloader » frd.exe
Fshare Tool » fsharetool.exe
G3torrent » g3torrent.exe
Gigatribe » gigatribe.exe
GomezPEER » gomezpeer.exe
JDownloader2 » jdownloader2.exe
JDownloader » jdownloader.exe
Kazaa Lite K++ » kazaalite.kpp
Kazaa » kazaa.exe
Lime Wire » limewire.exe
Megamanager » megamanager.exe
MoorHunt » moorhunt.exe
Orbit Downloader » orbitdm.exe
Overnet » overnet.exe
QQDownload » qqdownload.exe
RapidShareManager » rapidsharemanager.exe
Share EX2 » share.exe
Shareaza » shareaza.exe
Shareman » shareman.exe
Soulseek » slsk.exe
StrongDC++ » strongdc.exe
Thunder 9 background process » downloadsdkserver.exe
Thunder Network » thunderplatform.exe
Thunder Network » thunderservice.exe
Thunder P4P Client » p4pclient.exe
Thunder » thunder.exe
ThunderServiceLite » thunderservicelite.exe
Tixati » tixati.exe
Tixati » tixati_windows64bit.exe
Torrex » torrex.exe
Transmission-Qt client » transmission-qt.exe
Transmission » transmission-daemon.exe
USDownloader » usdownloader.exe
Vuze / Azureus » azureus.exe
WinMX » winmx.exe
Winny » winny.exe
Wuala File Sharing » wuala.exe
Zona Bittorrent » zona.exe
ares » ares.exe
clink file sharing » clink8236.exe
eMule » emule.exe
hiyagu downlord it » foxy.exe
qBittorrent Client » qbittorrent.exe
uSerenity » userenity.exe
uTorrent Advertizement » utorrentie.exe
uTorrent » utorrent pt.exe
uTorrent » utorrent.exe
uTorrent » utorrent_2.2.1_build_25302.exe
xfplay p2p » xfp2p.exe
搜狐加速器 » sohuva.exe
APKCombo VPN Client » apkcombovpn.exe
AnyDesk remote-desktop » anydesk.exe
Avast SecureLine » vpnsvc.exe
Avira Phantom VPN Client » phantomvpn.exe
Chrome Remote Desktop Host » remoting_host.exe
Citrix-Client » wfica32.exe
DNS Bench Benchmark Tool » dnsbench.exe
DNSCrypt / Umbrella Roaming Client / DNS Leak Fix » dnscrypt-proxy.exe
Docker VPN » com.docker.vpnkit.exe
ExitLag Lag » exitlag.exe
ExpressVPN » expressvpnd.exe
Game TV Plus App » gametvplus.exe
Garena platform service » gxxsvc.exe
HLSW Half-Life Server Watch » hlsw.exe
Hamachi VPN client » hamachi-2.exe
Hamachi » hamachi.exe
Haste Ping Reducer » haste.exe
Honeygain App » honeygain.exe
ICQLite » icqlite.exe
Ivacy VPN » ivacy.exe
IxChariot » endpoint.exe
Live Mesh Remote Desktop » wlcrasvc.exe
MetaTrader Platform Software » terminal.exe
Microsoft Terminal Services Client » mstsc.exe
Mikrotik WinBOX » winbox.exe
Mudfish VPN service » mudflow.exe
NetEase UU Online Game Accelerator » uu_ball.exe
Netviewer Meet Moderator » nv_meet_moderator_en.exe
NoPing Tunnel » noping.exe
NordVPN service » nordvpn.exe
NordVPN » nordvpn-service.exe
Ookla speed test speedtest.net » speedtest.exe
PARSEC remote access for gaming » parsecd.exe
Pidgin » pidgin.exe
Pingzapper » pingzapper.exe
Project V VPN » wv2ray.exe
Proton VPN » protonvpn.exe
Psiphon 3 » psiphon3.exe
Punkbuster » pnkbstrb.exe
QMProxyAccelerator » qmproxyacceler.exe
Radmin VPN Control Service » rvcontrolsvc.exe
Remote Administrator » radmin.exe
Shadow for Windows » shadow.exe
Shadowsocks Protocol Client » shadowsocks.exe
Shadowsocks Proxy » shadowsocksr-dotnet4.0.exe
Sichuan Xunyou Online Game Accelerator » xunyou.exe
Simple DNS Plus » sdnsmain.exe
SoftEther VPN Client » vpnclient.exe
SoftEther VPN client » vpnclient_x64.exe
SoftEther VPN server » vpnserver_x64.exe
Speedify VPN » speedify.exe
Sunlogin remote control » sunloginclient.exe
Supremo remote control » supremo.exe
Surfshark VPN Client » surfshark.service.exe
Surfshark VPN » surfshark.exe
Teamviewer Service » teamviewer_service.exe
Teamviewer » teamviewer.exe
ToDesk Remote Desktop » todesk.exe
TrackChecker » trackchecker.exe
TreeWalk DNS » named.exe
Trillian » trillian.exe
Tunngle LAN Gaming » tunngle.exe
UU Game Booster » uu.exe
Ultra VNC Viewer » vcviewer.exe
V2Ray core of Project V » v2ray.exe
VNC » winvnc4.exe
VPN Avira Antivirus Software » avira.vpnservice.exe
VPNGame.net Online Game Accelerator » vpngame.exe
Virtual Desktop » virtualdesktop.streamer.exe
WinVNC » winvnc.exe
WireGuard VPN Tunnel » wireguard.exe
Wonderful Accelerator » qimiao.exe
Yahoo! All-Seeing-Eye » eye.exe
ZeroTier Global Area Network » zerotier-one_x64.exe
eqwatch earthquake location & magnitude » eqwatch.exe
mIRC » mirc.exe
qiyou Game Accelerator » qeeyou.exe
雷神加速器转换 Game Accelerator » socksengine.exe
2Shared Downloader » cfpt_launcher.exe
360 Total Security » 360safe.exe
360 Total Security » 360tray.exe
360 anti-virus real-time monitoring » 360rp.exe
4K Stogram Portable » 4kstogram.exe
4K Video Downloader » 4kvideodownloader.exe
ADrive Cloud Storage Client » adrive.exe
AMD Graphics Settings » radeonsettings.exe
AMD Radeon Software » radeonsoftware.exe
AMD User Experience » auepmaster.exe
ASRock APP Shop » asrappshop.exe
ASUS Armoury Crate » armourycrate.exe
AVG Internet Security service » avgsvc.exe
Acrobat Reader » acrord32.exe
Acronis True Image » trueimagemonitor.exe
Acronis TrueImage Sync Agent Service » syncagentsrv.exe
Ad Muncher » admunch.exe
Adguard Web Filter » adguardsvc.exe
Adobe Creative Cloud » adobe desktop service.exe
Adobe Flash Player updater » flashplayerupdateservice.exe
Adobe Genuine Software Integrity service » adobegcclient.exe
Advanced SystemCare System-Cleaner » asc.exe
Advanced SystemCare updater » iobitliveupdate.exe
AirExplorer multicloud manager » airexplorer.exe
AlphaAntiLeak Java protector » alphaantileak.exe
Android Emulator » androidemulator.exe
Anonymizer » anonproxy.exe
Anti Virus Project » avp.exe
Anti-Malware Real-Time Windows Service » mbamservice.exe
Apache HTTP server » httpd.exe
Apple Push Service Daemon » apsdaemon.exe
Apple iCloud » iclouddrive.exe
Avast Antivirus Updater » instup.exe
Avast Antivirus » avastui.exe
Avast Cleanup Service » tuneupsvc.exe
Avast Emergency Update » avemupdate.exe
Avast Secure Browser » avastbrowser.exe
Avast » avastsvc.exe
Baidu Net Disk » baidunetdisk.exe
Baidu Spark Browser » spark.exe
Baidu Wangpan Web Drive » pandownload.exe
BaiduYunGuanjia file manager » baidunetdiskhost.exe
BattlEye Anti-Cheat Service » beservice.exe
Battlefield 4 Web Helper » bf4webhelper.exe
Battlefield 4 Web Helper » bf4x86webhelper.exe
Bethesda Launcher App » bethesdanetlauncher.exe
Bethesda Updater App » bethesdanetupdater.exe
Betternet VPN Service » betternet.exe
Binance Crypto Trading App » binance.exe
Binreader » binreader.exe
Bionius Booru image grabber » grabber.exe
Bitdefender 2018 VPN » bdvpnservice.exe
Bitdefender 2019 » bdservicehost.exe
Bitdefender Device Management Service » devmgmtservice.exe
Bitdefender Total Security service » productagentservice.exe
Bitdefender Total Security service » vsserv.exe
Bitdefender Vulnerability Scanner » vulnerability.scan.exe
Bitdefender Wallet Agent » bdwtxag.exe
Bitdefender service » bdredline.exe
Bittorrent file system » btfs.exe
Blitz App » blitz.exe
Blizzard in-game browser » blizzardbrowser.exe
Blocklist Manager » blockmgr.exe
BlueStacks Agent Android Emulator » hd-agent.exe
BlueStacks Android Host Player » hd-player.exe
BlueStacks Android Host Player » hd-runapp.exe
BlueStacks App Player helper » bluestackshelper.exe
BlueStacks App Player installer » bluestacksinstaller.exe
BlueStacks App Player » bluestacks.exe
Boinc » boinc.exe
Brave web browser » brave.exe
CA Personal Firewall » ca.exe
CCleaner updater » ccupdate.exe
CCleaner » ccleaner64.exe
CFToolbox » cftoolbox.exe
CORSAIR iCUE » icue.exe
CaptchaBotRS » captchabotrs.exe
CefSharp Web Browser » cefsharp.browsersubprocess.exe
Cent Browser Updater » centbrowserupdater.exe
Chia Blockchain Client » chia.exe
Chia Blockchain Client » start_full_node.exe
Chrome M1N3R Software » miner.exe
CloudflareWARP App » warp-svc.exe
Coc Coc Webbrowser » browser.exe
CocCoc browser updater » coccocupdate.exe
Comodo Dragon » dragon.exe
Comodo IceDragon Browser » icedragon.exe
Comodo Internet Security » cmdagent.exe
Corel Update Helper » cuh.exe
Creative Entertainment Console » entc.exe
Crossfire Europe Patcher » patcher_cf.exe
Crossfire Philippines Patcher » patcher_cf2.exe
CurrentWare client service » cwclient.exe
Cyberfox Web Browser » cyberfox.exe
Daily Office License Activation Heartbeat » olicenseheartbeat.exe
Docker » com.docker.backend.exe
Download Acceleration Manager » daman.exe
Download Accelerator Plus » dap.exe
Download Manager » aria2c.exe
Download Master » dmaster.exe
DrWeb Security » dwnetfilter.exe
Driver Booster » driverbooster.exe
DriverEasy driver downloader » drivereasy.exe
Dropbox Updater » dropboxupdate.exe
Dropbox » dropbox.exe
E/A Origin client service » originclientservice.exe
EA Background Service » eabackgroundservice.exe
EA Desktop App » eadesktop.exe
EA Desktop Launcher Helper » ealaunchhelper.exe
EA Desktop Launcher » ealauncher.exe
EA Origin Server » eacoreserver.exe
ESET Smart Security service » ekrn.exe
EagleGet » eagleget.exe
Easy Anti-Cheat EOS Service » easyanticheat_eos.exe
Easy Anti-Cheat Service » easyanticheat.exe
Easy Uploader » easyuploader.exe
EasyAntiCheat » easyanticheat_launcher.exe
Electronic Arts Connect Microsoft » eaconnect_microsoft.exe
Electronic Arts Link » ealink.exe
Electronic Arts Steam Proxy » easteamproxy.exe
Epic Online Services Host » epiconlineserviceshost.exe
Epic Online Services UI Helper » epiconlineservicesuihelper.exe
Epic Online Services User Helper » epiconlineservicesuserhelper.exe
Epic Online Services » epiconlineservices.exe
Epic Web Helper » epicwebhelper.exe
Exception Hunter 2 dev tool » hunt.exe
Extreme Media Digital Studio » dstudio.exe
F-Secure ORSP Service » fsorsp64.exe
FAROO Distributed Search » faroo.exe
FICUS/UI client » ficus-ui.exe
FTPRush » ftprush.exe
Face It anti-cheat service » faceitservice.exe
Facebook Gameroom » facebookgameroom.exe
FeedDemon » feeddemon.exe
Filezilla SFTP » fzsftp.exe
Filezilla » filezilla.exe
Firefox Portable » firefoxportable.exe
Firefox Telemetry » pingsender.exe
Firefox Webbrowser » firefox.exe
Firefox helper » helper.exe
Firstload » ikarus.exe
Flash to FireFox » plugin-container.exe
FlashFXP » flashfxp.exe
FlashGet 3 Download Manager » flashget3.exe
FlashGet Download Manager » flashget.exe
Fortress Secure Client » fsclient.exe
Free Download Manager » fdm.exe
G Data AntiVirus » avkproxy.exe
GIGABYTE AdjustService App Center » adjustservice.exe
GIGABYTE App Center » gcupd.exe
GOG Galaxy v2 Client Helper Application » galaxyclient helper.exe
GOG Galaxy v2 Client Service » galaxyclientservice.exe
GOG Galaxy v2 Communication Service » galaxycommunication.exe
GOG Galaxy v2 Galaxy Overlay » galaxyoverlay.exe
GOG Galaxy v2 Galaxy Updater Application » galaxyupdater.exe
GOG Galaxy v2 Launcher App » galaxyclient.exe
GOG Galaxy v2 Notifications Renderer » gog galaxy notifications renderer.exe
GQNA GameNet » qgna.exe
Gaijin Game updater » gaijin_downloader.exe
Game TV Plus Gaming Platform » gtvplus.exe
GameLoop Android Emulator » cef_game_render.exe
GameLoop Emulator » androidemulatorex.exe
Gameforge Client » gfclient.exe
GeForce Now » geforcenow.exe
GeForce monitor » geforcenowreliabilitymonitor.exe
Gigabyte App Center » apcent.exe
Gigabyte Home Cloud » hcloud.exe
GlobalProtect App » pangps.exe
Google Chrome Browser » chrome_proxy.exe
Google Chrome » chrome.exe
Google Drive sync » googledrivesync.exe
Google Earth » googleearth.exe
Google FileStream » googledrivefs.exe
Google Updater » googleupdate.exe
HFS (HTTP File Server) » hfs.exe
HTTP proxy » kenproxy.exe
Heimdal.DarkLayerGuard Security » heimdal.darklayerguard.exe
IObit Prozess Startup Manager » suo12_startupmanager.exe
IQ Option Trading App » iqtray.exe
Intel Driver and Support Assistant » dsaupdateservice.exe
Intel Graphics Control Panel » gfxdownloadwrapper.exe
Intel Telemetry » lrio.exe
Internet Download Accelerator » ida.exe
Internet Download Manager » idman.exe
Internet Explorer » iexplore.exe
Iridium Webbrowser » iridium.exe
JAVA updater » jusched.exe
Java » java.exe
Java » javaw.exe
JetSwap SafeSurf » safesurf.exe
Kaspersky Secure Connection » ksde.exe
Kinza Web Browser » kinza.exe
Kodi media center » kodi.exe
Kryptex cryptocurrency miner » kryptex.exe
LDPlayer Android Emulator Player » ldplayer.exe
LDPlayer Android emulator News » ldnews.exe
LDPlayer Virtual Box Android Emulator » ldvboxheadless.exe
LeechGet » leechget.exe
Leigod Online Game Accelerator » leigod.exe
Liebao Web Browser » liebao.exe
Logitech G HUB » lghub_agent.exe
Logitech Gaming Framework » lcore.exe
MEmu Android emulator » memu.exe
MEmu Multiple Instances Android emulator » memuconsole.exe
MS Windows text-to-speech » speechruntime.exe
MS Xbox App Services » xboxappservices.exe
MS Xbox App » xboxapp.exe
MS Xbox App » xboxpcapp.exe
Mail.ru Game Center » gamecenter@mail.ru.exe
MailClient by eM Client » mailclient.exe
Maiwei VM Memu » memuheadless.exe
Malware Anti-Malware » mbam.exe
Maxthon Web Browser » maxthon.exe
MegaSync Downloader App » megadownloader.exe
Megasync » megasync.exe
Mesh Operating Environment » moe.exe
MetaTrader Client Terminal » terminal64.exe
Microleaves Online Guardian » online-guardian.exe
Microsoft Compatibility Telemetry » compattelrunner.exe
Microsoft Cortana Maps » placesserver.exe
Microsoft Cortana module downloader » speechmodeldownload.exe
Microsoft Cortana service » actionuriserver.exe
Microsoft Edge Browser (Chromium) » msedge.exe
Microsoft Edge Browser » microsoftedge.exe
Microsoft Edge Content Process » microsoftedgecp.exe
Microsoft Edge Updater » microsoftedgeupdate.exe
Microsoft Edge Web Platform » microsoftedgesh.exe
Microsoft Edge Web View 2 » msedgewebview2.exe
Microsoft Edge browser helper » browser_broker.exe
Microsoft Feeds Synchronization » msfeedssync.exe
Microsoft Game Bar » gamebarpresencewriter.exe
Microsoft Gaming Install Services » gamingservices.exe
Microsoft HPC Pack » hpcmonitoringclient.exe
Microsoft HTA browser » mshta.exe
Microsoft MSN » microsoft.msn.news.exe
Microsoft Office Click-to-Run » officec2rclient.exe
Microsoft Office SDX Helper » sdxhelper.exe
Microsoft Office Telemetry Agent » msoia.exe
Microsoft Office background program » officeclicktorun.exe
Microsoft OneDrive » onedrivestandaloneupdater.exe
Microsoft Onedrive » onedrive.exe
Microsoft Outlook Communications » hxtsr.exe
Microsoft Outlook » hxoutlook.exe
Microsoft Outlook » outlook.exe
Microsoft Photo Image Viewer » microsoft.photos.exe
Microsoft Security Center » mssecsvc.exe
Microsoft Update Notifier » updatenotificationmgr.exe
Microsoft Widgets » widgets.exe
Microsoft Windows Process Settings » systemsettings.exe
Microsoft Windows Setting Synchronization » settingsynchost.exe
Microsoft Windows Store App » winstore.app.exe
Microsoft Windows rundll service » rundll32.exe
Microsoft Windows task host » taskhostw.exe
Microsoft Your Phone » yourphoneserver.exe
Mipony Download Manager » mipony.exe
Monex Trader » desktopcymo.exe
Mr. AutoTrading Client » mr.autotrading_lite.exe
Mr. Guard Email Vault » mr.guard.exe
MultiCharts Trading Client » tradingserver.exe
MultiCharts Trading » tsserver.exe
Mumu Emulator » nemuheadless.exe
My.com Games Center Service » hg64.exe
My.com Games Launcher/Updater » mycomgames.exe
NBMiner App » nbminer.exe
NOXGAMES MOMO Player » dnplayer.exe
NVIDIA Container » geforcenowcontainer.exe
NVIDIA Container » nvcontainer.exe
NVIDIA Container » nvdisplay.container.exe
NVIDIA Driver Profile Updater » nvprofileupdater64.exe
NVIDIA Share screen recording » nvidia share.exe
NVIDIA Telemetry Container » nvtelemetrycontainer.exe
NVIDIA Web Helper Service » nvidia web helper.exe
NW.js Javascript App framework » nw.exe
Neat Download Manager » neatdm.exe
Neologica Profit Pro » profitchart.exe
NewsLeecher » newsleecher.exe
Newsbin 64 bits » newsbinpro64.exe
NiceHash Miner 2.0 » app_nhm.exe
NiceHash Miner » excavator.exe
NiceHash QuickMiner Client » nicehashquickminer.exe
NinjaTrader » ninjatrader.exe
Node.js » node.exe
Norton Security » nortonsecurity.exe
Nox App Player Android emulator » multiplayermanager.exe
Nox App Player » nox.exe
Nox App Player » noxvmhandle.exe
Nox App Player » noxvmplayer.exe
OpenVPN » openvpn.exe
Opera Autoupdater » opera_autoupdate.exe
Opera » opera.exe
Oracle Virtual Box » ldboxheadless.exe
Oracle Virtual Box » virtualbox.exe
Orbitum social browser » orbitum.exe
Origin Web Helper Electronic Arts » originwebhelperservice.exe
Outlook Express » msimn.exe
Overwolf Browser » overwolfbrowser.exe
Overwolf » overwolf.exe
Pale Moon Browsers » palemoon.exe
Pando Download Manager » pmb.exe
Phoenixminer » phoenixminer.exe
Pressreader » pressreader.exe
ProgDVB TV and Radio via DVB-PCI card » progdvbnet.exe
Proxifier » proxifier.exe
Proxy for Multi Theft Auto » proxy_sa.exe
ProxySwitcher » proxyswitcher.exe
Psiphon tunnel » psiphon-tunnel-core.exe
Python » python.exe
QQ Browser by Tencent » qqbrowser.exe
Qihoo 360 Internet Security » qhactivedefense.exe
Qihoo 360 Total Security » 360se.exe
Qihoo Web browser » 360chrome.exe
Qt Web Engine Framework » qtwebengineprocess.exe
QuiteRSS news reader » quiterss.exe
RaiDrive cloud storage drive » raidrive.service.x64.exe
Razer Central Service » razercentralservice.exe
Razer GameManager » gamemanagerservice.exe
Razor Cortex booster » razercortex.exe
Rclone rsync » rclone.exe
Resilio File Sync » resilio-sync_x64.exe
Resilio File Sync » resilio/sync.exe
Riot Games User Experience Client » riotclientux.exe
Rockstar Games Launcher App » rockstarservice.exe
Rockstar Games Launcher Updater App » launcherpatcher.exe
Rockstar Games Social Club » socialclubhelper.exe
Routed connection » routed
Ruby interpreter » rubyw.exe
Rufus Create Bootable USB drives » rufus.exe
SABnzbd Binary Newsreader » sabnzbd.exe
SOPHOS Antivirus plugin » sophosmirror.exe
STB DataServer » stbdataserver.exe
Safari » safari.exe
Samsung Magician » samsungmagician.exe
Setup Program » setup.exe
Skype Icons » skypeicon.exe
Slimjet Browser » slimjet.exe
Snow Inventory Client » client64.exe
Soochow Securities trade software » xiadan.exe
Sophos Anti-Virus » swi_fc.exe
Speedify VPN UI » speedifyui.exe
Steam Client Service » steamservice.exe
Steam Client Web Helper » steamwebhelper.exe
Steam Error Reporter » steamerrorreporter.exe
Steam Launcher App » steam.exe
T-Rex Miner » t-rex.exe
Tencent Gaming Buddy » appmarket.exe
Tencent Gaming Buddy » gamedownload.exe
TeraBox Cloud Storage » terabox.exe
The Bat » thebat.exe
The Elder Scrolls Online launcher » bethesda.net_launcher.exe
The Tor Project » tor.exe
Thunderbird » thunderbird.exe
Total Commander » totalcmd.exe
Touchance 2020 tool » touchance.exe
Trader Workstation » tws.exe
Tresorit » tresorit.exe
Twitch Updater » twitch.exe
UC Browser for PC » ucbrowser.exe
Ubisoft Connect Launcher App » ubisoftconnect.exe
Ubisoft Connect Service » uplayservice.exe
Ubisoft Connect Web Core » uplaywebcore.exe
Ubisoft Game Launcher » ubisoftgamelauncher.exe
Ubisoft Game Launcher » ubisoftgamelauncher64.exe
Ummy Video Downloader » ummyvideodownloader.exe
Unknown program » unknown
Unreal Engine Launcher » unrealenginelauncher.exe
Update Donwloader for Tencent Games » teniodl.exe
Updater Program » update.exe
Updater Program » updater.exe
Uplay Client » upc.exe
Uplay Ubisoft game center » uplay.exe
Usenext » usenext.exe
VMWare » vmware.exe
VMware NAT Service » vmnat.exe
Valorant Riot Vanguard Anti-Cheat Service » vgc.exe
Vanguard Anti-Cheat Software » vanguard.exe
Vanguard Tray Anti-Cheat » vgtray.exe
VdhCoApp Video DownloadHelper » net.downloadhelper.coapp-win-64.exe
VirtualBox Headless Frontend » ld9boxheadless.exe
Vivaldi Browser » vivaldi.exe
Vkontakte » vkontaktedj.exe
WPS Office » wpscloudsvr.exe
WTFast » wtfast.exe
Warcraft III Loader » w3l.exe
Wargaming.net Client Web Helper » cef_browser_process.exe
Wargaming.net Game Center API » wgc_api.exe
Wargaming.net Game Center Renderer » wgc_renderer.exe
Wargaming.net Game Center Web Host » wgc_renderer_host.exe
Wargaming.net Game Center » wargamingerrormonitor.exe
Waterfox Web Browser » waterfox.exe
Website Watcher » wswatch.exe
Wegame game platform » wegame.exe
WhatPulse App » gujianol.exe
WiFi Master Key » wifimaster.exe
WinSCP File Transer Client » winscp.exe
Windows 7 Desktop Gadgets » sidebar.exe
Windows Background Task Host » backgroundtaskhost.exe
Windows Background Transfer service » backgroundtransferhost.exe
Windows Cortana » searchapp.exe
Windows Cortana » searchui.exe
Windows Defender Service exe
cutable » msmpeng.exe
Windows Defender SmartScreen » smartscreen.exe
Windows Device Census » devicecensus.exe
Windows Error Reporting » werfault.exe
Windows Explorer » explorer.exe
Windows Key Management Service » sppextcomobj.exe
Windows Live Mail » wlmail.exe
Windows PowerShell » powershell.exe
Windows Problem Reporting » wermgr.exe
Windows Search Filter Host » searchhost.exe
Windows Store App » winstore.exe
Windows System Startmenu » startmenuexperiencehost.exe
Windows WWA Host process » wwahost.exe
Windows app permissions service » runtimebroker.exe
Windows authentication process » lsass.exe
Windows dllhost service » dllhost.exe
Windows service host » svchost.exe
Windows system components repair » sihclient.exe
Windows update client » usocoreworker.exe
Windscribe ad blocker » windscribe.exe
X7 Oscar Keyboard Editor » oscareditor.exe
XBox Game Bar service » gamebar.exe
XMRig Miner Client » xmrig.exe
Xbox game service » xbox.exe
Xtreme Download Manager » xdm-app.exe
Yandex Browser » yandex.exe
Yandex.Disk » yandexdisk2.exe
YouTube Downloader » youtube-dl.exe
Zemana AntiMalware » zam.exe
Zen Fulcrum Browser » zfgamebrowser.exe
avira » avcenter.exe
cFosSpeed Service » spd.exe
cFosSpeed Status Windows » cfosspeed.exe
generic auto updater » autoupdate.exe
generic downloader » downloader.exe
k9 Internet Protect » k9filter.exe
t-online.de Browser » browser7.exe
thinkorswim Trading App » thinkorswim.exe
uFiler Download Manager » ufiler.exe
µTorrent Web browser extension » utweb.exe
世界之窗 » twchrome.exe
搜狗高速浏览器 » sogouexplorer.exe
Traffic Shaping Calibration
More on cFosSpeed Traffic Shaping
Ping times should start out low from the get-go, while the upload rate will first have to be properly aligned with a connection’s maximum specifications. You can switch between having your current ping time displayed either numerically or graphically on the status window.
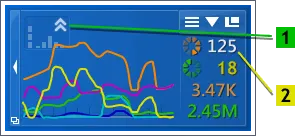
The cFosSpeed status window contains two important elements which indicate how Traffic Shaping works:
1 The Traffic Shaping indicator. It “blips” whenever cFosSpeed re-orders a packet, ie. whenever a prioritization takes place.
2 The ping time indicates how reactive your Internet connection is during upload/download. The lower the value the better.
Note: To measure the latency Pings will be sent to atlas-cfosspeed.com. However they never reach their destination, since they use only a small hop count (typically TTL 2 or 3). If you prefer another ping destination, you can set the key ping_dest in the file global.ini, section [param].
Additional things you can do
- Disable other products that try to limit the connection speed, e.g. the Traffic Shaping of the Fritz!Box. These two solutions will interfere with each other.
- In the context menu, select the correct medium for your connection under Options/Settings/2Traffic Shaping.
More information - If you’re frequently using phones plugged into the router for making Voice-over-IP (VoIP) calls, please select “variable bandwidth” for your connection.
More information
>How do I optimally calibrate cFos / cFosSpeed?
>What else does Traffic Shaping do?
>How can I determine the benefits of cFos Traffic Shaping myself?
API
Change cFosSpeed settings using SPD.exe
data.ini file
Settings represent the current characteristics of your connection. Parameters are subject to change with newer version. So change them ONLY if you REALLY know, what you are doing. Changes should always be done using spd commands!
MaxTxRaw
- max traffic send/second without waiting for acks
MaxRx
- max traffic that was received/second
MinDelay
- the minimum delay that was ever measured.
Method
- the underlying transport medium
MaxDelay
- the maximum delay that was ever measured.
TotalRxVolume
- the name says it all
TotalTxVolumeRaw
- the name says it all
TotalTxVolumeAcked
- the name says it all
MaxIpLen
- the maximum size of ip packet that was ever sent
PingCnt
- number of pings sent
PongCnt
- number of ping replies received
MaxRxMss
- maximum tcp mss that was ever received
MaxTxMss
- maximum tcp mss that was ever sent
AddHops
- use spd sethops X to change this value. increases the hop count that is pinged for latency measurements
msslimit
- the maximum tcp mss that cfosspeed will allow. if greated, it will force tcp mss to be this value.
SPD.exe - More Info
DSCP configuration
Classes can have a DSCP value as well. If set, this value is set to all outgoing packets of that class. Specify “-dscp X” in the class line to set DSCP value of “X”. DSCP values range from 0 to 63. By default, DSCP values are not set for any class. For more details see RFC 2474 (Differentiated Services, www.ietf.org/rfc/rfc2474.txt).
VLAN configuration
You can set VLAN Identifier (VID) and Priority Code Point (PCP) for traffic classes as well. To set VID, use “-vlan-id X” option for the traffic class, where “X” is the Identifier. VIDs range from 0 to 4095 (0xfff hex). To set PCP, use “-vlan-prio X”, respectively, where X is the PCP. PCPs range from 0 to 7. If you set one of these, all outgoing packets will have VID and PCP set. By default, VLAN settings are not changed for the packets of any class. For more details see IEEE 802.1Q (e.g. on Wikipedia).
RX-priorisation
Classes can have weights assigned for rx-priorisation. The concept is like this:
Each class (highest, higher, high, default, low, lowest) has a weight assigned. Furthermore, all TCP connections are mapped to a certain class (this only applies for bulk data; e.g. ACKs are always sent out in the higher class; see below for how the class mapping is done), according to filter rules. The class weight is used when TCP windows for rx-shaping are computed. A TCP connection with weight 100 gets a window that is about 4 times bigger than a connection with weight 25. This should usually translate into more speed on that connection, but not necessarily (e.g. the sending server might not be fast enough).
The pre-set weights are:
    class highest -weight 400
    class higher  -weight 400
    class high    -weight 400
    class default -weight 100
    class low     -weight 25
    class lowest  -weight 6
I.e. regular browser downloads (class default) should get about 16 times the speed than Torrents (class lowest).
The weighting needs some time (some seconds) to be through, so a newly created higher-than-average TCP connection needs these seconds to come to full speed.
How does cFosSpeed know which TCP connection has which class, since the filters assign classes on a packet-by-packet basis? Well, there are filter expressions that are constant for all packets that belong to a certain connection. The expression might be true or false, but it doesn’t change from one packet to the next. You can see which filter expressions have this criterium by using “spd filter”:
    rt-  -highest -c highest
    rt-  -higher -c higher
    rt-  -high -c high
    rt-  -l7-prot @higherprots -c higher
    rtc  -l7-prot @highprots -c high
    rtc  -l7-prot @lowprots -c low
    rtc  -l7-prot @lowestprots -c lowest
    rt-  -prog @higherprogs -c higher
    rtc  -prog @highprogs -c high
    rt-  -prog @lowprogs -c low
    rtc  -prog @lowestprogs -c lowest
    rt-  -low -c low
The first column (with the “rtc”) shows this: ‘r’ means the filter is active when receiving packets, ‘t’ means the same for transmitting packets. ‘c’ means that it is constant and thus ‘c’ is set for the -l7-prot and -prog rules, since the l7-protocol and program name are saved on a per-connection basis. The -high etc. filters are packet specific and thus have no ‘c’ set.
Now what if cFosSpeed is wrong about the constantness of a filter expression? For example you could have DSCP values assigned to certain connections from another machine, but the -dscp rule is a per-packet rule, not a per-connection rule. To force cFosSpeed to set the class even on account of such a filter expression, use the -force-set-class option. By using this, the filter expression will be flagged ‘c’ and thus considered constant over all packets of that conenction.
Creating your own rules
If you want to assign a class to your own prioritized traffic, use “high”. It’s probably best not to use the other two classes, as this may interfere with overall traffic-shaping performance. You may even add a class of your own, but don’t use a priority of 90 or more for the same reason mentioned above.
Keep in mind that what the whole prioritization system basically does is reorder packets for transmission. Thus, prioritizing more packets will leave fewer packets “normal”. Taken to the extreme, this means that priotizing every single packet indiscriminately would soon slow traffic on the fast lane to little more than stop and go.
The spd utility (see below) and the trace.txt file can be used to show class-usage statistics. As a general rule of thumb, I’d advise you prioritize no more than 10% or 20% of your traffic.
The spd utility
The cFosSpeed installation directory contains a small file called spd.exe for communicating with cFosSpeed. It lets you handle commands and will display results for you.
An easy way to use the spd tool is to click on Start – Programs – cFosSpeed – Open Console. This will bring up a regular command prompt with the cFosSpeed directory as the current one.
Another way would be to copy it to some directory in your PATH.
“spd help” provides a list of commands.
“spd ver” shows cFosSpeed version information.
Changing expressions and classes
“spd class” lists all traffic classes. It usually looks like this:
    class highest -prio 100 -weight 400
    class higher -prio 90 -weight 400
    class high -prio 80 -weight 400
    class default -weight 100
    class low -prio 0 -speed 25%,-10 -weight 25
    class lowest -prio 0 -speed 25%,-30 -weight 6
    class drop
If you want to add a class, use “spd class <name> -prio <prio>”, where <name> is the class name and <prio> the assigned priority.
If you want to delete a class, use “spd class <name> -D”. Classes can only be deleted if there are no expressions referring to them.
You can later change the priority of an already existing class <name> by using “spd class <name> -prio <prio>”. However, you cannot change a low into a high class or vice-versa.
Likewise, you can change the speed of a class after it’s been created. Just use “spd class <name> -speed <speed>” on an already existing <name>, where <speed> can be any positive number or “inf” for no speed limit.
You can get a list of the active filters by using the “spd filter” command. This will usually read something like this:
    0 -highest -c highest
    1 -higher -c higher
    2 -high -c high
    3 -prog @user.ini/highprogs -c high
    4 -prog @highprogs -c high
    5 -low -c low
    6 -prog @user.ini/lowprogs -c low
    7 -prog @lowprogs -c low
    8 -prog @user.ini/lowestprogs -c lowest
    9 -prog @lowestprogs -c lowest
New filter expressions can be appended to the bottom of the expression list by the “spd filter -A <filter> -c <class>” command, where <filter> is a set of filter rules and <class> is the target traffic class.
In the same way, you can use “spd filter -I <pos> …” to insert a filter at a specific position into the filter list.
“spd filter -R <pos> …” replaces the filter at position <pos> with the new filter.
“spd filter -M <old> <new>” moves a filter from its old position <old> to a new position <new>.
Finally, “spd filter -D <pos>” deletes a filter at position <pos>.
If you want to review your traffic-class usage, type “spd cstat” to get corresponding statistics. This is an example of what it looked like after a long time transferring:
    shaping is currently enabled; txspeed = 139907, max_queue_size = 419,721

    class highest -prio 100 -weight 400
      sent          320,292 (  2%) packets      8,968,176 (  0%) bytes
      in queue            0        packets              0        bytes

    class higher -prio 90 -weight 400
      sent        1,045,165 (  8%) packets     42,809,356 (  0%) bytes
      in queue            0        packets              0        bytes

    class high -prio 80 -weight 400
      sent          411,963 (  3%) packets     66,261,691 (  0%) bytes
      in queue            0        packets              0        bytes

    class default -weight 100
      sent          103,663 (  0%) packets     15,722,812 (  0%) bytes
      in queue            0        packets              0        bytes

    class low -prio 0 -speed 25%,-10 -weight 25
      sent            4,670 (  0%) packets      5,979,376 (  0%) bytes
      in queue            0        packets              0        bytes

    class lowest -prio 0 -speed 25%,-30 -weight 6
      sent        9,828,143 ( 83%) packets 10,913,999,530 ( 98%) bytes
      in queue            0        packets              0        bytes

    class drop
      dropped             0        packets              0        bytes

    queue overflow        0        packets              0        bytes
Filter expressions and classes can be modified while cFosSpeed is up and running online. If you want to save the changes you made, use “spd save” with either -class, -filter or -all to specify what to save.
You can change settings.ini from the outside with an editor as well. But you have to reload the new settings after you saved the new version of settings.ini by typing “spd reload”. This will, however, only reload the filter settings, not the classes.
Managing program names:
To manage lists of programs that are to be filtered with -tcp-prog, -udp-prog or -prog there are three commands:
- addkey <key> <section>
- This will add the line <key> to the section <section> in settings.ini.
- delkey <key> <section>
- This will delete the <key> line from <section>.
- showsect <section>
- This will display all keys set in the named section.
More useful commands:
With the “spd netstat” command, you can review statistics of the total traffic transmitted over your line. After the long time mentioned above, our sample stats looked as follows:
    IP statistics                     sent       rcvd     bytes sent     bytes rcvd

      Good packets              11,714,403  8,245,216 11,053,999,872  1,874,597,769
      Fragments                      5,267      4,608      5,781,578      4,195,207
      Fragment timeouts              5,191      4,532
      Fragments ignored                 72         76         47,732         42,236
      Protocol 2 (IGMP)                 13          0            520              0


    ARP statistics                    sent       rcvd     bytes sent     bytes rcvd

      Good packets                     783    130,384         21,924      5,997,484


    ICMP statistics                   sent       rcvd     bytes sent     bytes rcvd

      Good packets                 320,702    341,119      9,027,507     19,482,227
      Bad packets                        0      1,085              0        114,283


    UDP statistics                    sent       rcvd     bytes sent     bytes rcvd

      Good packets               1,479,668  1,256,672    146,482,897    158,899,222


    TCP statistics                    sent       rcvd     bytes sent     bytes rcvd

      Good segments              9,905,831  6,638,246 10,892,171,744  1,691,413,796
      Checksum errors                    0         97              0          9,394
      Segments w/o connection        1,961        826        223,937         36,904
      Invalid RST segments               3          7
      ACKs for unset data                0          2
      Segments after reset             765        562         78,108        299,641
      Filtered resents                 193                   233,461
      Used sequence space                             10,304,070,182  1,409,658,307
      Resent segments              184,715     23,005    196,810,498     14,087,200
      Reordered segments                13    200,175            556     80,270,918

      Total sessions                66,765
      Active sessions                    4
      Orderly releases              60,222
      Abortive releases              6,091
      Timeouted sessions               448
      Failed connection attempts    15,905      2,396
      Peak sessions                    147
      Peak half-open sessions          121


    RTP statistics                    sent       rcvd     bytes sent     bytes rcvd

      RTP Packets                        0          0              0              0
      RTCP Packets                     347        331          9,032          9,552
It’s really a lot like the Windows NETSTAT command, except it does only count packets transmitted on the cFosSpeed connection rather than all packets in the system and in some respects it’s much more detailed.
The “spd cperf” command will switch on or off class traffic dumping. By setting “spd cperf on” cFosSpeed will dump about once per second how many bytes were sent in what priority class. This can help in testing filter rules or finding performance problems.
“spd fstat” command displays which filters matched how often. Use it to check if your filters are working. “spd fstat -clear” clears the stats.
Connection Technology setting
cFosSpeed tries to auto-detect which technology you use to access the Internet. Sometimes it guesses wrong or the technology used it too esoteric. Here is a list of currently suppoted values:
- 1
- PPPoE
In spd this is called “pppoe”.
This is sometimes called “RFC 1483 Bridged, PPPoE” or “RFC 2684 Bridged, PPPoE”. - 2
- PPPoA, VC-multiplexed
In spd this is called “pppoa_vc_mux”.
This is sometimes called “RFC 2364 VCMUX”. - 3
- ISDN HDLC with or without VJ-compression
In spd this is called “isdn”. - 4
- PPTP
In spd this is called “pptp”. - 5
- Raw IP (with DHCP)
In spd this is called “raw_ip”. - 6
- PPPoA, LLC-encapsulated
In spd this is called “pppoa_llc”.
This is sometimes called “RFC 2364 LLC”. - 7
- LLC encapsulated routed IP over AAL
In spd this is called “ip_over_aal5”.
This is sometimes called “RFC 1483 Routed”, “RFC 1577 Routed” or “RFC 2684 Routed”. - 8
- Adaptive, much like PPPoE method.
In spd this is called “adaptive”. - 9
- LLC encapsulated bridged 802.3 Ethernet over AAL5.
In spd this is called “bridged_over_aal5”.
Sometimes this is called “RFC 1483 bridged” or “RFC 2684 bridged”.
You can check the value by issuing a “spd set method” command or change it by using “spd set method X”, where X is the new value.
TCP MSS handling
cFosSpeed manages your TCP MSS (“MSS clamping”) (i.e., the MTU for TCP packets) automatically. The MSS values chosen are chosen so data transfer rates are maximized and ping times are minimized.
But if you want cFosSpeed to leave the MSS alone, you can enter “spd gset handle_mss 0” to instruct it so. Add a “-save” to have the setting saved in cfosspeed.ini.
Reading the trace.txt file
Many different parts of cFosSpeed write to the trace file trace.txt and \WINDOWS\cFosSpeed_Setup_Log.txt. You can distinguish them by the character that separates the time in hh:mm:ss from the milliseconds:
170058.515
cfosspeed.sys
170058'515
cfosspeed.exe
170058~515
speedsrv.dll
170058:515
cfosspeed.dll
170058_515
setup.exe
170058-515
spd.exe
SPD.exe - the cFosSpeed API
Detailed description of spd commands (with examples)
spd command – overview
To use spd commands you can enter them on the cFosSpeed console, which can be open by
START/Programs/cFosSpeed/cFosSpeed Console
If you enter the command spd help you get the following list of commands:
- set port specific variable (set <v> /? for help)
- module <name> on/off
- switch module <name> on or off
- perf on/off
- switch statistics display on/off
- close
- close LAN port
- ping
- send a echo request.
- sethops
- set the TTL for outgoing test pings.
- speed
- show current shaper settings.
- medium
- set connection characteristics (medium /? for help)
- tsclear
- clear the traffic shaping settings for this connection.
- class
add a new traffic class or change settings on an existing one.
- -speed <x>
- sets the speed to <x>. use ‘inf’ to specify infinite speed.
- -prio <x>
- sets the priority to <x>
- -dscp <x>
- set DSCP value of packets to <x>. use ‘none’ to not set.
- -clear
- clears the stats.
- cstat
- print all classes with stats. accepts a wildcard like ‘*’ or ‘f*’. -clear clear stats afterwards.
- filter
show/add/modify filters. -print prints filters after the operation.
- <no option>
- show all filters
- -A <f>
- append filter <f> at the end.
- -D <num>
- delete filter at position <num>
- -I <num> <f>
- insert filter <f> at position <num>
- -R <num> <f>
- replace filter at position <num> with filter <f>
- -M <old> <new>
- move filter from position <old> to <new>
- reload
reload settings from ini file.
- -filter
- reload filters
- save
save filter/class settings to ini file.
- -class
- save classes
- -filter
- save classes or filters.
- addkey <section> <key>
- add <key> to <section> in settings.ini
- delkey <section> <key>
- delete <key> from <section> in settings.ini
- showsect <section>
- show section <section> in settings.ini
- fwstat
- show firewall statistics (-clear to clear after display)
- fstat
- show all filter statistics (-clear to clear after display)
- netstat
- print global network protocol statistics
- pingstat
- print ping statistics (-clear clears stats after printing)
- cons
- list of tcp connections (-cps for cps, -vol for volume)
- budget
- show active budget’s settings and stats
- burst
- start a burst of data to check line speed
- ports
- list all ports
- pcnt
- show packet counters
- ver
- print cFosSpeed version info
- dump
- on/off/in/out/net/app/ign/ip/ipr dump of network packets
- gset
- set global variable (-save to save it to ini file)
- tvstat
- print tcpview statistics
- prognames
- print known program names
- reset_budget
- reset online budget
Description of spd commands (with examples)
spd set
With spd command set different cFosSpeed values can be set manually. You can get an overview of all values by simply entering spd set.
If you want to change a value manually,the following command structure applies : spd set = ‘value’.
To get detailed instruction, type set /?
Example: Output from spd set
C:\Programme\cFosSpeed>spd set
avg_time = 4000
budget = 0
burst_cnt = 3
curr_max_rx = 791599
curr_max_tx = 1055763
delay_auto = 1
fixed = 0
high_diff_cnt = 1683
inhibit_bridged = 0
low_diff_cnt = 1360
maxdelay = 24102267
maxiplen = 1492
maxrx = 6030441
maxtxacked = 1433436
maxtxraw = 1445060
medium = adaptive (0)
method = adaptive (8)
mindelay = 8186
net_talk = 1
net_talk_bcast = 0.0.0.0
perf = 0
ping_cnt = 113804
pong_cnt = 103173
record_packet_sizes_rx = 0
reg_id = 3
rx_delay = 20000
rx_limit = inf
rx_width = 1497
tcp_cons = 42836
time_used = 885530
tx_bounce_cnt = 5
tx_delay = 10000
tx_limit = inf
tx_width = 1000
txspeed = 1517313
udp_cons = 42679
vari_fixed = 0
variance = 5121
vollso = 9699544186 (9250M)
volrsc = 0 (0)
volrx = 19347327844 (18.01G)
voltxacked = 10165906693 (9694M)
voltxraw = 11648109237 (10.84G)
wperf = 0
Example: Changing the fixed value to 1
C:\Programme\cFosSpeed>spd set fixed=1
fixed = 1
spd ping
The spd command ping sends a single measuring ping. The current value of the ping time then flashes briefly in the numerical cFosSpeed status window. In the example this is the value 8 ms
Example
C:\Programme\cFosSpeed>spd ping
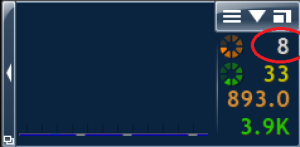
spd sethops
With the command sethops you can set the ttl value of the cFosSpeed measure pings. Just set the number i for the value. The output is: “addhops 2+i (ttl i)“, where first you get the variation from the default value (2). Then you get the current and new ttl-value.
Hint: The command only works, if you are online. If you are not you will get the error message: cannot perform command; section name still unknown
Example: set ttl-value to 5
C:\Programs\cFosSpeed>spd sethops 5
add_hops = 3 (ttl 5)
see also:
http://en.wikipedia.org/wiki/Time_to_live
spd speed
With the spd command “speed”, you get an overview of various traffic shaping values. The most important are:
- maxrx – maximum download bandwidth in cps
- method – Information about the transmission method used: PPPoE, PPPoA, PPPtP, Cable, etc.
- addhops – here the current ttl value is displayed in brackets.
- pingcnt – total number of pings sent
- pongcnt – total number of ping responses (pongs) received
- txspeed – Upload bandwidth in cps
Example:
C:\Programme\cFosSpeed>spd speed
Current shaper settings (v13.00.3000):
maxtxraw=1445K maxtxacked=1433K maxrx=6030K avg_time=4000
mindelay=7441 variance=3896 vari_fixed=0
reg_id=3 method=adaptive (8) pinger=udp_km3
voltxraw=10.86G voltxacked=9704M volrx=18.36G time_used=10d 7h
maxiplen=1492 rx_limit=inf tx_limit=inf inhibit_bridged=0
ping_cnt=115966 pong_cnt=105300 (90.8%) burst_cnt=3
adapter=WIFI link speed: rx=108.3M tx=43.87M
txspeed=1517K fixed=0 tx_bounce_cnt=5 calibrated=100
tx delay=10000-14896 rx delay=20000-25393 delay_auto=1
spd tsclear
The command “spd tsclear” clears the traffic shaping settings for the current connections. The current data in the corresponding section of the data.ini file is deleted. The connection can now be recalibrated.
Example:
C:\Programme\cFosSpeed>spd tsclear
traffic shaping settings cleared.
spd dump
With the “dump” command you can write a text file (dump.txt) that records all datapackets.
Example:
C:\Programme\cFosSpeed>spd dump ip
dump ip (64)
dump data: IP packets.

C:\Programme\cFosSpeed>spd dump off
dump off (0)
functions:
    on  : turn on writing of dump file
    off : turn off writing of dump file
    in  : dump only incoming data packets
    out : dump only outgoing data packets
    net :
    app :
    ign :
    ip  : dump IP packets (possibly fragmented)
    ipr : dump IP datagrams (after IP reassembly).
spd cstat
The “cstat” command provides upload statistics for sent data packets of the individual cFosSpeed traffic shaping classes (highest, higher, high, default, low and lowest). The first line of the command output indicates whether traffic shaping is enabled. The upload bandwidth in cps (txspeed) and the maximum queue overflow value are also specified here.
Example:
C:\Programme\cFosSpeed>spd cstat
shaping is currently enabled; txspeed = 19659, max_queue_size = 58,977

class highest -prio 100
  sent            2,431 (  4%) packets         68,068 (  0%) bytes
  in queue            0        packets              0        bytes

class higher -prio 90
  sent           16,777 ( 34%) packets        671,716 (  3%) bytes
  in queue            0        packets              0        bytes

class high -prio 80
  sent           10,489 ( 21%) packets      1,235,682 (  5%) bytes
  in queue            0        packets              0        bytes

class default
  sent           14,593 ( 29%) packets     19,897,796 ( 90%) bytes
  in queue            0        packets              0        bytes

class low -prio 0 -speed 25%,-10
  sent            4,820 (  9%) packets        221,720 (  1%) bytes
  in queue            0        packets              0        bytes

class lowest -prio 0 -speed 25%,-30
  sent                0 (  0%) packets              0 (  0%) bytes
  in queue            0        packets              0        bytes

class drop
  dropped             0        packets              0        bytes

queue overflow        0        packets              0        bytes
spd ver
The “spd ver” command outputs information about the currently installed version. The version number, build number and installation date including the installation time are displayed. You will also receive information about the operating system and processor used. Finally, the current installation date is stated as well as the installation and info directories of cFosSpeed.
Example:
C:\Programme\cFosSpeed>spd ver
This is cFosSpeed (x64) v13.00, build 3000
Copyright (c) 2003-2023 Atlas Tech Solutions SM PC -- https://atlas-cfosspeed.comOS: Windows 10 Home Multiprocessor Free (x64) (16 procs) v10.00.22631, LangId 0409
OS build is ???? (x64) (22621.1.amd64fre.ni_release.220506-1250)
CPU: 13th Gen Intel(R) Core(TM) i7-1360P, ID 0b06a2h (06_bah, Raptor Lake (Raptor Lake-P))
Time now: 2024-02-07 15:27:44.987 (UTC+1)
Load time: 2024-02-07 15:27:14.748 (UTC+1)
CPU speed: 5762 cfops
Using performance counter running at 10 MHz
Timer resolution is 4 msec (coarsest=15.625)
Driver base address is 0xfffff8062d4f0000; timestamp is 65841734 (2023-12-21 10:45:08 UTC)
Installation directory is "C:\Program Files\cFosSpeed\"
Programdata directory is "C:\ProgramData\cFos\cFosSpeed\"
Licensed to (End-user license) [A10000]
spd gset
With the copmmand spd “gset” some of the cFosSpeed variables are listed. They switched on (1), off (0) or set to certain value. To switch a function on and off or set it to a certain value you can use commands with the folowing structure “spd gset <function>=X” (where X is 1, 0 or the value to be set)
If you add “-save” you can save the settings and they will be also set after the next reboot of your system.
Enter “spd gset” and you will get:
C:\Programs\cFosSpeed>spd gset
analyze_rtp = 1
auto_burst = 1
avoid_loss = 1
balloon_no_pings = 0
bulk_detect = 1
delay_ndis_completions = 0
dump_arp = 0
dump_ascii = 1
dump_framing = 0
dump_relseq = 0
dump_sessions = 0
dump_tcp_data = 0
dump_udp_data = 1
dump_wshark = 0
expand_rwin = 1
expand_rwin_dest_time = 200
fg_detect = 1
filter_fix = 3
firewall = 0
func_trace = 0
fwlog = 1
global_counters = 0
handle_mss = 0
handle_tsopt = 0
l7_detect = 1
latency = 2
log_sessions = 0
max_dump_size = 16777216 (16 M)
max_expand_rwin_time = 300
max_fwlog_size = 4194304 (4 M)
max_pinglog_size = 1048576 (1 M)
max_queue_time = 1000
max_session_dump_size = 100000
max_session_log_size = 1048576 (1 M)
max_trace_size = 16777216 (16 M)
mcast_router = 0
net_talk_default = 1
net_talk_port = 889
passthru = 0
patch_dns_ttl = 0
ping_fixed = 0
pinglog = 0
prioritize_ssl = 1
reg_id_default = 3
resend_in_queue = 0
router_info = 1
router_stats = 1
rtp_trace = 0
rx_shape = 1
save_in_session = 1
send_usage_metadata = 1
shape = 1
store_dns_names = 1
strict_rtp_check = 1
tcp_warn = 0
traffic_stat = 1
tx_shape = 1
udp_timeout = 10000
user1 = 0
vari_fixed_default = 0
vari_trace = 0
worker_threads = 0
examples
d:\tools>spd gset firewall=1
firewall = 1
Turn off permanently Traffic Shaping:
C:\Programs\cFosSpeed>spd gset shape=0 -save
shape = 0
value saved.
C:\Programs\cFosSpeed>spd gset passthru=1
passthru = 1

C:\Programs\cFosSpeed>spd gset passthru=0
passthru = 0
Possible values:
     0 : off
     1 : ignore all packets, pass them on to the next driver immediately.
     2 : ignore all packets, send them through the cFosSpeed connection
         engine, but don't do anything with them.
Disable writing of firewall log file fwlog.txt:
C:\Programme\cFosSpeed>spd gset fwlog 0 -save
fwlog = 0
value saved.
prevent cFos / cFosSpeed from saving data.ini, budget and traffic stats every 10 minutes: “spd gset save_in_session 0 -save“
C:\Programme\cFosSpeed>spd gset save_in_session 0 -save
save_in_session = 0
value saved.
Specify after how many seconds of inactivity the LAN port (and status window) will be closed automatically: “spd gset port_close_time ‘n’ “
C:\Programme\cFosSpeed>spd gset port_close_time 5
port_close_time = 5
spd reset_budget
With the command spd “reset_budget [n]” you can reset online budget with the number ‘n’ (n=0..9). If ‘n’ is omitted the current budget is reset.
Skins
Display traffic shaping statistics on your phone
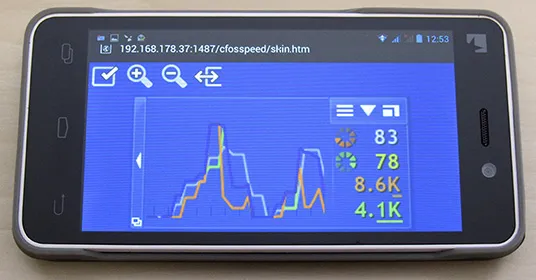
Beginning with v9.05 build 2090 cFosSpeed has a build-in web server, so you can display the status window on your phone or tablet, in addition to your desktop. This is especially helpful for fullscreen applications like games or videos. Here is how to configure it:
- Start “Options/Settings” from the cFosSpeed context menu and set a server password in the “Preferences/Enable Phone Skins” dialog. The web server will need authorization if you access it from another machine than your local computer.
- Open the context menu and select the first option (cFosSpeed vX.XX…) to display your local IP addresses.
- Open the browser on your phone or tablet and enter the following address: http://[Your IP address]:1487/cfosspeed/skin.htm. [Your IP address] is usually the first listed address from step 2, but you can try all others if the first doesn’t work.
- Now fill the authentification dialog with “cfosspeed” as username and the server password you configured under “Preferences/Enable Phone Skins” as password.
Note: You can also view and prioritize your current connections from your phone or tablet. Simply open http://[Your IP address]:1487/cfosspeed/console.htm in your browser. This dialog works as if started from the cFosSpeed status window or context menu.
Note: You need Windows 7 or higher to use the built-in web server.

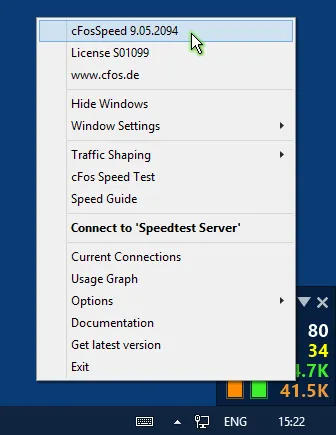
cFosSpeed Status Windows
All you need to know about the cFosSpeed Status Windows and Skins
The cFosSpeed Status Windows display important statistics about your current Internet connection. You should choose the skin most useful to you, e.g. the icon skins which integrate into the task bar or the Traffic Analysis skin with real-time statistics about your current different traffic types. Please vote on the different skins. This will help us when designing the next skin window.
Metro Skin
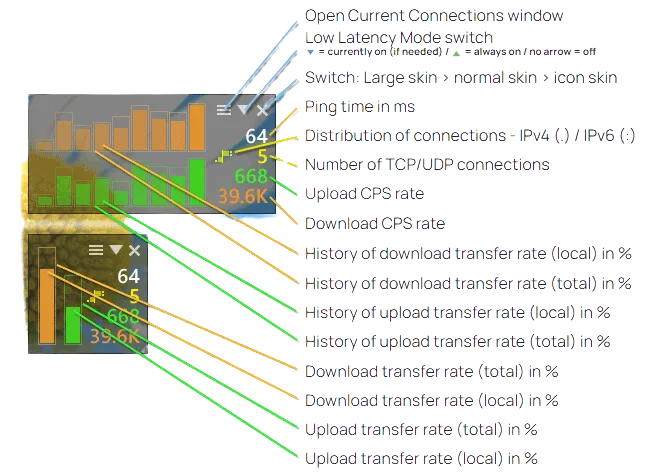
Deactivating the cFosSpeed status window
You can deactivate the cFosSpeed status window by right-clicking on it, selecting Window Settings and then deactivating “Auto-show/Auto-hide”.

How Effective is cFosSpeed Traffic Shaping?
Default-Skin (graphical)
All you need to know about the cFosSpeed Status Windows and Skins
The cFosSpeed Status Windows display important statistics about your current Internet connection. You should choose the skin most useful to you, e.g. the icon skins which integrate into the task bar or the Traffic Analysis skin with real-time statistics about your current different traffic types. Please vote on the different skins. This will help us when designing the next skin window.
Default-Skin (graphical)
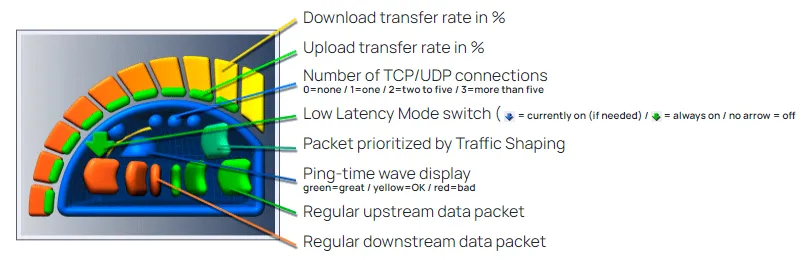
The standard skin has been designed to track the data stream graphically.
Ping times are represented by green, yellow, or red waves in the standard skin’s graphical display. Actual ping times depend in significant part on the number of simultaneous up- and downloads. If this number rises, latency will likely increase as well. To reach maximum transfer rates during download, the ping time for each download must therefore be raised briefly.
Switching between Graphical and Numerical Display of the Default Skin:
By clicking on the corresponding buttons, it is possible to toggle between graphical and numerical skin display.
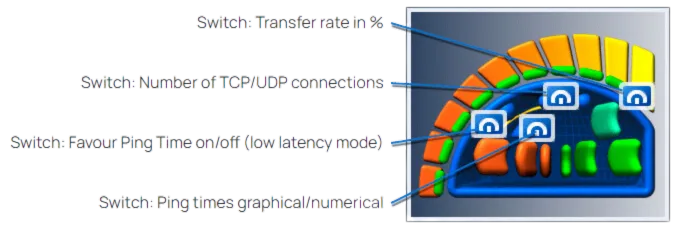
Numerical Display
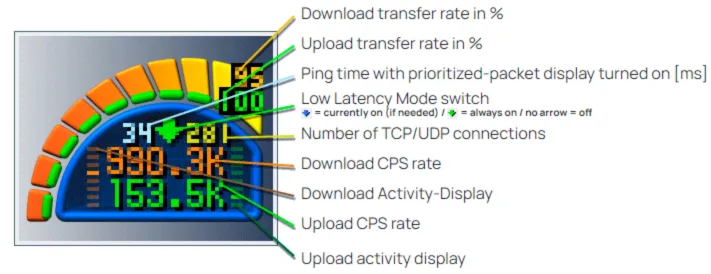
Deactivating the cFosSpeed status window
You can deactivate the cFosSpeed status window by right-clicking on it, selecting Window Settings and then deactivating “Auto-show/Auto-hide”.
Aquarium Icon Skin
All you need to know about the cFosSpeed Status Windows and Skins
The cFosSpeed Status Windows display important statistics about your current Internet connection. You should choose the skin most useful to you, e.g. the icon skins which integrate into the task bar or the Traffic Analysis skin with real-time statistics about your current different traffic types. Please vote on the different skins. This will help us when designing the next skin window.
Icon skin
You can switch between the 3 states of the Icon Skin and point out different Displays. The position of the switch is in the middle of the skin (see picture).
Deactivating the cFosSpeed status window
You can deactivate the cFosSpeed status window by right-clicking on it, selecting Window Settings and then deactivating “Auto-show/Auto-hide”.
Liquid Crystal Skin
All you need to know about the cFosSpeed Status Windows and Skins
The cFosSpeed Status Windows display important statistics about your current Internet connection. You should choose the skin most useful to you, e.g. the icon skins which integrate into the task bar or the Traffic Analysis skin with real-time statistics about your current different traffic types. Please vote on the different skins. This will help us when designing the next skin window.
Liquid Crystal Skin
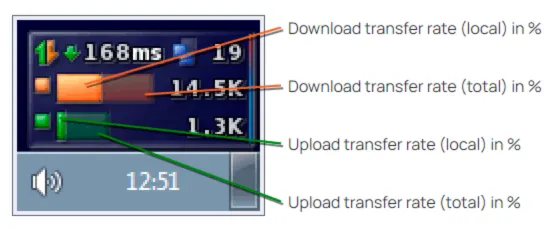
Transfer rate in %
The vertical bar graphs scrolling from the right to the left show the history of transfer as percentage of the maximum reached up-/download transfer rate since the last installation or calibration of cFosSpeed. The total and local transfer rates are related to running cFosSpeed in multi-user mode. Local shows the transfer rates for the current computer only, while total – the amount of traffic within the local network.
The other display methods are the same as in the Liquid Crystal History skin
The background
The transparent background of the status window can be replaced by an opaque one by applying (under Vista and Windows 7 with admin rights) the following changes to the file net.ini in the directory [cFosSpeed install directory]\liquid_crystal_skin:
line 7: background=background.tga -> ;background=background.tga
line 8: ;background=matrix.tga -> background=matrix.tga
The file matrix.tga (in the same directory) can be modified to your needs by using a suitable graphics program.
Deactivating the cFosSpeed status window
You can deactivate the cFosSpeed status window by right-clicking on it, selecting Window Settings and then deactivating “Auto-show/Auto-hide”.
Liquid Crystal History Skin
All you need to know about the cFosSpeed Status Windows and Skins
The cFosSpeed Status Windows display important statistics about your current Internet connection. You should choose the skin most useful to you, e.g. the icon skins which integrate into the task bar or the Traffic Analysis skin with real-time statistics about your current different traffic types. Please vote on the different skins. This will help us when designing the next skin window.
Liquid Crystal History Skin
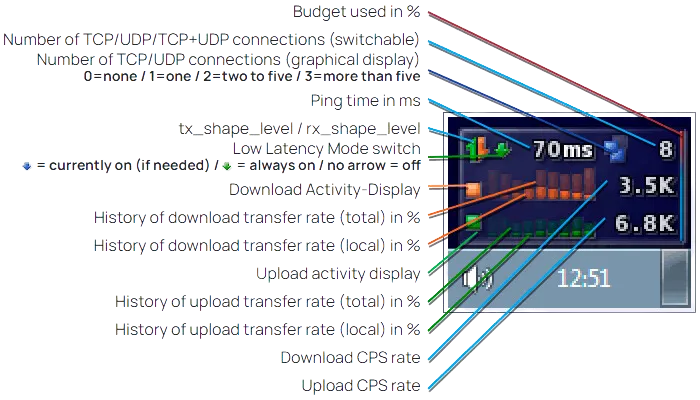
Shape level
The brighter the indicator is visible the more Traffic Shaping is working for each of the transfer directions.
Transfer rate in %
The horizontal bar graphs for upload and download show the current transfer as percentage of the maximum reached up-/download transfer rate since the last installation or calibration of cFosSpeed. The total and local transfer rates are related to running cFosSpeed in multi-user mode. Local shows the transfer rates for the current computer only, while total – the amount of traffic within the local network.
The background
The transparent background of the status window can be replaced by an opaque one by applying (under Vista and Windows 7 with admin rights) the following changes to the file net.ini in the directory [cFosSpeed install directory]\liquid_crystal_skin:
line 7: background=background.tga -> ;background=background.tga
line 7 8: ;background=matrix.tga -> background=matrix.tga
The file matrix.tga (in the same directory) can be modified to your needs by using a suitable graphics program.
Deactivating the cFosSpeed status window
You can deactivate the cFosSpeed status window by right-clicking on it, selecting Window Settings and then deactivating “Auto-show/Auto-hide”.
Traffic Analysis Skin
All you need to know about the cFosSpeed Status Windows and Skins
The cFosSpeed Status Windows display important statistics about your current Internet connection. You should choose the skin most useful to you, e.g. the icon skins which integrate into the task bar or the Traffic Analysis skin with real-time statistics about your current different traffic types. Please vote on the different skins. This will help us when designing the next skin window.
Traffic Analysis Skin
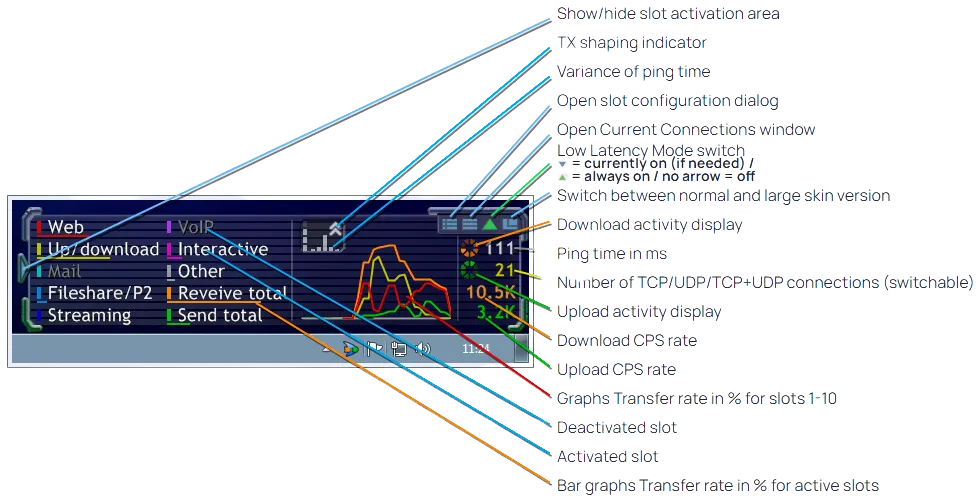
Transfer rate in %
The slot graphs show the current transfer rates as percentage of the maximum reached transfer rate since the last installation or calibration of cFosSpeed.
The slots
The configuration of slots 1-10 (as a part of the cFosSpeed settings) can be accessed by either clicking on the Open slot configuration dialog button of the skin or using the Options/Settings menu entry of the systray icon. Each slot can be configured and renamed individually.
The background
The transparent background of the status window can be replaced by an opaque one by applying (under Vista and Windows 7 with admin rights) the following changes to the files net.ini and net_l.ini in the directory [cFosSpeed install directory]\traffic_analysis_skin:
line 7: background=background_blank(_l).tga -> ;background=background_blank(_l).tga
line 8: ;background=background_color(_l).tga -> background=background_color(_l).tga
The files background_color(_l).tga (in the same directory) can be modified to your needs by using a suitable graphics program. The transparent area of the images must not be changed.
Deactivating the cFosSpeed status window
You can deactivate the cFosSpeed status window by right-clicking on it, selecting Window Settings and then deactivating “Auto-show/Auto-hide”.
Traffic Analysis Skin
All you need to know about the cFosSpeed Status Windows and Skins
The cFosSpeed Status Windows display important statistics about your current Internet connection. You should choose the skin most useful to you, e.g. the icon skins which integrate into the task bar or the Traffic Analysis skin with real-time statistics about your current different traffic types. Please vote on the different skins. This will help us when designing the next skin window.
Traffic Analysis Icon Skin
Transfer rate in %
The slot graphs show the current transfer rates as percentage of the maximum reached transfer rate since the last installation or calibration of cFosSpeed.
The slots
The configuration of slots 1-10 (as a part of the cFosSpeed settings) can be accessed by either clicking on the Open slot configuration dialog button of the skin or using the Options/Settings menu entry of the systray icon. Each slot can be configured and renamed individually.
Traffic Analysis Net Talk Icon Skin
Instead of displaying the slots 1-10, this skin shows the local up- and download transfer rates in bright green and orange while the total rates (within your local network) in darker green and orange.
Deactivating the cFosSpeed status window
You can deactivate the cFosSpeed status window by right-clicking on it, selecting Window Settings and then deactivating “Auto-show/Auto-hide”.
Traffic Analysis Insight Skin
All you need to know about the cFosSpeed Status Windows and Skins
The cFosSpeed Status Windows display important statistics about your current Internet connection. You should choose the skin most useful to you, e.g. the icon skins which integrate into the task bar or the Traffic Analysis skin with real-time statistics about your current different traffic types. Please vote on the different skins. This will help us when designing the next skin window.
Traffic Analysis Insight Skin
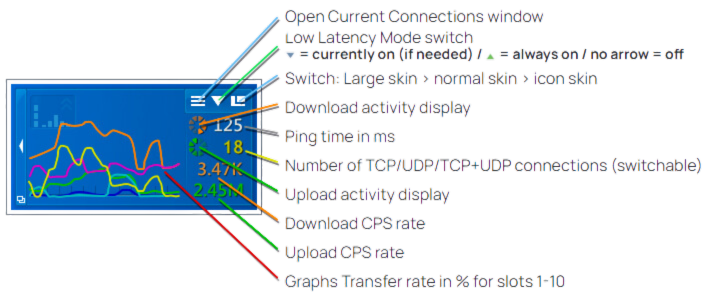
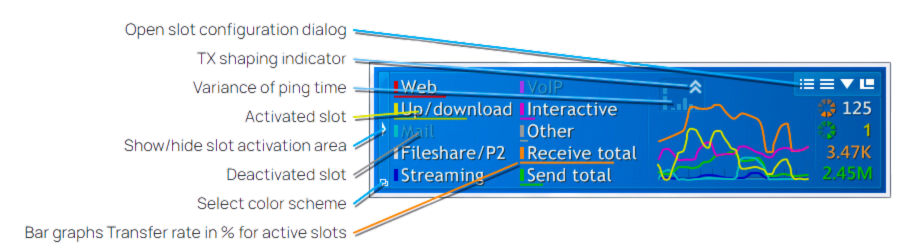
Transfer rate in %
The slot graphs show the current transfer rates as percentage of the maximum reached transfer rate since the last installation or calibration of cFosSpeed
The slots
The configuration of slots 1-10 (as a part of the cFosSpeed settings) can be accessed by either clicking on the Open slot configuration dialog button of the skin or using the Options/Settings menu entry of the systray icon. Each slot can be configured and renamed individually.
The background
The transparent background of the status window can be replaced by an opaque one by applying (under Vista and Windows 7 with admin rights) the following changes to the files net(_n).ini and net(_n)_l.ini in the directory [cFosSpeed install directory]\ta_insight_skin:
line 7: background=background_blank(_l).tga -> ;background=background_blank(_l).tga
line 8: ;background=background_color(_l).tga -> background=background_color(_l).tga
The files background_color(_l).tga (in the same directory) can be modified to your needs by using a suitable graphics program. The transparent area of the images must not be changed.
User Skin/Keyboard LEDs
All you need to know about the cFosSpeed Status Windows and Skins
The cFosSpeed Status Windows display important statistics about your current Internet connection. You should choose the skin most useful to you, e.g. the icon skins which integrate into the task bar or the Traffic Analysis skin with real-time statistics about your current different traffic types. Please vote on the different skins. This will help us when designing the next skin window.
Shinnher’s Skin
This compact skin was designed by a cFosSpeed user, who just modified the Liquid Crystal.
You can download the Skin from here: >Shinnher’s Skin
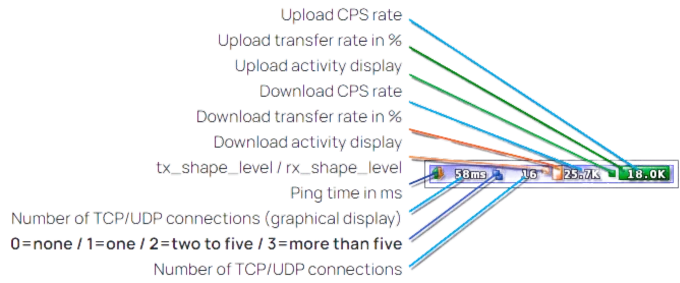
Use keyboard LEDs to display Traffic Shaping information
cFosSpeed can use the Num Lock and Scroll Lock LEDs to display information about the current Internet traffic. This is especially useful for gamers and users of fullscreen application, who can’t see the cFosSpeed status window. By using the keyboard LEDs the most important traffic statistics are indicated: >Keyboard LEDs
Deactivating the cFosSpeed status window
You can deactivate the cFosSpeed status window by right-clicking on it, selecting Window Settings and then deactivating “Auto-show/Auto-hide”.
FAQ
Traffic Shaping
- How to fix problems with my Internet connection speed?
- How do I optimally calibrate cFosSpeed?
- What is Traffic Shaping?
- How can I test the effect of Traffic Shaping?
- How can I determine the benefits of cFos Traffic Shaping myself?
Ping
- What is ping, tracert und ttl?
- Help me I have Ping Problems!
- Where does cFosSpeed send his calibration-pings?
Installation/Registration
Troubleshooting
cFosSpeed and torrents
Bittorrent
Fast BitTorrent download
Again and again the problem arises that with BitTorrent downloads Traffic Shaping does not function well. We checked the problem and found out here through tests, that the RX-rate drops, if you download with too many connections simultaneously.
The result of our tests is: Downloads are substantially faster and Ping-times better if one limits the amount of the connections to for example 50 in the BT-client.
Below follows documention regarding the issue. Unfortunately so far we haven’t found the exact reason for this problem.
Tests were run on a DSL-16000/1000 connection provided by Deutsche Telekom with a 1950kb/128kb flow-rate. Testing occured via constantly reloading Debian CD-Images with uTorrent 1.6.1 every 30 minutes.
This is what the transfer looks like with the limitation of 50 connections maximum:
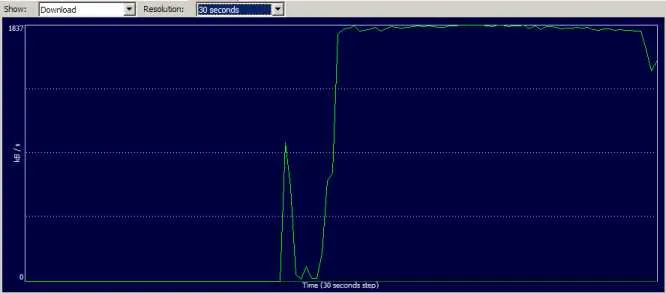
The mean DL-rate scored at 1613 kb/sc, the mean ping at 63 msec.
And with 850 connections:
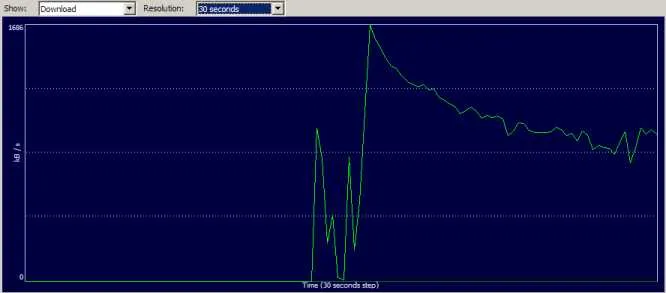
The mean DL-rate scored at 1009 kb/sec, the mean ping at 97 msec.
Meaning: It is neither advisable for appropriate ping times nor for fast downlaods. On top of this the many connections also play out on CPU load (with about 50% used rather than about 25%).
This effect has emerged earlier when dealing with a DSL-2000 connection and azureus. This does not seem to be the cause here, though. Furthermore it does not make any difference whether RX-Shaping is switched off or on.
We are continually working on an explanation as well as a solution for this problem. Until then we can offer only one measure, that is, however, very simple: Limit the amount of connections. We recommend a value of 50. Torrent clients will only decrease the amount of connections when a download is completed or if you restart.
Windows – Balloontip, at over 30 connections
cFos and cFosSpeed generate a Windows – Balloontip, once so many connections transfer data that RX-shaping can hardly stop them anymore. This is the case at 30 or more connections.
cFos and cFosSpeed always generate these baloon tips if rx-shaping has reduced connections to a maximum for 10 seconds at a time. If other connections are added at this point cfos and cfosspeed respectively is no longer able to keep the port regarding rx from being congested and ping rates increase.
If this balloon is, however, undesired and the user is not able or does not want to reduce the amount of used connections he or she can switch off the ballon with the command spd gset balloon_many_cons 0 -save.
Driver Not Loaded
Problem: “Driver not loaded”
If the message “Driver not loaded” appears into a the cFosSpeed menu after a cFosSpeed-installation, there can be several reasons.
Please first follow this steps:
0. cFosSpeed Installation in Windows Safe Mode
Check if the cfosspeed installation in Windows Safe Mode is possible.
- Uninstall cFosSpeed
- Reboot the system in Windows Safe mode
- Install the latest cFosSpeed Version in Windows Safe Mode
- Reboot the system
1. Check the network installation
- Uninstall cFosSpeed
- Reboot the system
- Unistall all network adapters
- Reboot the system
- Do a fresh installation of all network adapters using the latest drivers offered by the vendors
- Reboot the system
- Install the latest cFosSpeed Version
HINT: Please check your network adapters installation in detail!
At ‘view’, turn on the feature show hidden devices.
Also check the installation of the network adapters into the Windows safe mode!
2. Gradual examination of the installation of all network adapters
The only way to detect precisely which network adapter conflicts with the installation of cFosSpeed is to go through with the check-up one by one.
To do that we recommend the following procedure:
- Uninstall cFosSpeed
- Uninstall all network adapters (see also: List of hidden devices within the Windows device manager!)
- Step-by-step installation of all network adapters as follows:
- First of all install the network adapter necessary for your Internet connection.
- Install cFosSpeed, reboot the system and check if it is functioning.
- Install the next network adapter, reboot the system and check if it is working.
With this method you can find out which network adapter causes the problem. Now you can remove the binding with the cFosSpeed protocol from this particular adapter.
Firewall, virus-protection and other security software often also installs “virtual” network adapters. Please remove the bindings for these adapters, too.
3. Check your security software
3.1 Configuration of security software
The starting of the cFosSpeed service (cfosspeed6.sys) must be allowed by all security programs (Firewall, Anti-Spy- , Anti-Virus-Software, etc.).
Make sure the file cfosspeed6.sys. in the directory C:\Windows\System32\Drivers\ exists.
3.2 Installation conflicts
If your security software conflicts with cFosSpeed, please try the following:
- Completely uninstall the security software
- Completely uninstall cFosSpeed
- Reboot
- Install the latest version (https://atlas-cfosspeed.com/downloads/) of cFosSpeed and check whether the connection problems persist.
- Reboot
- Reinstall and configure security software to cooperate with cFosSpeed.
- Reboot
This procedure works for: Kaspersky Internet Security 2010, ZoneAlarm Pro (v 9.3.037.000)
4. Windows-Driver-Signing
You need to ignore all warnings concerning the digital signature of cFosSpeed during the installation. You should continue the installation if this message appears. Please re-install cFosSpeed taking care of this point.
5. Reset Internet Protocol (TCP/IP) in Windows XP
In some cases a solution was to reset the Internet Protocol (TCP/IP) in Windows XP. This avoids an annoying complete new installation of Windows. You can find an official description here: How to reset Internet Protocol (TCP/IP) in Windows XP
You can also use the program WinSock XP Fix to do the reset automatically.
6. Check bindings of the cFosSpeed protocol
Steps:
- Go to: /Options/Connections/
Set ‘no’ for all Connections, which should not use traffic Shaping
Set ‘yes’ only for the Router Connection which should use cFosSpeed Traffic Shaping - Safe the changes by clicking on “Close Window”
- Reboot the system
- Go to: START/Control Panel/Network Connections and check if the ‘cFosSpeed protocol for faster Internet connections’ (Click right on the connection and choose ‘Properties’) is activated only for the network adapters chosen in step 1.
7. Windows 7 – 32 and 64 bit versions
In case you experience install problems with cFosSpeed version 10.12 or higher on Windows 7 please check if this Windows Security Update does help:
Security Update for Windows 7 (KB3033929)
Security Update for Windows 7 for x64-based Systems (KB3033929)
If the problem persists…
…please send us these files:
- trace.txt (cFosSpeed Directory)
- cFosSpeed_Setup_Log.txt (Windows Directory)
As an additional step you can install cFosSpeed using the Option -ide
Save the installation file (i.e., cfosspeed-400.exe) on your system (i.e., at c:\install\) and start it via START/Init/ using the command ‘c:\install\cfosspeed-400.exe -ide’. Afterwards please send us the files indicated above.
Issues with Pings
First of all, download and install the latest cFosSpeed version:
cFosSpeed – problems with pings
Once activated, cFosSpeed will be sending ping packets to the Internet to measure how “congested” the connection is. Without these packets, cFosSpeed Traffic Shaping won’t work.
cFosSpeed will only send pings if you are up or downloading at a certain minimum rate. Therefore, the easiest way to confirm that pings are actually getting through is to start an upload that will take at least 30 seconds (e.g., by sending yourself a large e-mail message). Then, check and see if the message balloon appears (see below).
Should there be no response to these pings for an extended period of time, cFosSpeed will indicate this by displaying a balloon. You should then proceed as follows:
Notes on some specific firewalls or routers
AVM Fritzbox:
The AVM FritzBox for several versions of hard- and firmware comes with an included PPPoE Filter. This filter should be switched off, because it blocks IcmP and therefore the cFosSpeed calibration pings will not be transmitted:
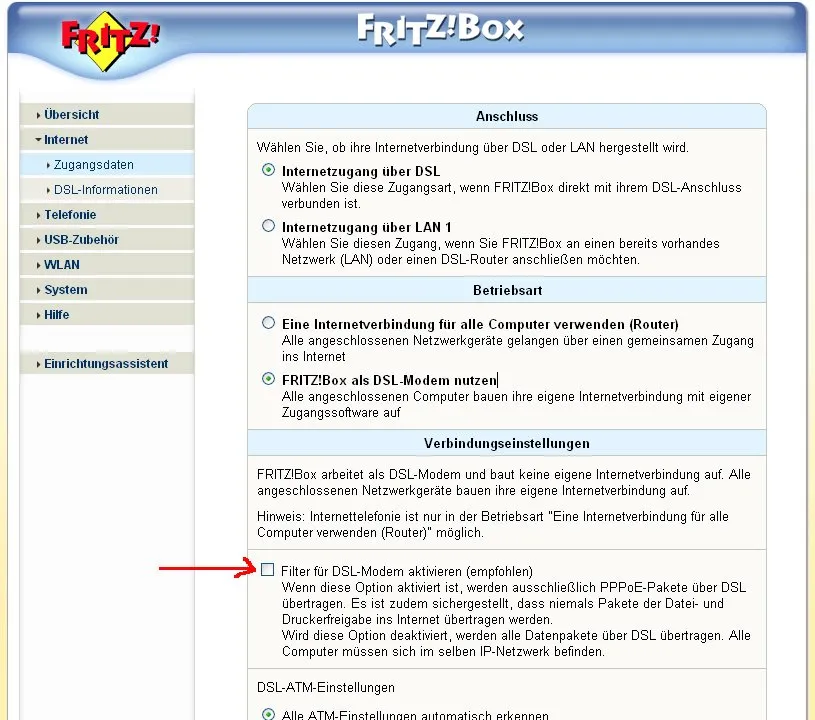
Sygate Personal Firewall:
Under “options,” go to the “security” tab and deactivate “DoS detection.” This is necessary because otherwise the firewall will wrongly classify the cFosSpeed calibration process as a DoS attack.
Users have also reported that the “Anti-IP Manipulation” must be turned off for cFosSpeed to run without problems.
Agnitum Outpost Firewall:
Here, users have reported that in the IcmP settings you have to check the “Echo reply – outgoing” box, so the firewall doesn’t block outgoing replies.
Eset Smart Security:
IcmP Setting for Eset Smart Security to allow cFosSpeed pings:
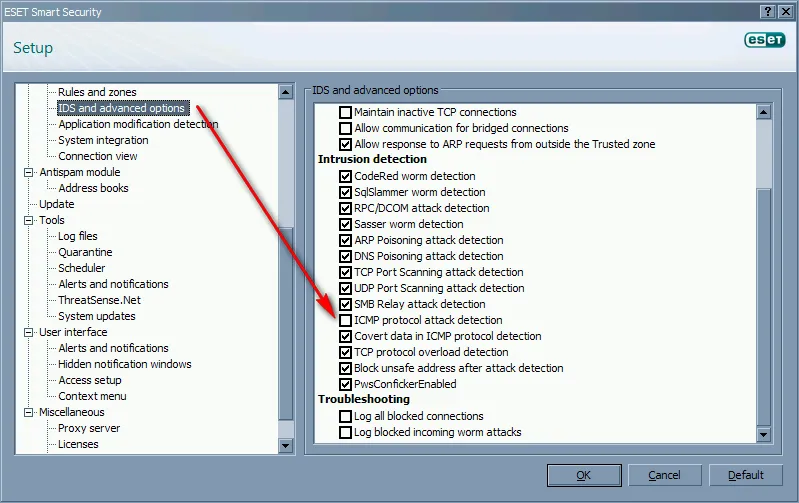
Orange Livebox:
Settings for the Orange livebox with built in Inventel router to allow cFosSpeed pings:
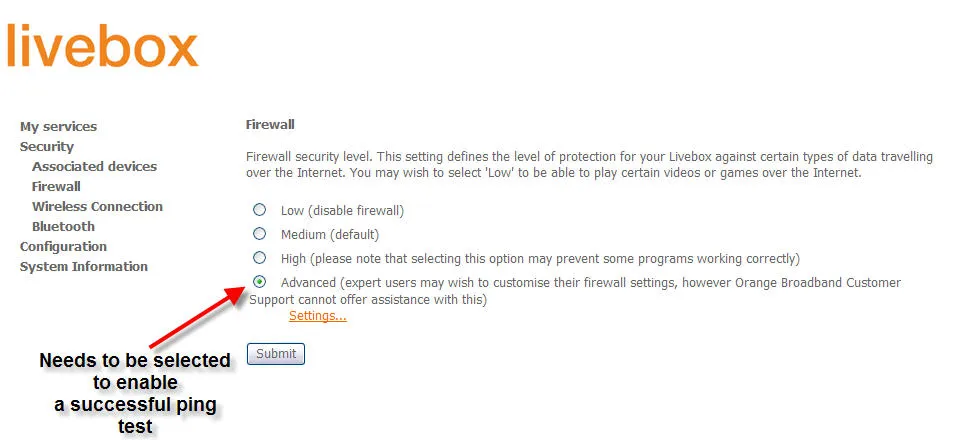
Kaspersky Anti-Hacker:
You can set special rules for each application. In this case for SPD.EXE (cFosSpeed service). This allows the cFosSpeed communication. Further you can disable that Anti Hacker detects “DoS” attacks, to avoid false Anti-Hacker actions.
You should also activate the option “Allow outgoing IcmP packets with IcmP-Code: Echo Reply”.
The IcmP Settings should be:
- IcmP Type 0 (Echo Reply) incoming : allow
- IcmP Type 8 (Echo) outgoing : allow
- IcmP Type 11 (Time Exceeded) incoming : allow
- Other IcmP Types incoming and outgoing : allow
Draytek Router:
Some users have reported that the option “Ip Filter/Firewall Setup – DoS defense” has to be switched off cause otherwise the router filters cFosSpeed PING Packets.
Linksys wag54g router:
Some users have reported that the option “Block Anonymous Internet Requests” has to be switched off cause otherwise the router blocks IcmP answers.
TP-Link Router:
TP-Link offers a new firmware, which now allows pings. Please go to the TP-Link website and install the most recent firmware.
Attention: Following user reports, this seems to not apply to at least the models TL-R460, TL-R860 and TL-R402M.
PC Cillin 2007:
To allow the Windows tracert command for PC Cillin 2007 just follow this steps:
- Open the PC Cillin main console -> network- and firewall-control -> personal firewall -> settings -> select account -> edit -> network control -> add
- Now you can add 2 new protocols.
- For outgoing connections:
(default) allow for outgoing connections
(protocol) icmp
(port) all ports
(ip-settings) all ip-settings - For incoming connections just repeat step 3 for incoming connections
AVG Internet Security:
AVG setting for cFosSpeed to work properly:
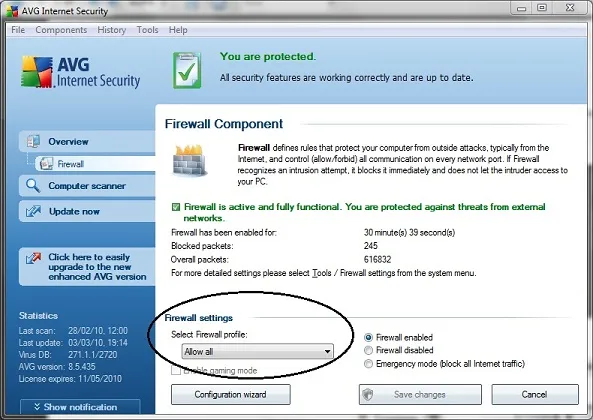
Retrieving and interpreting cFosSpeed’s ping statistics
Open the cFosSpeed console and type in “spd pingstat”
This should yield an output similar to the one below:
Ping statistics:

Total ping requests      107,686
  done                   107,686     (1)
  ...and only            107,686

Total pings sent         106,949
  strong                 106,778
  ...and new             106,778     (2)

Total pongs              106,804
  found                  106,566
  ...and strong          106,519
  ...and strong reply    106,519     (3)
  ...and used            106,519     (4)

Ping outage statistics:
  1 ping in a row 33 times
  5 pings in a row 1 time

Ping src/dst: 192.168.0.100 to 194.95.249.23, ttl 3
Ethernet src/dst: 00:0e:a6:57:9b:0b to 00:11:95:78:27:a4
The three values given for “total ping requests” should be identical. In case there is any great deviation among these, please report it to us.
The value marked (1) should be approximately the same as the one next to (2). If that is not the case, it is typically strong evidence for a firewall blocking data transmission. As above, a small deviation of several percent isn’t dramatic, though.
Values for (3) and (4) should likewise be about the same. If not, do send us a mail.
By the same token, values (2) and (3) should be roughly identical. If this is not so, this usually indicates pings and their replies get lost somewhere “in the Net” (which happens quite a lot). Unfortunately, there is nothing we can do about that.
When writing us an e-mail, please refer to step 3 below regarding what files to attach to your message.
Hint:
If the ping problems remain while the firewall is deactivated, please uninstall your firewall and try again.
Do you have a firewall?
Check if you have a firewall running on your system. If so, make sure the SPD.EXE program (cFosSpeed service) is allowed to send and receive IcmP data. Also note that CFOSSPEED.EXE does not access the Internet.
Important!
When the configuration of your firewall for IcmP data avoids that answers to the cFosSpeed measure pings are allowed, cFosSpeed Traffic Shaping will not work. You can check this with a simple tracert command.
1. Enter tracert command
Click Start -> Programs -> cFosSpeed -> Open console, and type in “tracert https://atlas-cfosspeed.com”. If everything checks out, it should return something like this:
Tracing route to https://atlas-cfosspeed.com [194.95.249.23] over a maximum of 30 hops:

1    56 ms    56 ms    55 ms  217.0.116.148
2    55 ms    54 ms    54 ms  217.0.74.50
3    54 ms    53 ms    55 ms  k-ea1.K.DE.net.DTAG.DE [62.154.55.154]
4    61 ms    62 ms    61 ms  h-eb1.H.DE.net.DTAG.DE [62.154.49.166]

etc.
![]() What is absolutely crucial here is that there are time values (and not asterisks) displayed in columns 2 through 4.
What is absolutely crucial here is that there are time values (and not asterisks) displayed in columns 2 through 4.
If that’s the case, skip to step 3 below.
However, pings are being blocked if the output reads as follows:
Tracing route to https://atlas-cfosspeed.com [194.95.249.23] over a maximum of 30 hops:

1     *        *        *     Request timed out.
2     *        *        *     Request timed out.
3     *        *        *     Request timed out.
4     *        *        *     Request timed out.

etc.
In this case, continue on with step 2
2. Tracert does not work
Tracert does not seem to be working on your system. If you do not use a firewall or you use one that does let pings of SPD.EXE through, pings and incoming replies are likely being blocked by another component.
If you are using a router, it must also be set to allow pings to pass through. Configure your router so that cFosSpeed can send outgoing pings (IcmP echo requests – type 8) and receive ping replies (IcmP echo reply – type 0) in addition to time-outs (or IcmP TTL/time exceeded – type 11). You may have to restart your router for these changes to take effect.
Now repeat step 2 above, using the “tracert https://atlas-cfosspeed.com” command. Should there still be no pings coming through, chances are your Internet provider may be filtering such data out. In this case, you should contact your provider.
Last possibility: Disable your firewall and try again. If this still doesn’t help, uninstall your firewall and try again.
3. Tracert is working
Tracert is working, but the message balloon still appears: Please check again if your firewall software isn’t blocking the pings from SPD.EXE after all.
If, during an upload running at maximum speed (or close to it), cFosSpeed is at any time displaying ping times on the status window, pings are not being filtered by your system but are lost somewhere in the Internet instead. The reliability of ping data can vary widely among different Internet providers. It may also be affected by other factors such as network load, over which cFosSpeed has naturally no control.
If Tracert is working but ping time values never appear on the status window, please send us an e-mail and attach copies of TRACE.TXT and TRACE_OLD.TXT from your cFosSpeed directory. Please make sure to send us these files shortly after the problem has occurred so that they contain all data necessary for closer analysis.